Restore Your Excel Sheet in 3 Simple Steps

The frustration of losing your Excel data can't be overstated. Whether it's due to an unexpected error, a software crash, or accidental deletion, recovering your data is paramount to prevent the loss of important information. Luckily, restoring your Excel sheet can be streamlined into three simple steps. Let's walk through each method to ensure your data safety and restoration.
Step 1: Utilize AutoRecover

Excel's AutoRecover feature is a lifesaver if enabled. Here’s how you can access and restore your files using this feature:
- Open Excel: Launch your Microsoft Excel application.
- Go to Document Recovery: If Excel detects a recent recovery operation, you'll see the Document Recovery pane at the left side of the window.
- Review and Open: You should see a list of recoverable files. Review the dates and select the one you need. Double-click to open the recovered file.
- Save As: Once you have your document open, immediately Save As to a new file to prevent any future loss.
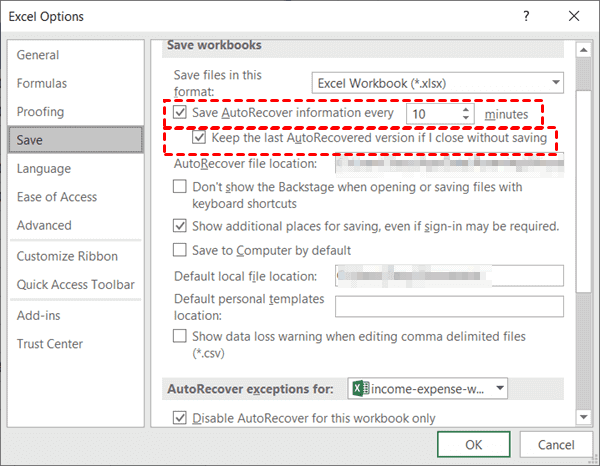
💡 Note: Remember to enable the AutoRecover feature from File > Options > Save, if you haven’t already.
Step 2: Check for Temp Files

Even if you didn’t use AutoRecover, there might be temporary files that could help you recover your lost Excel sheet:
- Open the File Explorer: Press Win+E to open your File Explorer.
- Navigate to Temp Folder: Type %temp% in the address bar and hit Enter. This will open the temporary files folder.
- Find Excel Files: Look for files with .tmp or .xlsb extensions or files named like Excel or Microsoft Excel.
- Open the Temp Files: Double-click any likely candidate. If it opens in Excel, you're in luck.
- Save As: If the file contains your data, save it immediately to avoid any potential issues.
Step 3: Use Data Recovery Software

If the above methods fail, data recovery software can be your next best bet:
- Choose a Recovery Software: Programs like Stellar Data Recovery, Recuva, or EaseUS can recover deleted or lost files.
- Install and Run: Download and install the software of your choice, then run it as administrator.
- Select Excel Files: Specify your search to focus on Excel files or any document types related to spreadsheets.
- Scan Drive: Initiate a deep scan of the drive where your lost Excel file was saved.
- Recover Files: Once the scan is complete, go through the list of found files, and select your Excel sheet for recovery.
Each step increases your chances of successfully restoring your Excel sheet, and it’s beneficial to understand all these options for future reference.
In summarizing, the recovery of an Excel sheet is not only possible but can be quite straightforward with the right knowledge. Remember these key points:
- Always enable AutoRecover to safeguard against data loss.
- Temporary files can be a surprising source for data recovery.
- If all else fails, consider third-party recovery software as a final option.
With these steps in mind, you can ensure that you’re prepared for any mishap that could lead to Excel data loss.
Can I recover an Excel file if I didn’t save it?

+
Yes, if AutoRecover is enabled, Excel might have created a temporary file that you can recover from the Document Recovery pane or the %temp% folder.
How can I prevent Excel file loss in the future?

+
Regularly save your work, enable AutoRecover, and consider backing up your Excel files to cloud storage or external drives.
Does using recovery software guarantee success?

+
Recovery software increases your chances significantly, but there is no absolute guarantee. The likelihood of recovery decreases over time or if the drive has been extensively used since the loss.


