Remove Duplicates from Two Excel Sheets: Easy Guide

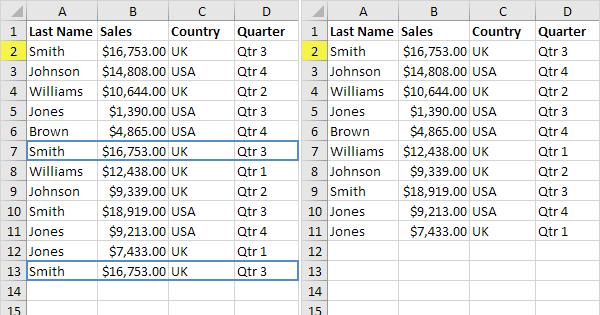
Dealing with duplicate entries in your datasets can be a daunting task, especially when managing data across multiple Excel sheets. It's crucial for maintaining accuracy in data analysis, customer relationship management (CRM), or simply to keep your records clean and concise. This guide will walk you through a simple yet effective process to remove duplicates from two Excel sheets, enhancing your data management skills.
Preparation

Before we dive into the steps, here's what you need:
- Microsoft Excel or a compatible spreadsheet application.
- Two Excel sheets with duplicate data you wish to clean.
- Basic knowledge of Excel functions.
Step-by-Step Guide

Step 1: Open Both Excel Files

Start by opening the two Excel files where you need to remove duplicates. You can do this by:
- Opening Microsoft Excel.
- Navigating to the File menu and selecting “Open.”
- Browsing for the Excel files and opening them.
Step 2: Merge the Two Sheets

With both sheets open:
- Copy all data from the second sheet.
- Paste it into a new column or at the bottom of your first sheet. Ensure that headers remain consistent if you choose to paste the data below the existing data.
📝 Note: Be cautious with the placement of the new data to maintain the structure of your dataset.
Step 3: Use the Remove Duplicates Feature

Here’s how to use Excel’s built-in feature to remove duplicates:
- Select the entire data range where you have merged the sheets.
- Go to the Data tab in the Excel Ribbon.
- Click on Remove Duplicates.
- In the dialog box, choose which columns to check for duplicates based on your dataset’s needs.
- Click OK to remove the duplicates.
Step 4: Review the Cleaned Data

After removing duplicates:
- Examine your dataset to ensure all duplicates have been removed correctly.
- If needed, sort the data or apply filters to better review the changes.
Step 5: Save Your Work

Once satisfied with the results:
- Save your Excel file under a new name to keep the original files intact.
💾 Note: Always backup your data before performing operations like removing duplicates to prevent unintended data loss.
Additional Tips for Advanced Users

If you’re dealing with large datasets or more complex scenarios, consider these tips:
- Conditional Formatting: Use conditional formatting to highlight duplicates in different colors, which can help in identifying unique entries.
- Advanced Filtering: Use Excel’s advanced filtering options to sort data based on specific criteria before removing duplicates.
- Power Query: For enterprise-level data cleaning, Power Query offers more sophisticated tools for data transformation and can handle multiple sheets with ease.
Final Thoughts

In conclusion, managing data efficiently involves removing duplicates from multiple Excel sheets, ensuring your data’s integrity and usability. By following these steps, you’ll not only streamline your data analysis process but also improve the accuracy of your CRM systems, financial tracking, or any other application where precise data is crucial. Remember to backup your files, use Excel’s advanced features for better control over the process, and keep practicing to enhance your data management skills.
Can I use these steps for Google Sheets?

+
Yes, Google Sheets also has a “Remove Duplicates” feature under the Data menu, although the exact steps might differ slightly.
What if my sheets have different headers?

+
Before merging, you’ll need to align the headers or manually adjust the data to ensure consistency, which could involve renaming columns or reordering them.
How can I avoid losing any important data?

+
Always keep backup copies of your original Excel files. Review the data before and after the removal process to ensure all needed information is retained.


