5 Ways to Print Multiple Excel Sheets on One Page

If you've ever struggled to fit multiple sheets from Microsoft Excel onto a single page, you're not alone. This common challenge can be approached in several ways, enhancing not only your printing productivity but also the presentation of your data. Below, we explore five effective methods to achieve this goal, along with tips for optimizing your document before you print.
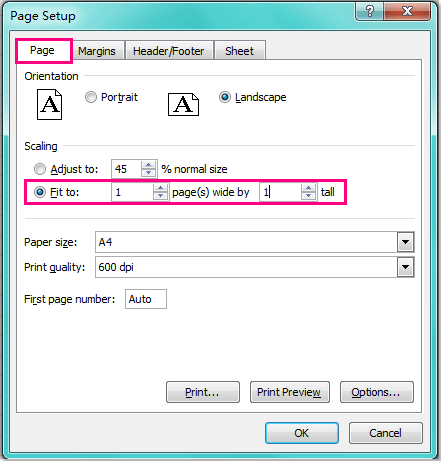
Method 1: Scaling with Excel’s Page Setup

The simplest way to print multiple sheets on one page is to adjust the scale. Here’s how you can do it:
- Open the Excel workbook containing the sheets you want to print.
- Go to File > Print or press Ctrl + P.
- In the Print settings, under ‘Settings’, select ‘Print Entire Workbook’.
- Choose ‘Fit Sheet on One Page’ from the ‘Scale to Fit’ option.
- Click ‘Print’.
Method 2: Using the Print Area Feature

If you only need specific sections from multiple sheets, use the Print Area feature:
- Select the range on your first sheet that you want to print.
- Go to Page Layout > Print Area > Set Print Area.
- Repeat this for all sheets you wish to print.
- Navigate to the Print Preview (Ctrl + P) and ensure ‘Print Entire Workbook’ is selected.
🔍 Note: This method allows you to selectively print parts of multiple sheets, making it ideal for when you need a summary of key data.
Method 3: Manual Page Break Insertion

For more control over how your data appears on the page:
- Go to each sheet where you want to adjust the page breaks.
- Select View > Page Break Preview.
- Drag the blue dotted lines to manually set where each page should start and end.
- Ensure all sheets are formatted as needed before printing.
Method 4: Adjusting Margins and Orientation

Often, the layout of your Excel document can be tweaked to fit more on one page:
- Go to Page Layout > Margins. Reduce margins if possible.
- Choose Landscape Orientation (Page Layout > Orientation > Landscape) to fit more columns.
- Consider also reducing the header/footer size and other non-essential elements.
| Page Settings | How to Adjust |
|---|---|
| Margins | Page Layout > Margins |
| Orientation | Page Layout > Orientation |
| Paper Size | Page Layout > Size |
| Header/Footer | Page Layout > Print Titles |

Method 5: PDF Printing and Manipulation

For a more flexible printing approach, consider converting your Excel workbook to PDF:
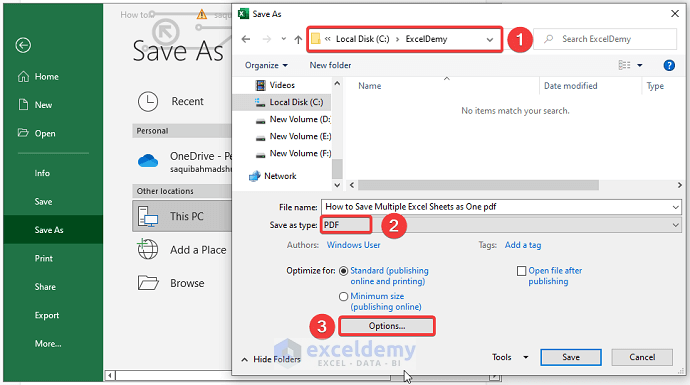
- From the File > Print menu, choose ‘Print to PDF’.
- After converting, open the PDF with a PDF editor like Adobe Acrobat or a free alternative.
- Use the editing tools to arrange multiple sheets onto one page manually.
- Print the arranged PDF as needed.
📝 Note: This method requires additional software but provides unparalleled flexibility for arranging pages.
By applying these five methods, you can significantly improve how your Excel documents are presented when printed. Each method offers different advantages, from quick and easy scaling to detailed manual arrangements. Remember to adjust your document's print settings for optimal results, and always do a print preview to ensure your sheets are arranged as expected. Whether it's for meetings, presentations, or personal records, having a well-organized printout can make all the difference.
Can I print non-adjacent sheets in Excel?

+
Yes, you can. Use the Page Layout’s ‘Print Area’ feature to define specific areas on multiple sheets, then print these together.
What if scaling doesn’t work well due to different sizes of data?

+
Consider using the PDF method for full control over how the pages are combined or adjust each sheet manually in Page Break Preview for optimal fit.
How can I ensure my printouts are readable?

+
Reduce margins, font sizes, and use a clear, simple font. Also, check the ‘Print Preview’ to adjust any issues before finalizing the print.
Is it possible to save these settings for future use?

+
Unfortunately, print settings in Excel are not automatically saved with the workbook. You’ll need to redo the settings each time or create a template with your preferred settings.


