Create an Excel Expense Sheet Easily

Managing personal or business finances can often seem daunting, especially when it comes to tracking your expenses. However, with Microsoft Excel, you can effortlessly create a dynamic and user-friendly expense sheet that keeps you organized and informed. In this blog post, we'll guide you through the step-by-step process of setting up an Excel expense sheet to simplify your financial tracking.
Why Use Excel for Expense Tracking?

Before we dive into the how-to, let's briefly discuss why Excel is an excellent choice for expense tracking:
- Flexibility: Excel allows you to customize every aspect of your expense sheet to fit your specific needs.
- Data Analysis: Excel's powerful analysis tools help you understand spending patterns, making budget adjustments easier.
- Accessibility: Excel files can be saved, shared, and accessed on various devices.
- Automation: With functions and macros, you can automate many tasks like calculations or data entry.
Step-by-Step Guide to Creating Your Excel Expense Sheet

1. Set Up Your Worksheet

Open a new Excel workbook:
- Create columns for Date, Category, Description, Amount, and Payment Method.
- Adjust column widths for better readability:
| Column | Header |
|---|---|
| A | Date |
| B | Category |
| C | Description |
| D | Amount |
| E | Payment Method |

📌 Note: Your column headers can be customized to suit your specific tracking needs.
2. Format Your Expense Sheet

To make your expense sheet visually appealing and easier to read:
- Use bold text or different colors for the header row.
- Apply conditional formatting for cells to highlight categories or high-value expenses.
- Include filters or dropdown lists for the Category and Payment Method columns:
- Select the Category column, go to Data > Data Validation > List, and enter categories like “Food”, “Utilities”, “Transportation”.
- Repeat the same for the Payment Method column with options like “Cash”, “Credit Card”, “Bank Transfer”.
3. Entering Expenses

Enter your daily or monthly expenses:
- Use the Date column to log when the expense occurred.
- Select the appropriate category from the dropdown menu.
- Provide a brief description in the Description column.
- Enter the expense amount in the Amount column with the negative sign for expenditures.
- Select the payment method from the dropdown list.
4. Summarizing Your Expenses

To get a quick overview:
- Use Excel formulas or pivot tables to sum up expenses by categories, months, or other criteria.
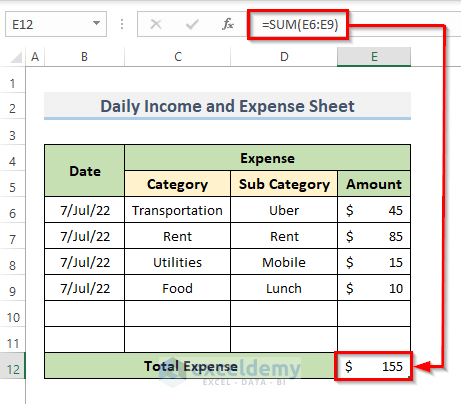
- Here’s a simple way to sum expenses:
=SUM(D2:D100)will sum all the amounts from D2 to D100.
5. Automate Your Sheet

Automation can save time:
- Create macros to automate repetitive tasks like formatting new entries or generating reports.
- Set up data validation to ensure only valid entries are made in certain cells.
6. Tracking and Analyzing Data

For deeper insights:
- Utilize pivot tables for sorting, filtering, and analyzing your data.
- Create charts or graphs to visualize your spending patterns over time.
7. Regular Updates and Maintenance

Keeping your sheet up-to-date is key:
- Update your expense sheet regularly to ensure accuracy.
- Review and update categories or other data validation lists as your financial situation changes.
In summary, by following these steps, you can create an effective Excel expense sheet that not only tracks your finances but also helps in analyzing and managing your expenditures more intelligently. With Excel's robust features, you'll find managing your financial health both easier and more insightful.
Can I use Excel for both personal and business expense tracking?

+
Yes, Excel can be used for both personal and business expense tracking. You can customize your sheet to track different types of expenses by setting up separate categories for personal and business purposes.
How do I ensure the accuracy of my expense entries?

+
To maintain accuracy, regularly update your sheet, cross-check with bank statements or receipts, and use data validation rules to limit entry errors.
What if I want to track income as well as expenses?

+
Add an “Income” column next to the Amount column, where you can enter positive amounts for income. Use formulas to differentiate between income and expenses for net calculation.


