Create an Invoice Sheet in Excel: Easy Guide

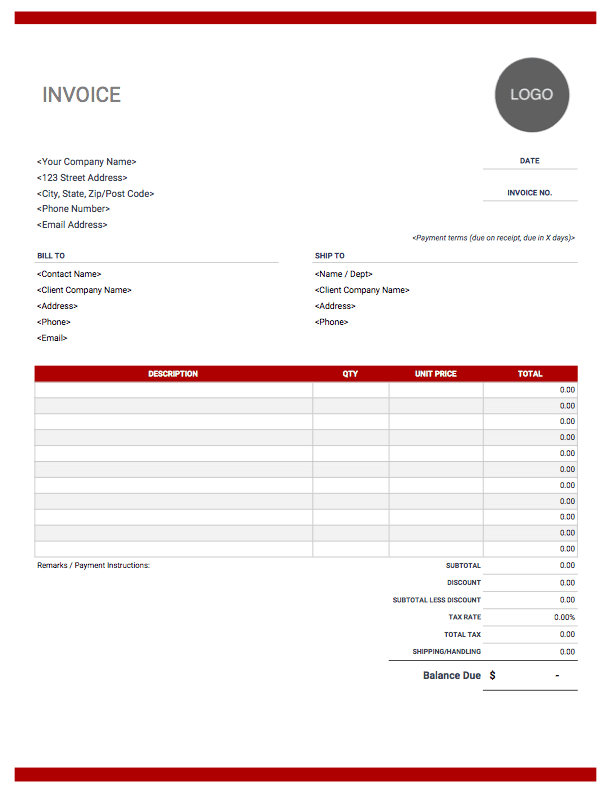
Creating an invoice in Microsoft Excel is a straightforward process that can significantly streamline your business operations. Whether you're a freelancer, run a small business, or manage a department's invoicing, Excel offers flexibility and power to customize your invoices to meet specific needs. This guide will walk you through the steps to create a professional invoice sheet, complete with formulas for automatic calculations, and offer tips for maintaining accuracy and efficiency.
Setting Up Your Invoice Sheet

Begin by opening Microsoft Excel. Here are the initial steps to set up your invoice:
- Open a new workbook and select a blank sheet.
- Set up your header: At the top of the sheet, input your business name, address, contact information, and invoice number. This acts as your invoice header, making it easier for clients to identify and pay the invoice.
- Create columns for Invoice Details:
- Item/Service
- Description
- Quantity
- Unit Price
- Total Price
Filling in Invoice Details

Now, you can start filling in the details of your invoice:
- Bill To: Under your header, leave some space and add a section for the client’s name, address, and contact information. This is crucial for addressing the invoice correctly.
- Date of Invoice: Enter the date when the invoice is issued. This can be automated with the TODAY() function for accuracy.
- Invoice Number: Provide a unique number for each invoice, either manually or using a formula like CONCATENATE("INV-", YEAR(TODAY()), "-", ROW()) to generate a sequential number.
- Client’s PO Number: If your client uses purchase order numbers, include this field.
| Header | Content |
|---|---|
| Your Business Name | Your Business Address |
| Date | Client’s PO Number (if applicable) |

Calculations and Formulas

The power of Excel lies in its ability to perform automatic calculations. Here’s how to set these up:
- Quantity * Unit Price: In the Total Price column, enter the formula
=C2*D2where C2 contains the Quantity and D2 the Unit Price. Copy this formula down the column for each item. - Subtotal: After listing all items, create a cell for the subtotal. Use the SUM function
=SUM(F2:F10)to add up the Total Price column, assuming your items go from row 2 to 10. - Taxes: If you need to include taxes, you can multiply the Subtotal by the tax rate. For example, if your tax rate is 8%, the formula would be
=E10*0.08. - Total: Sum the Subtotal and any taxes to get the Total Due. For instance,
=E10+F10.
Formatting for Clarity

Proper formatting not only makes your invoice look professional but also helps in quick reading and comprehension:
- Use bold text for headings to distinguish them from data entries.
- Format numbers: Currency format for monetary values, and center-align text in headers for a polished look.
- Separate sections with borders or shading to enhance readability.
- Adjust column widths to ensure all content is visible without wrapping unnecessarily.
Checking Your Work

Before sending your invoice, it’s critical to review it for accuracy:
- Ensure all calculations are correct by manually checking a few entries against the formulas.
- Double-check client information for accuracy.
- Verify that the invoice number is unique and follows your business's sequence.
- Review any notes or comments for spelling or grammatical errors.
💡 Note: Always keep a copy of sent invoices for your records, both digitally and printed if necessary for backup.
In wrapping up, creating an invoice in Excel is not just about generating a bill; it’s about setting up a system for efficient financial management. By following these steps, you can produce professional invoices that are easy to read, accurate, and tailored to your business needs. The key benefits include:
- Streamlined process: Automating calculations reduces errors and time spent.
- Professional presentation: Formatting enhances the document's look, making it credible.
- Flexibility: Excel allows for customization based on client requirements or business changes.
- Records Management: Keeping digital records for future reference and audit trails.
The practice of creating invoices in Excel not only ensures you get paid but also establishes a clear financial dialogue with your clients. As you refine your invoicing process, consider feedback from clients to improve your templates further. Remember, an effective invoice is not just about receiving payment; it’s about fostering a clear understanding of the value you provide.
What if my client requires a different format?

+
Customize the existing template or create a new one that aligns with their specific requirements. Excel’s flexibility allows you to easily modify or add sections as needed.
Can I use Excel for tracking payments?

+
Yes, you can add columns for payment status, date of payment, and notes. Set up a separate sheet or tab to track the status of all invoices if necessary.
How can I prevent duplication of invoice numbers?

+
Implement an automated numbering system using Excel formulas or manually check against previous invoices to ensure uniqueness. Also, consider using a dedicated invoice management system for larger operations.


