3 Simple Steps to Group Sheets in Excel 2016 on Mac

Grouping sheets in Microsoft Excel allows you to work with multiple spreadsheets at the same time, making data entry and modifications far more efficient. This is particularly useful when you need to apply the same changes across several worksheets or analyze data that spans multiple sheets. In Excel 2016 on Mac, grouping sheets can streamline your workflow significantly. Here's how to do it:
Step 1: Select Sheets for Grouping

Before grouping sheets, open your Excel workbook:
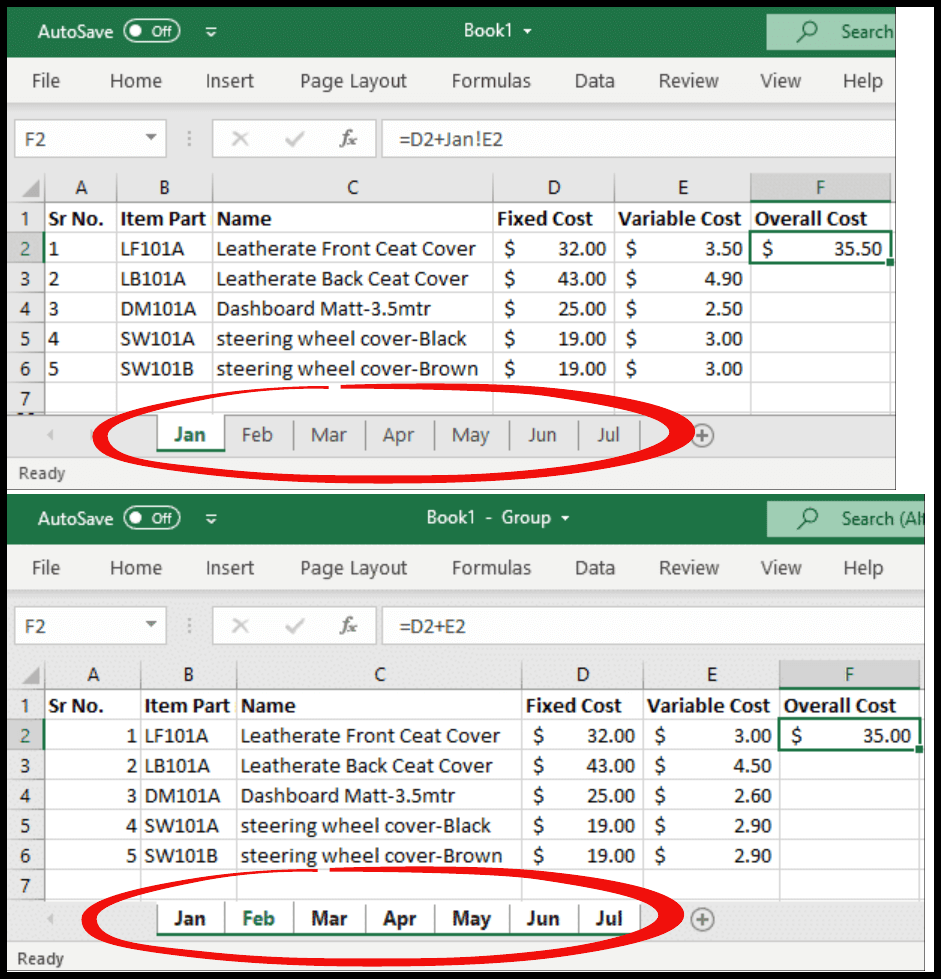
- Click on the first tab you want to group.
- Hold down the Command (⌘) key on your Mac.
- Click on additional sheet tabs to include in the group. Each tab you click will be highlighted, indicating that it’s part of the group.
- To select a range of sheets, click the first tab, hold down the Shift key, then click the last tab in the range.
Step 2: Work with Grouped Sheets

Once sheets are grouped, any changes you make will apply to all selected sheets:
- Enter data, apply formulas, or modify cell formats across all sheets in the group.
- Create charts or tables that pull data from multiple sheets for a comprehensive view.
- Use fill handle or drag functions to copy data or formulas between sheets in the group.
⚠️ Note: Remember, when grouped, sheets will change identically, so be cautious with your actions.
Step 3: Ungroup Sheets

After finishing tasks on grouped sheets, you’ll likely want to return to individual sheet editing:
- Click on any non-grouped sheet tab.
- Right-click on any sheet tab in the group and select Ungroup Sheets.
- Or click one of the grouped tabs while holding down Command (⌘) to deselect it from the group.
Why Group Sheets in Excel?

Grouping sheets provides several benefits:
- Time Efficiency: It saves time when applying changes across multiple sheets, like formatting or data entry.
- Consistency: It ensures that changes are consistent across grouped sheets.
- Data Analysis: It facilitates easier data analysis and reporting from multiple sources.
✅ Note: Always ensure you are aware of what sheets are grouped to avoid unintended changes.
Best Practices for Grouping Sheets

Here are some tips for effective sheet grouping:
- Plan your workbook structure before grouping to avoid unnecessary ungrouping and regrouping.
- Be cautious with formulas that reference cells outside the grouped sheets; they may return errors.
- Save frequently, especially when grouping sheets, to avoid losing data.
To sum it up, Excel 2016 on Mac provides a straightforward way to group sheets, enhancing your productivity when dealing with multiple spreadsheets. By following the simple steps of selecting, working with, and ungrouping sheets, you can streamline your data management tasks. Remember that while grouping is incredibly useful, it requires careful attention to avoid unintended changes or errors. Whether you're organizing financial data, managing inventory, or collating research findings, mastering the art of sheet grouping in Excel will significantly boost your efficiency and data handling capabilities.
What happens if I delete or rename a grouped sheet?

+
When you delete or rename one sheet in a group, the action will be applied to all sheets in the group. Be cautious to avoid unintended deletions or renames.
Can I copy data from grouped sheets to a new ungrouped sheet?

+
Yes, you can select and copy data from grouped sheets. However, you’ll need to manually paste this data into a new, ungrouped sheet, as grouped sheets do not interact directly with ungrouped sheets.
Are there any limitations to sheet grouping?

+
Yes, there are limitations:
- Formulas referencing cells outside the group can cause errors.
- Operations that apply to the entire workbook might not work as expected.
- Macros might behave differently with grouped sheets.
How do I ensure my data is safe when grouping sheets?

+
Save your workbook regularly, especially before making significant changes to grouped sheets. Also, create backups of important data to prevent any loss.


