Transferring Changes to Separate Excel Sheets: Simplified Guide

Streamlining Your Excel Workflow: Transferring Data Between Sheets

Working with Microsoft Excel can often mean managing large datasets across multiple sheets within the same workbook. Whether you’re compiling financial reports, managing inventory, or tracking project milestones, efficiently transferring data between sheets is a skill that can save time and reduce errors. This guide will walk you through the steps to seamlessly move data from one Excel sheet to another, ensuring that your workflow remains both fluid and accurate.
Understanding Excel Sheet Structure

Before diving into the methods of data transfer, it’s beneficial to understand the structure of an Excel workbook:
- Workbook: This is the entire Excel file, which can contain multiple sheets.
- Worksheet (or Sheet): These are the individual tabs within a workbook where you input your data.
- Cell: The basic building block of a worksheet, identified by column and row.
- Range: A group of cells within a worksheet, defined by a starting cell and an ending cell (e.g., A1:B5).
Methods to Transfer Data Between Sheets

Here are several effective ways to transfer data:
1. Copy and Paste

This is the simplest method, ideal for transferring small data sets:
- Select the range of data you wish to transfer on the source sheet.
- Right-click and choose ‘Copy’, or use the keyboard shortcut Ctrl + C.
- Navigate to the destination sheet.
- Select the starting cell where you want the data to appear.
- Paste the data using ‘Paste’ or the keyboard shortcut Ctrl + V.
💡 Note: Ensure the destination sheet has enough empty cells to accommodate the data being transferred.
2. Use Excel Formulas

Excel formulas can automatically pull data from one sheet to another:
- Simple Cell Reference: In the destination sheet, enter
=[SourceSheetName]!A1to display the content of cell A1 from the source sheet. - Range Reference: For transferring multiple cells, use
=[SourceSheetName]!A1:B5to import a range of cells.
3. VBA (Visual Basic for Applications)

For more complex data transfers or automation, VBA can be incredibly useful:
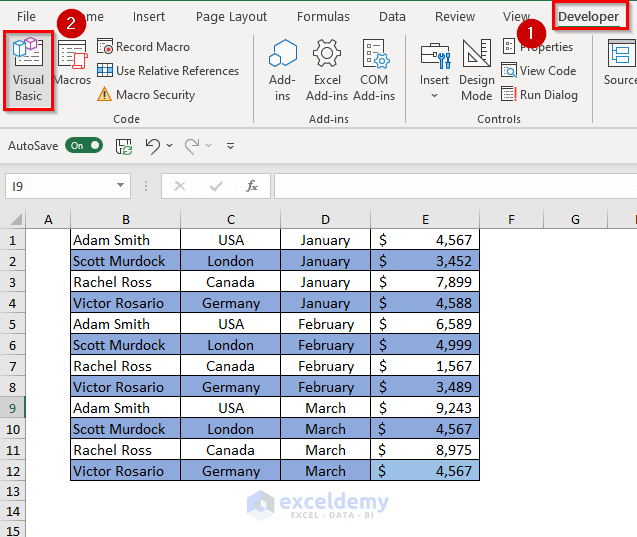
- Open the VBA editor by pressing Alt + F11.
- Write a VBA macro that uses the
.Valueproperty to transfer data:Sub TransferData() Sheets(“SourceSheet”).Range(“A1:B5”).Copy Destination:=Sheets(“DestinationSheet”).Range(“A1”) End Sub
⚠️ Note: Using VBA requires basic programming knowledge. Always backup your workbook before running macros.
4. Power Query

Power Query, an Excel add-in, offers powerful data extraction capabilities:
- From the ‘Data’ tab, select ‘Get Data’ > ‘From Other Sources’ > ‘From Microsoft Query’.
- Set up your query to import data from different sheets within the same workbook.
- Use the ‘Transform Data’ option to clean or restructure data as needed.
At this point, your Excel data transfer skills have been thoroughly honed. Transferring data between sheets in Excel not only saves time but also enhances data integrity by reducing the manual entry errors. Whether you're dealing with financial data, sales figures, or tracking information, knowing how to move this data efficiently will boost your productivity significantly.
Can I transfer data between workbooks with these methods?

+
Yes, most of the methods discussed can be adapted to transfer data between different Excel workbooks. For Copy and Paste, you can open both workbooks simultaneously. Formulas require absolute references or the INDIRECT function for dynamic workbook names. VBA can also handle workbook-to-workbook transfers with proper file paths.
Is it possible to automate data transfer between sheets daily?

+
Absolutely! Use VBA with timers or Excel’s Scheduled Tasks to automate daily data transfers. Power Query also supports scheduled refreshes for pulling new data automatically.
What if my data has formulas or formatting?

+
Paste Special can preserve formulas and formatting. For VBA, use the .PasteSpecial method with appropriate parameters to transfer values, formulas, or formats as needed.


