Save Part of Excel Sheet as PDF: Easy Steps

Streamlining your workflow often involves exporting specific parts of data into various formats for sharing, analysis, or presentation purposes. One common task is to convert sections of an Excel sheet into a PDF. This not only helps in preserving the data format but also makes sharing information more accessible. Here's how you can easily save selected parts of your Excel sheet as a PDF using built-in Microsoft Excel features:
Understanding the Basics

Before diving into the steps, let's clarify some terms:
- PDF (Portable Document Format): A file format designed to present documents consistently across different devices.
- Excel Sheet/Worksheet: An individual tab within an Excel Workbook where data is organized in rows and columns.
Key Benefits of saving Excel data as PDF:
- Compatibility: PDFs can be opened on almost any device, with no need for Excel installed.
- Security: PDF files can be password-protected to safeguard sensitive data.
- Fixed Layout: PDF preserves the layout of your Excel sheet, ensuring consistency in how the data is viewed.
Step-by-Step Guide to Save Part of an Excel Sheet as PDF

1. Open Your Excel File

Begin by opening the Excel workbook containing the sheet you want to export.
2. Select the Desired Data

- Click and drag to highlight the cells or range you wish to save.
- Alternatively, use the ‘Name Box’ in Excel to enter the range manually, like ‘A1:D20’.
3. Using Excel’s ‘Save As’ Feature

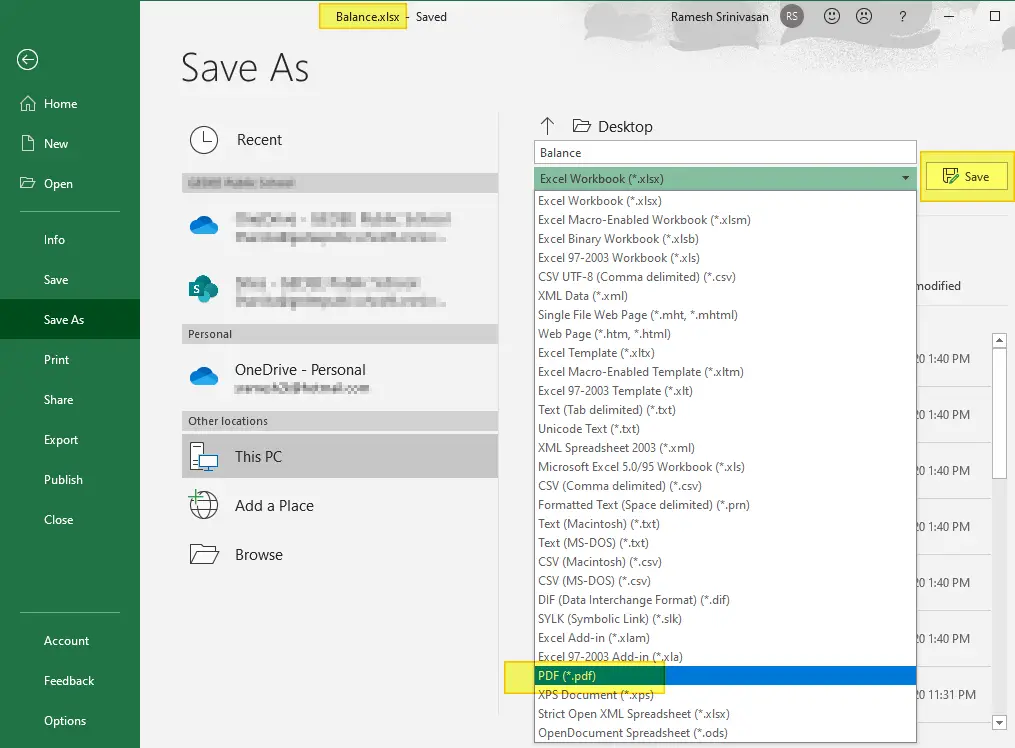
- Navigate to File > Save As.
- In the dialog box, select PDF from the “Save as type” dropdown menu.
- Choose the destination folder where you want to save your PDF.
- In the Options section, ensure you select:
- Print Selection
- Optimize for Accessibility
- Fit worksheet to one page
- Click Save to convert your selection to PDF.
4. Customize Your PDF Export

Here are some additional settings you can tweak:
- Headers and Footers: Add or modify headers/footers for additional context or branding.
- Page Setup: Adjust the page orientation, margins, and scaling options to fit your data on one or multiple pages.
- Password Protection: Enable password protection if your data needs to be secure.
- Quality: Select the PDF quality; standard, minimum, or printer-ready.
5. Review and Adjust

Before finalizing the PDF:
- Preview the PDF to ensure all data is captured correctly.
- If needed, adjust settings like zoom, print area, or page breaks to get the desired result.
6. Distribution and Sharing

Once satisfied with your PDF:
- Save the file in a location accessible to your audience.
- Share via email, cloud storage, or any preferred method.
- Remember, PDFs are great for preserving data integrity but are not easily editable.
📝 Note: If you need to export multiple sheets, you'll have to repeat the process for each one or use Excel's 'Print to PDF' function with appropriate settings.
Finalizing Your Workflow, ensure that:
- Your Excel sheet is up-to-date with all necessary data.
- Any formulas or charts that need to reflect in the PDF are correctly updated.
- The PDF is reviewed for accuracy, formatting, and security before distribution.
This guide has walked you through the process of saving specific parts of an Excel sheet as a PDF, highlighting both the simplicity and the customization options available within Excel. By following these steps, you can ensure that your data is not only shared efficiently but also presented in a professional and visually consistent manner.
Can I save multiple Excel sheets into one PDF file?

+
Yes, you can. When using the ‘Save As’ feature, choose ‘Entire Workbook’ to include all sheets. However, for more control, you might manually export each sheet and combine them using a PDF editor.
How do I ensure my charts and images are included in the PDF?

+
Select the range that includes your charts or images, or use ‘Print to PDF’ and adjust the print area to encompass these elements. Ensure they are visible within the print preview.
What if my data spans multiple pages?

+
You can adjust page breaks in Excel or use the ‘Fit worksheet to one page’ option under Page Setup, which might require zooming or scaling adjustments.


