Effortlessly Remove Excel Rows: Quick and Easy Guide

Do you often find yourself spending valuable time manually removing rows from your Excel spreadsheets? Whether you're dealing with outdated information, duplicate entries, or simply cleaning up your data, Excel offers several methods to streamline this process. This guide will walk you through various techniques, from basic to advanced, to effortlessly remove Excel rows with minimal fuss and maximum efficiency.
Method 1: Manual Deletion

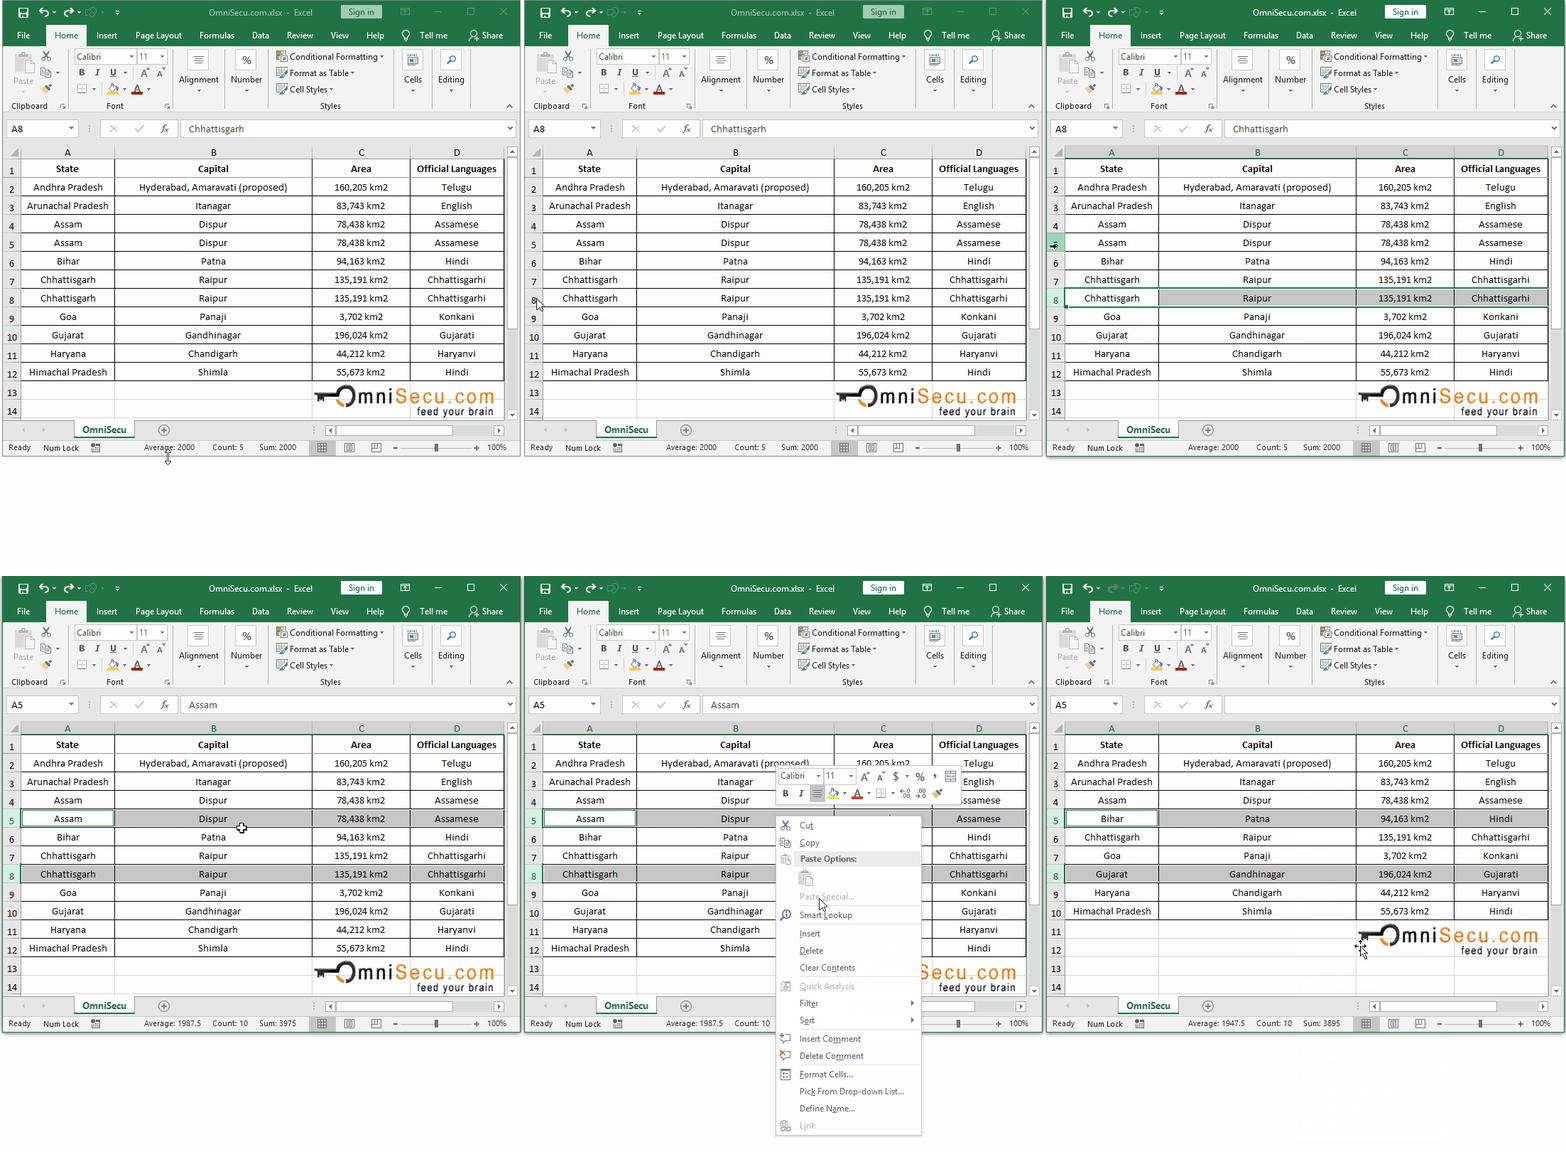
The simplest way to remove rows in Excel is to do it manually:
- Select the entire row by clicking the row number on the left-hand side.
- Right-click, then choose ‘Delete’ from the context menu.
⚠️ Note: This method is quick for occasional deletions but becomes inefficient with larger datasets.
Method 2: Using the ‘Go To Special’ Feature

If you need to delete rows based on specific criteria, Excel’s ‘Go To Special’ feature can help:
- Press Ctrl + G to open the ‘Go To’ dialog box.
- Click ‘Special’.
- Choose ‘Blanks’ or ‘Formulas’ depending on what you want to target.
- Click ‘OK’. Excel will highlight rows or cells meeting your criteria.
- Right-click the selected cells and choose ‘Delete’, then select ‘Entire Row’.
Method 3: Using Filters

Filtering data allows you to selectively remove rows:
- Select your data range.
- From the Data tab, click ‘Filter’.
- Use the filter dropdowns to display only the rows you want to delete or keep.
- Select the visible cells you want to remove, right-click, and choose ‘Delete’ → ‘Entire Row’.
Here is an example of how to use the Filter:
| Step | Description |
|---|---|
| 1 | Go to the Data tab and click Filter to activate the filter dropdowns. |
| 2 | Select the criteria you wish to filter by (e.g., all cells containing blank or a specific value). |
| 3 | Click on the dropdown arrow in the header row for the column, then choose the value you want to filter. |
| 4 | Delete the visible rows by selecting them and then selecting 'Delete' → 'Entire Row'. |

💡 Note: Clearing the filter after deletion is crucial to ensure you’re not missing any data from your view.
Method 4: VBA for Advanced Deletions

For more complex scenarios, VBA can automate the row removal process:
Sub DeleteRowsByCriteria() Dim ws As Worksheet Set ws = ActiveSheet Dim lastRow As Long lastRow = ws.Cells(ws.Rows.Count, “A”).End(xlUp).RowDim i As Long For i = lastRow To 1 Step -1 If Application.WorksheetFunction.CountA(ws.Rows(i)) = 0 Then ws.Rows(i).Delete End If Next i
End Sub
This script will delete all rows that are completely empty. You can modify the criteria within the loop to match your specific requirements.
📝 Note: Always backup your Excel file before running macros as they can make irreversible changes to your data.
Method 5: Conditional Formatting

While not a deletion tool, conditional formatting can highlight rows for easier identification and manual removal:
- Select your data range.
- From the Home tab, choose ‘Conditional Formatting’.
- Set rules to highlight rows based on your criteria (e.g., cells with a specific value or format).
- Review the highlighted rows and delete them manually.
Final Thoughts

Removing rows in Excel can be as simple or as sophisticated as your dataset demands. The methods range from quick manual deletions to powerful automated scripts. By mastering these techniques, you can streamline your workflow, ensuring your data is always current, accurate, and easy to manage. Whether you’re a beginner or an Excel pro, these methods offer a range of solutions to keep your spreadsheets clean and efficient.
Can I undo the row deletion in Excel?

+
Yes, you can undo a row deletion by pressing Ctrl + Z. However, this only works if you haven’t closed the workbook or performed too many other actions after the deletion.
How can I delete rows in large datasets?

+
For larger datasets, using VBA scripts or filters to remove rows is more efficient. These methods help you manage data with minimal manual intervention, reducing errors and time.
What should I be cautious about when deleting rows with VBA?

+
Be cautious about the criteria you set for deletion to avoid accidentally removing critical data. Always test your macro on a backup of your data first.


