3 Ways to Print Excel Sheets on One Page Each

When dealing with large datasets in Microsoft Excel, presenting information in a clear and concise manner can often be challenging, particularly when it comes to printing. Ensuring that each sheet prints on one page can save paper, reduce clutter, and improve the overall readability of your data. Below, we'll explore three effective methods to accomplish this task.
Method 1: Using Page Layout

The simplest way to ensure your Excel worksheet prints on one page is by adjusting settings in the Page Layout view:
- Switch to Page Layout: Select the ‘Page Layout’ tab on the Ribbon.
- Adjust margins: Click on ‘Margins’ and choose ‘Narrow’ or customise them to fit your content.
- Set Print Area: Highlight the cells or range you want to print, then go to ‘Page Layout’ > ‘Print Area’ > ‘Set Print Area’.
- Scale to Fit:
- In ‘Scale to Fit’ group, adjust the ‘Width’ and ‘Height’ dropdowns to ‘1 page’.
Image Placeholder

Method 2: Adjusting Page Setup Manually

Another approach is to manually adjust the Page Setup, giving you finer control over how your worksheet will print:
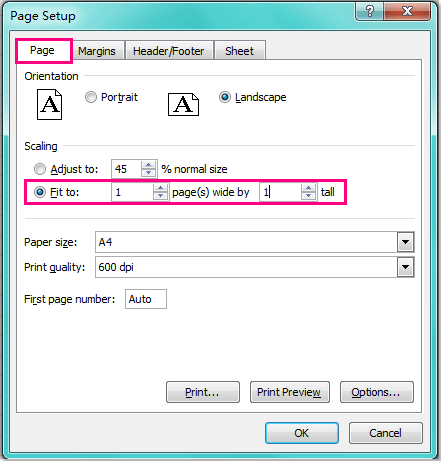
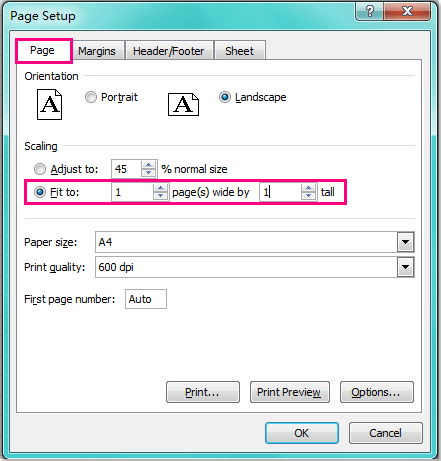
- Go to Page Setup: Click on the ‘Page Layout’ tab then select ‘Page Setup’ in the lower right corner.
- Fit to:
- Under the ‘Page’ tab, in the ‘Scaling’ section, choose ‘Fit to:’ and enter ‘1’ for the number of pages wide by ‘1’ tall.
- Scaling Options: Use ‘Fit to’ scaling, keeping in mind that the worksheet might look smaller on paper.
Image Placeholder

Method 3: Using VBA (Visual Basic for Applications)

For a more automated approach, VBA can be used to format each sheet to fit on one page:
- Open the Excel workbook containing the sheets you want to format.
- Press ALT + F11 to open the VBA editor.
- From the left-hand side menu, right-click on ‘VBAProject (Your Workbook)’ > ‘Insert’ > ‘Module’.
- Copy and paste the following code:
Sub PrintEachSheetToOnePage() Dim ws As Worksheet For Each ws In ThisWorkbook.Worksheets ws.PageSetup.PrintArea = “” ws.PageSetup.FitToPagesWide = 1 ws.PageSetup.FitToPagesTall = 1 Next ws End Sub - Run the macro by pressing F5 or from the menu ‘Run’ > ‘Run Sub/UserForm’.
Image Placeholder

These are just a few methods among many that can help you manage your printing preferences in Excel. The choice between Page Layout, manual adjustments, or using VBA largely depends on your comfort level with Excel's features and the specific needs of your worksheet.
📝 Note: When using 'Fit to:' scaling, remember that text might become very small. Ensure readability by adjusting font sizes if necessary.
In summary, Excel provides several tools to manage how your worksheets print. Whether you choose to use Page Layout for quick adjustments, manually configure Page Setup for precise control, or automate the process with VBA, each method ensures your sheets fit neatly onto one page. This can greatly enhance the presentation of your data, reduce paper waste, and make your printouts more professional. Understanding and applying these techniques can significantly improve your efficiency with Excel printing tasks.
What if my content still doesn’t fit on one page after scaling?

+
If scaling doesn’t work, consider reducing unnecessary whitespace or font size. If that still doesn’t work, you might need to split the worksheet into logical sections that can each print on one page.
How do I stop Excel from automatically splitting my sheet across pages?

+
Go to ‘Page Layout’ > ‘Breaks’ and select ‘Remove Page Break’ or adjust your settings so that the content fits within the print area.
Can I apply these settings to multiple sheets at once?

+
Yes, by using Group mode or VBA. Hold Ctrl and select multiple sheets then apply Page Setup changes. For VBA, the provided macro will apply to all sheets in the workbook.


