5 Simple Steps to Move Excel Sheet to Word

Moving an Excel sheet to a Word document can streamline your work process, allowing for a seamless integration of data and text within one document. Whether you're compiling a report, creating a presentation, or just organizing information for better presentation, here are the five simple steps to transfer your Excel data effectively into a Word document.
Step 1: Prepare Your Excel Sheet

Before you start transferring data, make sure your Excel sheet is in the format that you want to appear in your Word document:
- Adjust column widths: Ensure that all necessary data is visible without needing to scroll left or right.
- Format the data: Use proper formatting like fonts, colors, and cell styles. Remember, some formatting might not transfer perfectly.
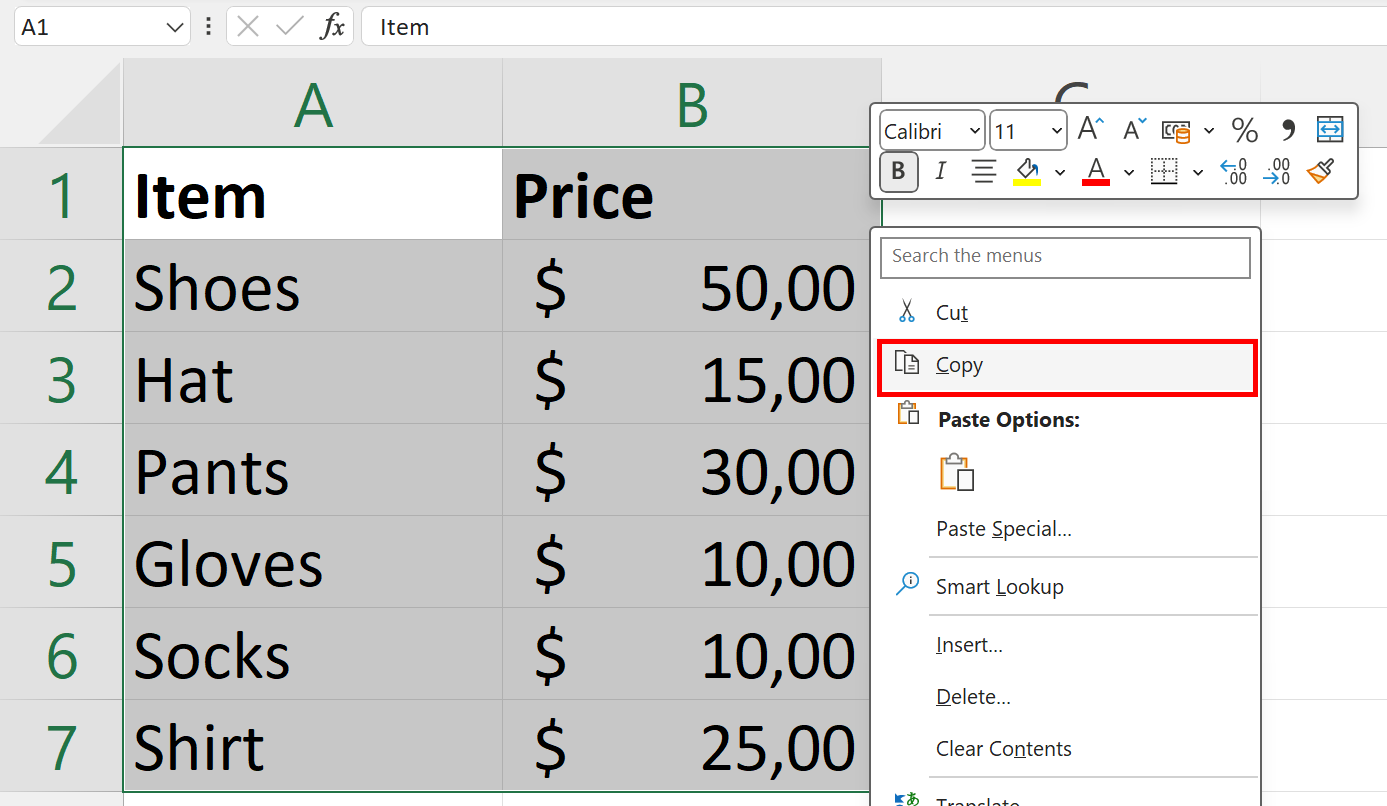
- Select the data: Click and drag to select the cells or range of data you wish to transfer. You can also select entire rows or columns.
Step 2: Copy the Excel Data

With your data selected:
- Right-click and choose Copy, or press Ctrl + C (Windows) or Cmd + C (Mac).
Step 3: Paste into Word Document

Now, switch over to your Word document:
- Right-click where you want to insert the table, then select Paste Options from the context menu or press Ctrl + V (Windows) or Cmd + V (Mac).
- Choose from the following options:
- Keep Source Formatting: This will maintain the look from Excel.
- Use Destination Styles: This will adapt to the existing Word document formatting.
- Link & Keep Source Formatting: This option creates a live link to your Excel data, which will update in Word if changed in Excel.
💡 Note: If your table is large, using the ‘Link & Keep Source Formatting’ option can be extremely useful as any update in Excel will automatically reflect in your Word document.
Step 4: Adjust the Table in Word

Once your data is in Word:
- Use Word’s table tools to adjust the layout, size, or apply additional formatting if needed.
- If the table does not fit the page properly, you might need to:
- Resize the columns.
- Change font size or type.
- Split the table into multiple smaller tables.
Step 5: Final Touches

After transferring and formatting:
- Check for any data integrity issues or formatting discrepancies.
- If necessary, add headers or footers, include additional text explanations, or label the table for clarity.
The process of moving data from Excel to Word can be a critical step in creating comprehensive documents. This guide ensures that you can do so effectively, retaining data accuracy and presentation quality. Whether for reports, presentations, or record-keeping, this method provides you with a straightforward approach to document integration.
Can I update the Excel data after pasting it into Word?

+
If you used the ‘Link & Keep Source Formatting’ option, any changes made in Excel will update in Word automatically. If you simply pasted the data, you’ll need to manually update the table in Word.
Why doesn’t my formatting transfer properly?

+
Sometimes, complex Excel formatting does not translate well into Word. You might need to adjust the table formatting within Word or consider simplifying the formatting in Excel before copying.
What if I need to transfer multiple sheets from Excel to Word?

+
You can repeat the process for each sheet, or use Word’s Insert > Table > Excel Spreadsheet feature to embed a dynamic Excel worksheet within your Word document, where you can manually copy each sheet’s data.


