5 Simple Steps to Create Excel Check Sheets

In today's fast-paced business environment, accuracy and efficiency are crucial. Excel, a ubiquitous tool in data management, provides a versatile platform for creating check sheets to streamline tasks, ensuring nothing falls through the cracks. Here are five simple steps to create Excel check sheets that will help manage your operations effectively.
Step 1: Open Excel and Create a Blank Workbook

Start by launching Microsoft Excel. Choose to open a new blank workbook. This will give you a clean slate to design your Excel check sheet.
Why a Blank Workbook?

- A blank workbook allows you to have full control over the layout, design, and functionality.
- It ensures you’re not constrained by pre-existing templates, giving you the freedom to tailor the check sheet to your specific needs.
Step 2: Design Your Check Sheet Layout

Designing the layout is pivotal to the usability of your Excel check sheet. Here’s how:
Define Sections and Columns

- Column Headers: Decide on the necessary data fields. Examples include date, task description, responsible person, status, etc.
- Formatting: Use bold text for headers, consider color-coding or cell borders for visual distinction.
- Data Entry: Allocate space for users to input data. Consider using data validation to control entries.
Adding Checkboxes

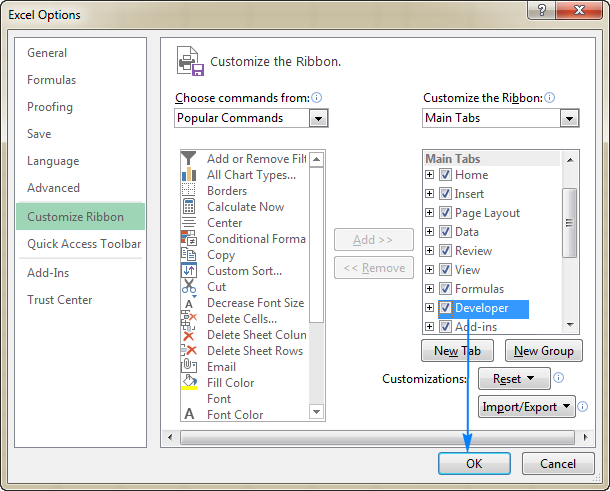
Excel provides a Developer tab where you can insert checkboxes to make your check sheet interactive:
- Go to File > Options > Customize Ribbon, check the Developer box.
- On the Developer tab, click Insert > Form Controls > Checkbox.
- Drag where you want the checkbox on your sheet.
🔍 Note: If the Developer tab is not visible, you'll need to enable it first.
Step 3: Populate and Format Your Data

With your layout in place, start populating your Excel check sheet:
Manual Entry

- Manually enter tasks, dates, and names as needed.
Using Formulas

To automate some aspects:
- Use Excel formulas like
=TODAY()to autofill dates. - Apply conditional formatting to visually highlight tasks that are overdue or complete.
Drop-down Lists

Utilize data validation to add drop-down lists:
- Select the cells where you want the list to appear.
- Go to Data > Data Validation.
- Under “Allow,” choose List, and enter your items.
Step 4: Add Automation and Interactivity

To make your Excel check sheet more dynamic:
Checklist Automation

Link checkboxes to cells to automate task completion:
- Right-click on a checkbox > Edit Text > Type in a cell reference (e.g.,
C3). - The checkbox will now control the value of that cell (True/False).
Advanced Features

- Sorting and Filtering: Use sorting options to manage tasks based on criteria like due date or status.
- Formulas for Calculations: Use formulas to tally completed tasks, calculate overdue tasks, etc.
Step 5: Finalize and Share Your Check Sheet

Before sharing your Excel check sheet:
Testing

- Simulate various scenarios to check functionality and user experience.
Formatting Review

- Ensure readability by reviewing font size, colors, and cell alignment.
Protection
Protect your workbook or certain cells to prevent unwanted changes:
- Go to Review > Protect Sheet/Workbook.
- Choose what actions you want to allow users.
Incorporating these steps will result in a well-designed, user-friendly Excel check sheet that can significantly enhance productivity in any work environment. These check sheets can be adapted for various scenarios, from quality control checks in manufacturing to daily task management in a small business office. By following these steps, you've empowered yourself to create a tool that not only helps in tracking but also in streamlining your work processes.
Remember, the beauty of Excel lies in its flexibility. Customizing your Excel check sheets to fit your unique requirements will make them an indispensable part of your workflow. Keep experimenting with different features and formulas to continually improve your check sheets, ensuring they meet your evolving needs.
The key takeaways from creating Excel check sheets include:
- Understanding your specific needs before designing the layout.
- Implementing automation to reduce manual work and improve accuracy.
- Ensuring the check sheet is user-friendly, visually appealing, and protected to prevent unintended changes.
Can I share my Excel check sheet with others?
+Yes, you can easily share your Excel check sheet by saving it to cloud services like OneDrive or SharePoint and sharing the link. Alternatively, you can export it to PDF for read-only distribution.
How often should I update my check sheet?
+The frequency of updates depends on your needs. Daily check sheets might be updated each day, whereas weekly or monthly sheets might be updated less frequently. Use automation like macros or formulas for recurring updates.
What are some common uses for Excel check sheets?
+Excel check sheets are widely used in:
- Inventory management
- Quality control inspections
- Task tracking
- Time management
- Health and safety checklists


