5 Ways to End Excel Sheet at Specific Column

Do you often find yourself working with extensive datasets in Microsoft Excel where navigating through columns seems like an endless task? It's all too common to have columns extending far beyond the point where they contain meaningful data. Not only does this clutter your workbook, but it can also slow down your work and make data analysis challenging. Fortunately, Excel offers several methods to end your Excel sheet at a specific column, helping you streamline your workflow and manage your data more efficiently.
Understanding the Need for Column Limitation

Excel sheets, by default, can have up to 16,384 columns. While this is usually ample for most datasets, it's unnecessary for smaller datasets, and managing these columns can become cumbersome. Here's why you might want to limit your Excel sheet at a specific column:
- Improving Performance: Reducing the number of columns can decrease the file size, speeding up Excel's processing time.
- Easier Navigation: By eliminating unused columns, you simplify navigation and reduce the risk of data entry errors.
- Cleaner Data Presentation: Limiting columns helps in presenting data more clearly and with less visual noise.
Method 1: Using Page Setup Options

One of the simplest ways to end your Excel sheet at a specific column for printing or viewing purposes is by adjusting the page setup:
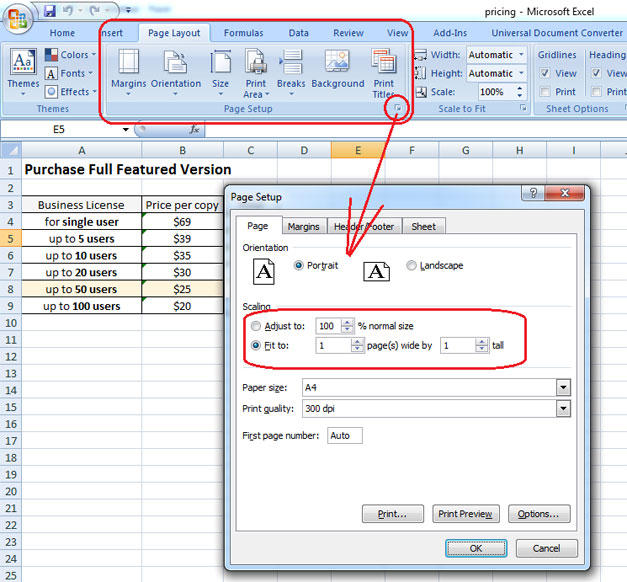
- Go to File > Page Setup or press Alt+P.
- Select the Sheet tab in the Page Setup dialog.
- In the Print Area section, specify the range of cells you want to print, e.g., $A$1:$I$50 to print from column A to I.
- Alternatively, to limit what is seen on screen:
- Navigate to View > Freeze Panes > Freeze Panes.
- Select the cell just to the right of where you want the columns to end, then freeze the panes. This doesn't remove columns, but it keeps them out of view.
👉 Note: The Page Setup method affects printing and on-screen viewing, but it doesn't physically limit your workbook's columns.
Method 2: Using Column Width

To create a virtual end to your worksheet at a specific column, you can adjust the column widths:
- Select the column immediately to the right of where you want your sheet to end.
- Right-click and choose Column Width.
- Set the column width to a very small number (like 0.1 or 0) to visually hide columns to the right.
- Alternatively, you can set these columns to 0 width to hide them completely.
👉 Note: This method does not delete columns; it merely hides them from view, which might be useful if you need to reference these columns later.
Method 3: Hiding Columns

If you want to hide columns without altering their data or affecting calculations:
- Select the columns you wish to hide.
- Right-click on the selection and choose Hide from the context menu.
This method keeps the data intact but moves it out of sight, which can help in presenting data more cleanly to the audience or users.
Method 4: Custom View

Excel's custom views feature allows you to save different views of your workbook, including specific column visibility:
- Set up your worksheet with the desired columns visible and hidden.
- Go to View > Custom Views.
- Create a new custom view, giving it a name that describes the column limit, like "Data Report View."
- When you need to switch back, use the Custom Views feature to return to this view.
This method is perfect if you need to frequently switch between different column layouts for various tasks.
Method 5: VBA Macro

If you're comfortable with programming, a VBA macro can automate the process of hiding or deleting columns beyond a certain point:
Sub EndAtColumn()
    Dim lastCol As Long, col As Long, desiredCol As Long

    ' Set the desired last column
    desiredCol = 10 ' This is column J

    ' Get the last used column in the worksheet
    lastCol = ActiveSheet.Cells(1, Columns.Count).End(xlToLeft).Column

    ' Hide or Delete Columns
    For col = desiredCol + 1 To lastCol
        Columns(col).EntireColumn.Delete 'or .Hidden = True
    Next col
End Sub
This macro will delete or hide columns beyond column J in your active worksheet.
👉 Note: Macros can be powerful but use them cautiously, as they can alter your data. Always ensure you have backups or the ability to undo changes.
Wrapping Up

Managing Excel sheets to end at a specific column can significantly enhance your data handling, presentation, and analysis. By applying one or more of these methods, you can tailor your Excel environment to suit your current needs, improve performance, and reduce visual clutter. Remember, the goal is to make your work with Excel as efficient and effective as possible, and these techniques give you the flexibility to do just that.
Why should I limit the columns in my Excel sheet?

+
Limiting columns can improve file performance, reduce clutter, make navigation easier, and present data more clearly for specific tasks or audiences.
Can I still recover hidden columns in Excel?
+
Yes, hidden columns can be unhidden by selecting the columns on either side, right-clicking, and choosing “Unhide.”
Is it possible to dynamically hide columns based on data?

+
While Excel doesn’t support true dynamic column hiding, you can use conditional formatting to highlight or VBA macros to hide/show columns based on data criteria.
What’s the difference between hiding and deleting columns?

+
Hiding columns keeps the data intact but out of view, while deleting removes the data entirely from the workbook, freeing up space but potentially losing information if not careful.
How do I know if a column is hidden or not?

+
Excel indicates hidden columns by showing a double line between column headers where the hidden column is located. You can also right-click and check the “Hide” option to see if it’s active.


