Create a Password-Protected Excel Sheet in Minutes

Securing sensitive data is crucial in today's digital age. Whether you're managing financial data, HR documents, or personal records, Excel offers a straightforward method to protect your spreadsheets. This guide will walk you through the process of creating a password-protected Excel sheet in just a few minutes. Let's dive in.
Why Password-Protect Your Excel Sheets?

Before we delve into the steps, understanding the importance of securing your Excel sheets is vital. Here are several key reasons why:
- Prevent Unauthorized Access: Locking your Excel files with a password ensures that only those who know the password can access the data.
- Protect Data Integrity: You can prevent accidental or intentional changes to critical data by locking sheets or entire workbooks.
- Comply with Privacy Regulations: If you handle personal or sensitive information, password protection can help meet legal requirements.
- Maintain Confidentiality: Keep business strategies, financial figures, or any confidential information private from competitors or unauthorized parties.
Step-by-Step Guide to Password-Protecting Your Excel Sheet

Creating a password-protected Excel sheet is simple. Here’s how you can do it:
1. Opening Microsoft Excel

Open Microsoft Excel on your computer or through Microsoft 365 online. Ensure you have the workbook or sheet that you wish to protect ready.
2. Encrypting Your Excel Workbook

To encrypt the entire workbook with a password:
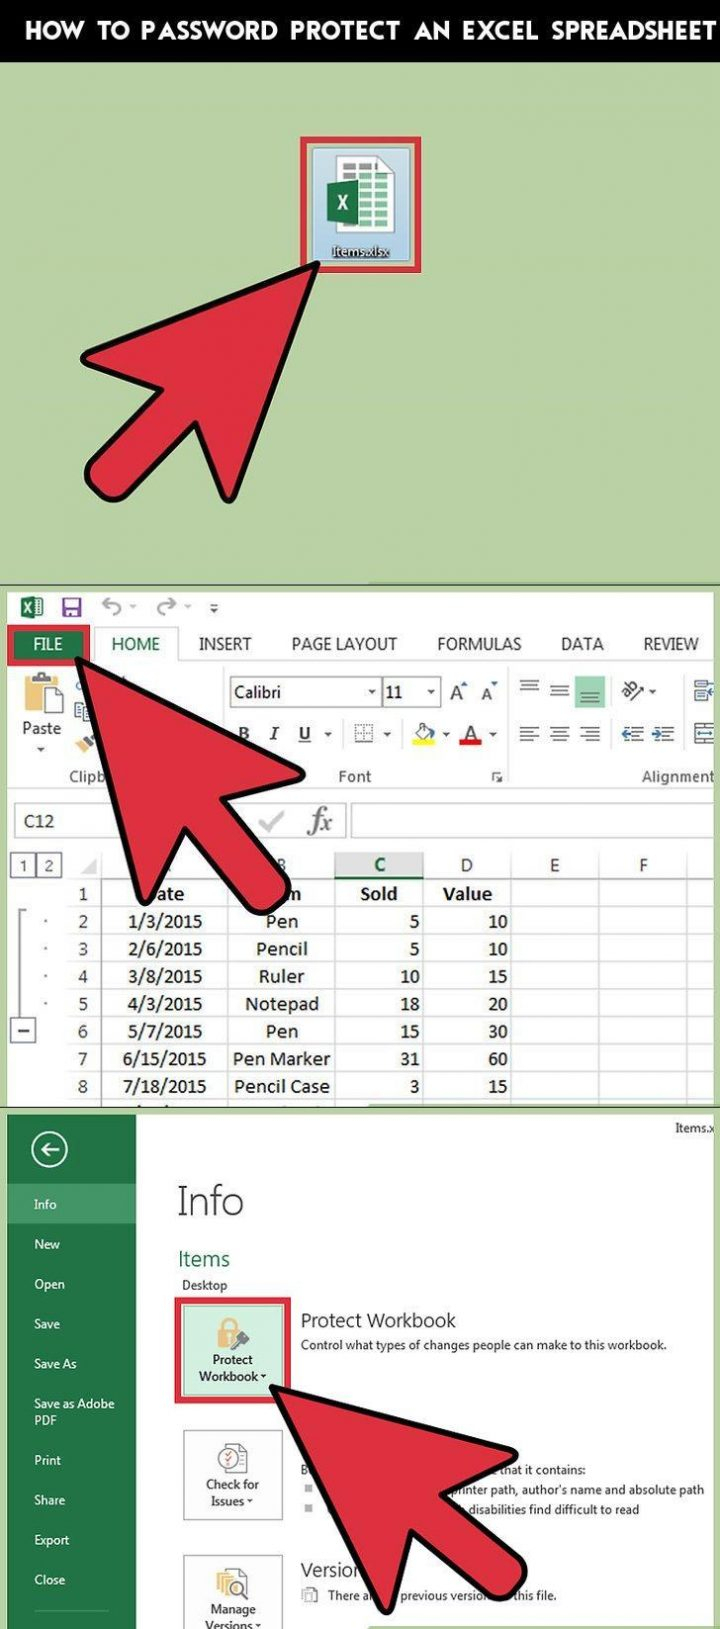
- Go to File > Info.
- Select Protect Workbook.
- Click Encrypt with Password.
- Enter your desired password in the dialog box. Remember to use a strong password.
- Re-enter the password to confirm and click OK.
⚠️ Note: Losing your password means you can’t access the workbook again. There is no built-in recovery option from Microsoft.
3. Protecting Specific Sheets

If you only need to lock certain sheets within a workbook:
- Open the worksheet you want to protect.
- Go to the Review tab on the ribbon.
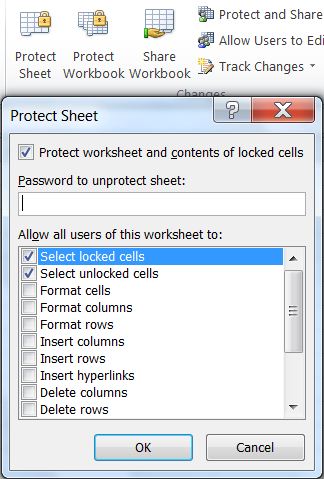
- Click on Protect Sheet.
- In the dialog box, you can set a password. Additionally, customize what users can or cannot do (like selecting locked or unlocked cells, formatting cells, etc.).
- Click OK to finalize the protection.
📝 Note: For more granular control, you can also allow certain cells to remain editable by protecting those cells specifically before locking the entire sheet.
4. Saving Your Password-Protected Excel File

After setting your protections:
- Go back to File > Save As.
- Choose where you want to save the file.
- Ensure you select a format that supports password protection (like .xlsx).
- Click Save.
Remember, once you've saved a workbook with password protection, you'll need to enter the password each time you open it to view or edit the data.
FAQs about Password-Protecting Excel Sheets

Can I recover a lost password for an Excel file?

+
No, there’s no built-in way to recover or reset a forgotten password in Excel. Always keep your passwords secure and in a safe location.
What happens if I forget the password?

+
If you forget your password, the data in the Excel sheet will be effectively lost to you. There are third-party tools that claim to unlock files, but they might not work, and using them carries security risks.
Is the password protection in Excel secure?

+
Excel’s password protection uses encryption algorithms like AES, which provides a reasonable level of security against casual prying, but it’s not foolproof against professional cracking attempts or advanced tools.
How can I share a password-protected Excel sheet?

+
You can share the password-protected file via email, cloud storage, or any other medium. Remember to share the password separately or securely with those who need access.
Can I protect only specific cells instead of the entire sheet?

+
Yes, before protecting a sheet, you can lock only specific cells by selecting them, right-clicking to format, and checking the “Locked” option. Then, when you protect the sheet, only those cells will be protected.
In summary, password-protecting your Excel sheets is a smart way to safeguard your data. By following the steps outlined, you can ensure that your sensitive information stays confidential. Remember, however, that while Excel’s password protection provides a basic level of security, it’s always advisable to use strong passwords and consider additional security measures for critical data.


