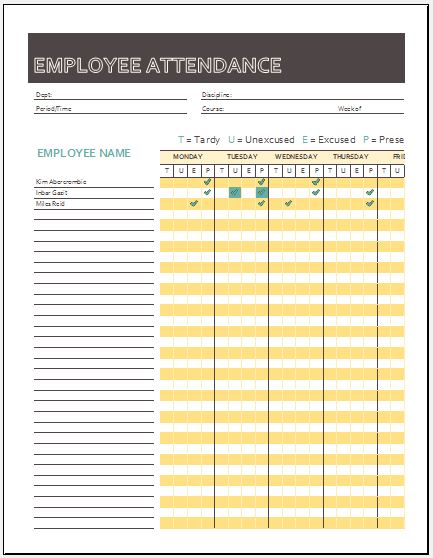
How to Make an Office Attendance Sheet in Excel

Creating an office attendance sheet in Microsoft Excel is a streamlined way to keep track of employee attendance, offering clarity and consistency in attendance management. This guide will walk you through the steps to make an effective office attendance sheet, ensuring you can monitor absences, tardiness, and other attendance metrics seamlessly.
Understanding the Basics of Excel

Before diving into creating the attendance sheet, it's worth noting that:
- Excel is not just a calculator; it's a powerful data management tool.
- Familiarity with basic Excel functions like cell formatting, formulas, and data validation will significantly speed up the process.
Step-by-Step Guide to Creating an Attendance Sheet

1. Setting Up Your Spreadsheet

Open Excel and start with a blank workbook:
- Name your first sheet: ‘Attendance Sheet’ or similar.
- Adjust column widths for better readability:
- Drag the line between column headers to expand or contract column width.
- Right-click the column header, select ‘Column Width’, and input a specific value.
2. Inputting Basic Information

Set up the following headers in the first few rows:
| Cell | Data |
|---|---|
| A1 | Employee Name |
| B1 | Date |
| C1 | Present |
| D1 | Late |
| E1 | Leave |
| F1 | Excused Absence |
| G1 | Unrequested Leave |

3. Formatting the Sheet

To enhance readability:
- Highlight the header row with a different background color.
- Bold the header text and center align it.
- Add borders to cells for a more organized look.
4. Creating Date Drop-Down Lists

To ensure dates are entered correctly:
- Select cell B2.
- Go to Data > Data Validation > Settings > Allow > Date.
- Set the start date for the calendar year or month and an end date (e.g., ‘1-Jan-2023’ to ‘31-Dec-2023’).
- Click OK to apply the drop-down.
⚠️ Note: This drop-down will make input easier but isn’t mandatory for simple tracking.
5. Adding Formulas for Attendance Metrics

To automate calculations:
- In F2, type this formula for the total number of days an employee was present:
=COUNTIF($B$2:$B$100,"P") - In G2, to count the days late:
=COUNTIF($B$2:$B$100,"L") - Continue this pattern for other attendance metrics.
6. Protecting Your Attendance Data

To prevent unauthorized changes:
- Select all cells you want to lock (e.g., B2:G100).
- Go to Home > Cells > Format > Format Cells.
- In the Protection tab, ensure ‘Locked’ is checked.
- Back in Excel, go to Review > Protect Sheet, set a password, and optionally allow certain actions.
The recap of key points:
- Excel Knowledge: Basic understanding of Excel’s functions.
- Data Entry: Proper formatting and data validation enhance accuracy.
- Protection: Protecting the sheet ensures data integrity.
Can I customize the attendance sheet for different shifts or departments?

+
Yes, you can easily customize the sheet by adding additional columns or tabs for different shifts or departments.
How can I automate updates for new entries?

+
You can use Excel’s features like ‘Data Validation’ or VBA scripting to automate updates. Also, setting up pivot tables or named ranges can help with data sorting and updates.
What if I need to track specific leave types?

+
Add separate columns for each leave type (e.g., sick leave, vacation, etc.). Use data validation to ensure users enter only the approved leave types.
How do I manage historical attendance data?

+
Create separate sheets for each year or month, or use dynamic named ranges to pull data from multiple sheets into a summary.


