5 Steps to Convert Excel Data into Mailing Labels

In today's digital era, handling data efficiently is crucial for businesses of all sizes. Excel, Microsoft's powerhouse spreadsheet application, is a widely used tool for organizing and analyzing data. However, when it comes to transforming this data into practical applications like mailing labels, many users find the transition challenging. This guide will walk you through five straightforward steps to convert your Excel data into mailing labels, making your data work for you beyond the spreadsheet.
Step 1: Prepare Your Excel Data

Before you can print mailing labels, ensure your Excel data is ready:
- Data Validation: Check for errors or missing information in your dataset. Labels require specific details like names, addresses, and postal codes.
- Data Structure: Organize your data in a columnar format where each column represents a field (e.g., Name, Address, City, State, ZIP Code).
- Column Headers: Use clear and consistent headers for your data columns. This will help in mapping data during label creation.
💡 Note: Ensure all data is standardized, especially postal codes and addresses, to avoid mailing issues.
Step 2: Export or Copy Data from Excel

Now that your data is set, you’ll need to get it into a format compatible with label printing software or your printer’s software:
- Exporting: In Excel, you can export your data as a CSV file, which can be easily imported into other applications.
- Copy-Pasting: Alternatively, select all the relevant data in Excel, copy it, and paste it into a document or software where labels can be created.
Step 3: Choose the Right Label Printing Software

You have several options for creating labels:
- Microsoft Word: Comes with built-in tools for creating labels from Excel.
- Label Printing Software: There are dedicated programs like Avery Design & Print, Brother, or Labelwriter that offer more customization.
- Online Tools: Websites like OnlineLabels or Canva allow you to design labels online and download them for printing.
Select the tool that best fits your needs in terms of customization, integration with Excel, and printing capabilities.
Step 4: Create and Design Your Labels

With your data ready and software chosen:
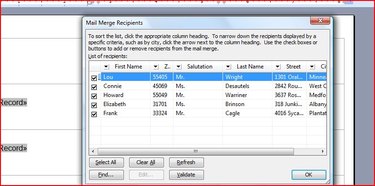
- Import Data: If using Word or similar software, use the mail merge feature to import your Excel data.
- Design: Choose a label template or design your own, ensuring that the layout accommodates your data fields.
- Formatting: Adjust font sizes, spacing, and alignment for readability and aesthetics.
Remember to check the preview of your labels before printing to ensure all data is correctly placed.
Step 5: Print Your Labels

Once you’re satisfied with your label design:
- Print Settings: Ensure your printer is set to the correct label size and type to avoid misalignment or printing issues.
- Label Sheet: Use high-quality label sheets, and make sure they are properly loaded in your printer.
- Print Test Page: Consider printing a test page first to check alignment, particularly if it’s your first time or you’ve changed settings.
This guide has equipped you with a thorough understanding of how to transform your Excel data into mailing labels. By ensuring your data is well-prepared, choosing the right tools, and executing a careful design and printing process, you can efficiently create labels that not only look professional but also function effectively. Leveraging these steps ensures that your data from Excel can be seamlessly integrated into your business processes, enhancing communication, marketing efforts, and operational efficiency.
What if my Excel data contains errors?

+
Ensure to validate your data before proceeding. Tools like Excel’s data validation can help identify and correct errors. Consider using formulas like VLOOKUP or conditional formatting to highlight issues.
Can I use Excel to print labels directly?

+
While Excel doesn’t have a direct label printing feature, you can export data from Excel and use Word or other software for label printing.
How can I ensure the labels fit exactly?

+
Use label templates provided by your label sheets manufacturer. Adjust the printer settings for exact dimensions and print a test page to check alignment.
Can I use free tools for label printing?

+
Absolutely! Tools like Google Docs, Canva, or some online label printing websites offer free options for basic label design and printing.
What should I do if my labels misalign during printing?

+
Check your printer settings for correct paper size and alignment. Ensure your label sheet is properly loaded, and consider printing a test page to adjust manually.


