Transfer Data Between Excel Sheets: Easy Steps

Transferring data between Excel sheets is a fundamental skill for anyone dealing with data analysis, accounting, or any task that requires manipulation of datasets in Microsoft Excel. Whether you're managing sales figures, organizing financial data, or simply keeping track of project timelines, knowing how to seamlessly move data between sheets can streamline your workflow. Here, we'll explore the different methods to transfer data, providing both basic and advanced techniques to suit various needs.
Basic Techniques for Data Transfer

Copying and Pasting Data
- Select Cells: Click and drag to select the cells you wish to copy.
- Copy: Right-click and choose "Copy," or press Ctrl + C.
- Navigate: Move to the sheet where you want to paste the data.
- Paste: Right-click and select "Paste" or press Ctrl + V.
This method is straightforward but not ideal for large datasets or frequent data updates.
Drag and Drop

If both sheets are visible:
- Select Data: Highlight the cells you want to move.
- Hover Over: Position your cursor over the edge of the selected area until the cursor changes to a cross with an arrow.
- Drag: Click and drag to the target sheet's cell.
- Drop: Release the mouse button to drop the data in place.
📌 Note: Ensure your source and destination sheets are arranged side by side for ease of drag and drop.
Using Formulas for Dynamic Data Linking

For situations where data needs to update automatically:
- Cell Reference: Simply type
='SourceSheetName'!CellReferenceto link data. For example,=Sheet1!A1will link to cell A1 in Sheet1. - Array Formula: Use
=SourceSheetName!Rangeto link an entire range. Replace "SourceSheetName" and "Range" with appropriate values.
Named Ranges

| Step | Description |
|---|---|
| 1. Define Range | Select the data you want to reference and name it under Formulas > Define Name. |
| 2. Use Named Range | In another sheet, type =NamedRange where "NamedRange" is the name given to your range. |

🔍 Note: Named ranges make formulas cleaner and easier to understand.
Advanced Techniques for Data Transfer

Using Excel's Power Query

For complex data transformation and integration:
- Import data from various sources, including different Excel sheets.
- Transform and shape data with Power Query Editor.
- Link this data to a new Excel sheet for reporting.
Power Query allows you to refresh data, ensuring your reports are always current with the source data.
Using Excel VBA (Visual Basic for Applications)

Create macros for repetitive data transfer tasks:
- Open VBA Editor with Alt + F11.
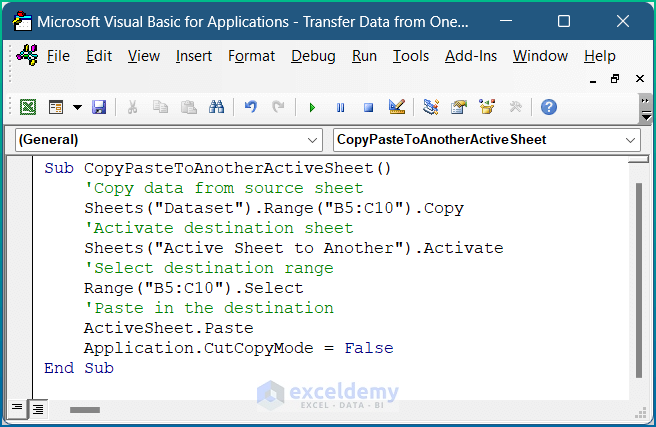
- Insert a new module, and write your macro code:
Sub TransferData()
    Dim sourceSheet As Worksheet
    Dim targetSheet As Worksheet
    Set sourceSheet = ThisWorkbook.Sheets("Sheet1")
    Set targetSheet = ThisWorkbook.Sheets("Sheet2")

    sourceSheet.Range("A1:B10").Copy Destination:=targetSheet.Range("A1")
End Sub
Run this macro to transfer data automatically.
In summary, transferring data between Excel sheets can be accomplished through a variety of methods, each with its own advantages:
- Copy and Paste: Simple for one-time transfers.
- Drag and Drop: Useful for small datasets.
- Formulas: Ideal for live data links.
- Power Query: Best for complex data integration and updates.
- VBA: Automates repetitive tasks.
By mastering these techniques, you can enhance your efficiency in handling data in Excel, reducing manual work and improving accuracy.
Can I transfer data between Excel files as well as sheets?

+
Yes, you can use similar techniques to transfer data between Excel files. Ensure both files are open, and use cell references or Power Query to link data across workbooks.
How often can I update data using Power Query?

+
You can set Power Query to refresh data manually, automatically when opening the workbook, or at timed intervals through Excel’s Data Model options.
What are the limitations of using VBA for data transfer?

+
VBA macros run on the computer where the workbook is opened, which might not work on shared environments or cloud platforms like Office 365 without additional setup.


