5 Simple Steps to Print Your Excel Sheet Easily

Whether you are a student, a professional, or simply someone who loves organizing data, Microsoft Excel is likely a tool you've turned to time and again. Excel's versatility and functionality make it indispensable, but despite its many features, a common task that still trips up users is printing a spreadsheet correctly. You want your Excel sheet to look just as good on paper as it does on your screen, so here are five straightforward steps to print your Excel sheet effectively:
Step 1: Prepare Your Spreadsheet

- Start with a clean slate by reviewing your data for accuracy. Ensure that there are no unintentional blank columns or rows, as these can result in unnecessary pages being printed.
- Consider the page breaks. Use Excel’s ‘Page Break Preview’ feature to visually adjust where pages will break, helping you optimize your layout to avoid awkward splits across pages.
- Check for merged cells which might distort when printed. If possible, unmerge and adjust content or column widths to maintain readability.
- Adjust print settings like scaling or fit to page if your sheet is too large to fit within the margins or page size.
🔍 Note: Make sure you’ve checked all headers, footers, and any special formatting before you start this step.
Step 2: Configure Print Area

Here, you’ll determine what part of your Excel sheet actually needs to be printed.
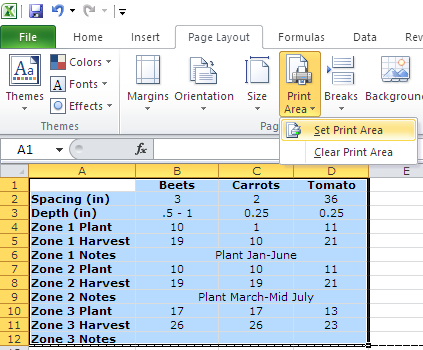
- Go to the ‘Page Layout’ tab.
- Click on ‘Print Area’ in the ‘Page Setup’ group.
- Select ‘Set Print Area’ to define the range of cells you want to include on your printout.
- If you have multiple non-adjacent ranges to print, you can hold Ctrl while selecting different areas, then set them all at once.
📌 Note: If you frequently print the same range, you can save the print area for future prints.
Step 3: Access Print Preview

Previewing your sheet before printing helps to catch any formatting issues that could look wrong on paper.
- Navigate to the ‘File’ tab.
- Click on ‘Print’ to open the Print Preview screen.
- Here, you can examine how your data will appear. You might need to adjust the scaling, margins, or choose different print options.
🔍 Note: The Print Preview is your friend; it’s better to catch issues here than waste paper on a misprinted sheet.
Step 4: Page Setup Customization

Customizing your page setup is key to ensuring everything prints exactly as intended.
- From the ‘Page Layout’ tab, go to ‘Margins’, ‘Orientation’, and ‘Size’ to adjust these settings according to your needs.
- Set headers and footers if you need them, or clear them if they’re not required.
- Modify the print quality or color options based on your printer capabilities.
Step 5: Final Check and Print

This is where you make the final adjustments and print your document.
- Go back to the ‘Print Preview’ to review your work.
- Use the ‘Print Titles’ feature to ensure that headers and column labels repeat on each page if your data spans multiple pages.
- Select the appropriate printer from the list if you have multiple devices connected.
- Choose the number of copies, print range, and other specific options as needed.
- Finally, click ‘Print’ to get the physical copy of your work.
Once you've followed these steps, your Excel sheet should print without any surprises. Remember, the time you invest in preparation pays off by reducing potential issues during the printing process. Whether you're printing for a presentation, record keeping, or for a personal project, a well-formatted Excel printout reflects professionalism and attention to detail.
When you've honed your Excel printing skills, you'll find that it becomes a seamless part of your workflow, ensuring that your data is presented accurately and with the polish that it deserves. Practice, adjust, and you'll master the art of printing in Excel in no time.
Why does my Excel sheet print extra blank pages?

+
Excel may print blank pages if there are empty rows or columns within your print area. Check your print area settings and remove any unnecessary blank cells to avoid this issue.
How do I print just one part of my Excel sheet?

+
Select the specific range of cells you want to print. Go to ‘Print Area’ in the ‘Page Layout’ tab, and select ‘Set Print Area’. Make sure to clear the print area when done to avoid confusion for future prints.
Can I print my Excel sheet with gridlines?

+
Absolutely. Navigate to ‘Page Layout’ > ‘Sheet Options’, and under ‘Gridlines’, check the box for ‘Print’ to include gridlines on your printed sheet.
Why won’t my Excel sheet fit on one page?

+
If your content doesn’t fit, you can use the ‘Scale to Fit’ options in ‘Page Layout’ to adjust scaling. Alternatively, you can reduce font size, margins, or even split the sheet into multiple pages.
How can I print row and column headings on every page?

+
Go to ‘Page Layout’ > ‘Print Titles’, and under ‘Rows to repeat at top’ or ‘Columns to repeat at left’, select the row or column you want to appear on every page.


