Split Excel Data into Multiple Sheets Easily

Why Split Data into Multiple Sheets?

Data organization in Excel can be quite a challenge, especially when you’re dealing with a large dataset that spans many rows and columns. Here are some compelling reasons to split your data into multiple sheets:
- Improved Readability: By compartmentalizing information, it becomes easier to manage and navigate through your data, reducing the visual clutter and enhancing user experience.
- Efficiency: Splitting data allows for quicker access to specific information, speeding up workflows, especially in collaborative environments.
- Organization: Grouping related data together makes it simpler to perform analyses, create charts, or generate reports on specific subsets of the data.
- Data Analysis: When data is split, analysis can be done in a more focused manner. This can lead to better insights and decisions.
Manual Method to Split Data

If you prefer a hands-on approach, here’s how you can manually split your data:
- Copy and Paste: Select the rows or columns you wish to move and paste them into a new sheet.
- Sorting and Filtering: Use Excel’s sorting or filtering options to isolate the data you want to move, then copy and paste it to a new sheet.
💡 Note: Manual methods can be time-consuming and error-prone, especially with large datasets. Automation is recommended for accuracy and efficiency.
Using VBA for Automating Data Split

For those who are comfortable with VBA (Visual Basic for Applications), automating the splitting process can save a significant amount of time:
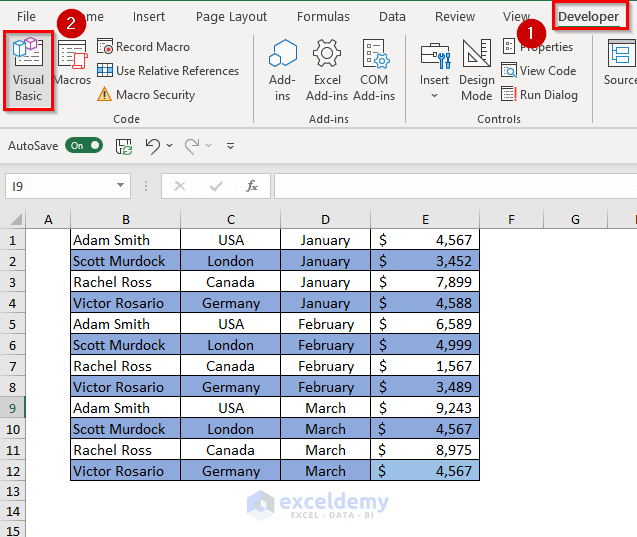
- Open Excel, go to the Developer tab (or enable it from File > Options > Customize Ribbon), and click on “Visual Basic”.
- Create a new module in the VBA editor.
Sub SplitDataByColumnValue() Dim wsSource As Worksheet Set wsSource = ThisWorkbook.Sheets(“Sheet1”) ‘ Change to your source sheet name Dim rngSource As Range Set rngSource = wsSource.Range(“A1:Z100”) ’ Adjust range as necessaryDim i As Long, j As Long Dim criteria As String Dim wsNew As Worksheet Dim dict As Object Set dict = CreateObject("Scripting.Dictionary") ' Loop through each row in the range For i = 2 To rngSource.Rows.Count ' Assume headers are in row 1 criteria = rngSource(i, 1).Value ' Column A as criteria column If Not dict.Exists(criteria) Then ' Create new sheet if not exists Set wsNew = ThisWorkbook.Worksheets.Add(After:=ThisWorkbook.Sheets(ThisWorkbook.Sheets.Count)) wsNew.Name = criteria dict.Add criteria, wsNew.Name ' Copy headers to new sheet wsSource.Rows(1).Copy Destination:=wsNew.Range("A1") Else Set wsNew = ThisWorkbook.Worksheets(dict(criteria)) End If ' Copy current row to the corresponding sheet rngSource.Rows(i).Copy Destination:=wsNew.Range("A" & wsNew.Rows.Count).End(xlUp).Offset(1, 0) Next i MsgBox "Data has been split into multiple sheets successfully!", vbInformation
End Sub
🔖 Note: Ensure your Excel has macros enabled, and remember to save your workbook with a macro-enabled file extension (.xlsm) to retain the VBA script.
Using Excel Functions for Data Splitting

For those not comfortable with VBA, you can use Excel’s built-in functions to achieve similar results:
- Filter: Filter your data by criteria and copy the filtered results into new sheets.
- Advanced Filter: This function allows you to filter unique records, which can be used for splitting data.
Data Validation for Data Splitting

Before splitting data, ensure:
- Data is clean with no duplicate or empty values in your criteria column.
- You have enough space in your workbook to accommodate multiple sheets.
- Your data is consistent in format to avoid errors during the splitting process.
⚠️ Note: Always make a backup of your data before performing any operations that modify your worksheet.
Tips for Efficient Data Splitting

- Automation: Use VBA or Excel functions to automate the process where possible for consistency and speed.
- Data Integrity: Maintain data integrity by ensuring your splits are based on consistent criteria.
- Workbook Organization: Keep your workbook organized by naming sheets clearly and deleting any unnecessary ones.
- Limitations: Be aware of Excel’s limitations regarding the number of sheets per workbook.
In wrapping up our exploration on how to split Excel data into multiple sheets, we’ve covered manual and automated methods, along with tips for efficient data management. Whether you choose to manually divide your data, leverage VBA scripts, or utilize Excel functions, the goal is to make your data more manageable, readable, and analysis-friendly. Remember to ensure data integrity, automate processes for better efficiency, and maintain a clean workbook for better collaboration and analysis.
Can I undo a split in Excel?

+
If you split data using VBA or manual methods, Excel does not provide an automatic undo feature for these operations. You will need to manually combine the data or restore from a backup if you have one.
Is there a limit to how many sheets I can split my data into?

+
The practical limit in Excel is about 255 sheets per workbook. However, remember that with large datasets, splitting can significantly increase the file size, which might affect performance.
What’s the best way to manage multiple sheets after splitting?

+
Group related sheets, color code tab names, and ensure clear and consistent naming conventions. Use Excel’s grouping and outline features to quickly collapse or expand sheets for easy navigation.


