5 Ways to View Excel Sheets Side by Side

When working with multiple Excel spreadsheets, comparing or referencing data across different sheets or workbooks can be a challenge. Fortunately, Excel provides several efficient methods to view sheets side by side, enabling you to enhance your productivity by streamlining your workflow. Here, we'll explore five different ways to achieve this seamlessly.
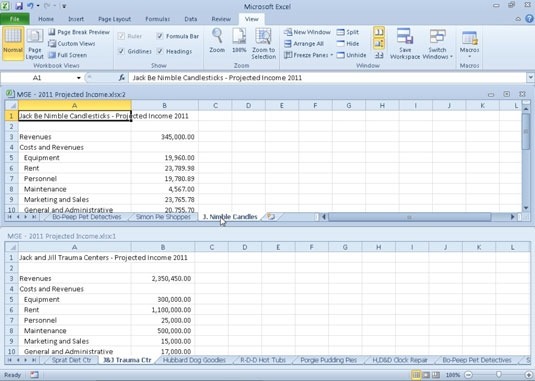
Using the View Side by Side Feature

The View Side by Side feature in Excel allows you to compare two workbooks or sheets at once, which is particularly useful when you need to perform detailed comparisons or copy data from one sheet to another.
- Open both Excel workbooks or sheets you want to compare.
- Navigate to the View tab on the ribbon.
- Click on View Side by Side. If you have more than two windows open, Excel will prompt you to select the one you want to compare with.
- Both workbooks will now appear side by side. If they are not arranged as desired, click on Arrange All to customize their placement.
🖥️ Note: If your workbook has only one window open, the ‘View Side by Side’ option will be grayed out.
New Window for Multiple Instances of a Workbook

Sometimes, you might want to compare different sheets within the same workbook. Here’s how you can open the same workbook in two separate windows:
- Open the workbook.
- Click View > New Window. This action creates a second window of the same workbook.
- Use the View Side by Side method described above to compare these windows.
📖 Note: Remember to save changes in both windows as they are not synchronized live.
Split View

If you need to compare two different parts of the same sheet, Excel’s Split view function is perfect for this:
- Click in the cell where you want the split to appear.
- Go to View > Split.
- Excel will split the window into four panes, allowing you to scroll independently in each pane.
Freeze Panes for Comparison

This method is helpful when you need to keep column or row headings in view while comparing data in other cells:
- Select the row below or column to the right of where you want to freeze the view.
- Click on View > Freeze Panes and choose your option: Freeze Panes, Freeze Top Row, or Freeze First Column.
- With this setup, you can now scroll through other parts of the sheet while keeping important reference data visible.
❄️ Note: Freezing panes affects only the view and not the actual data in the sheet.
Vertical Synchronization (Synchronous Scrolling)

When using the View Side by Side feature, you can enable synchronous scrolling to ensure that scrolling one sheet also scrolls the other:
- After arranging the windows side by side, click Synchronous Scrolling under the View tab. A checkmark next to it indicates it’s active.
- Now, as you scroll through one sheet, the other sheet will scroll in sync.
⚙️ Note: Synchronous scrolling is useful for sheets with similar structures or when you need to compare or match data systematically.
By leveraging these five methods to view Excel sheets side by side, you can significantly streamline your data analysis and management tasks. Each method offers a unique way to compare or work with data, whether you're looking at different workbooks, different sheets within the same workbook, or simply different parts of the same sheet. Remember to save your work frequently when working with multiple windows, as changes in one might not be reflected in the other. These techniques not only boost productivity but also reduce the likelihood of errors due to manual data transfer or comparison.
What is the difference between View Side by Side and Split View?

+
View Side by Side allows comparison of two different sheets or workbooks side by side. Split View, on the other hand, splits a single sheet into multiple panes for viewing different sections simultaneously within the same window.
Can I use these methods on Excel for Mac?

+
Yes, these methods work on Excel for Mac as well, though some ribbon options might be located under different menus or tabs.
How can I disable synchronous scrolling if it’s active?

+
Simply click the Synchronous Scrolling option again from the View tab to remove the checkmark and deactivate it.


