3 Ways to Save Excel Sheets to Your Desktop Instantly

Streamlining Your Workflow: Saving Excel Sheets to Your Desktop in Three Easy Methods

Are you spending too much time navigating through folders just to save a new Excel file? Here, we explore three straightforward methods to save your Excel sheets directly to your desktop, enhancing your productivity and cutting down those extra clicks.
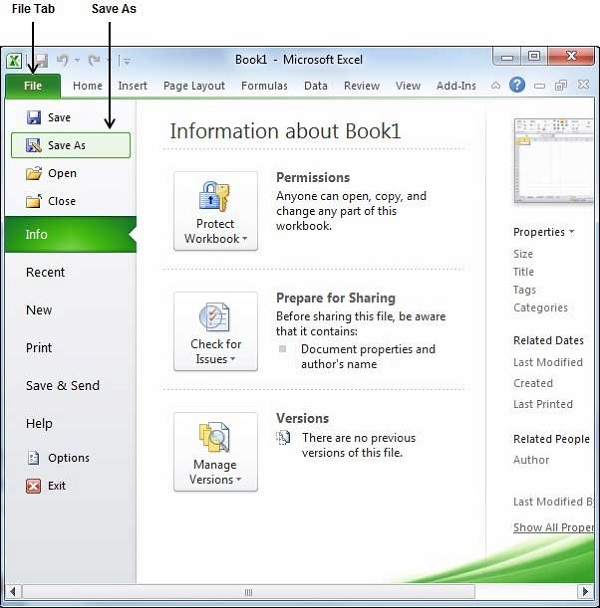
1. The Classic Approach: ‘Save As’ Function

The ‘Save As’ function is the most straightforward method for saving an Excel sheet directly to your desktop:
- Click on File in the top-left corner of your Excel window.
- Select Save As from the dropdown menu.
- Navigate to This PC or Quick Access in the navigation pane.
- Click on Desktop.
- Provide a file name for your Excel sheet.
- Finally, click Save.
🔗 Note: This method ensures that the file is saved to your desktop. However, this approach requires several clicks which can be time-consuming if repeated frequently.
2. Using Keyboard Shortcuts

Keyboard shortcuts can significantly speed up your file-saving process:
- Press Ctrl + S to open the Save dialog box.
- Type the name for your file.
- If you want to save directly to your desktop:
- Windows users: Press Alt + D to go to the Address Bar, type desktop, then press Enter.
- Mac users: Press Shift + Command + D to quickly navigate to the desktop.
- Click Save.
This technique reduces the number of mouse clicks, making it a bit faster than the classic approach.
3. Excel’s ‘Quick Access Toolbar’ Customization

For users who find themselves saving frequently to the desktop, customizing the Quick Access Toolbar (QAT) can streamline the process:
- Right-click anywhere on the Ribbon (the tabs at the top of Excel) and select Customize Quick Access Toolbar… from the context menu.
- From the dropdown menu, select All Commands.
- Scroll down and select Save As.
- Click Add and then OK.
- Now, when you click the ‘Save As’ icon in the QAT, it will open the same dialog as described in method 1, but with fewer clicks.
💡 Note: Customizing the QAT saves time in the long run but requires initial setup. Consider adding this command only if you're a frequent desktop saver.
Choosing the Best Method for You

Each method for saving Excel files to your desktop has its own advantages:
- Using the ‘Save As’ function is the most universal method, but it’s not the quickest.
- Keyboard shortcuts can be a great time saver if you’re accustomed to them.
- Customizing the QAT is excellent for those who save frequently and want to minimize the number of steps involved in saving.
Regardless of your choice, these methods help you save Excel sheets instantly to your desktop, reducing the hassle of navigating through directories.
In your daily Excel workflow, having one or more of these techniques up your sleeve can greatly enhance your productivity. Whether you're a beginner or an Excel power user, these methods will help you keep your files organized and accessible, right where you need them: on your desktop.
Can I save files to the desktop with a single click?

+
While none of these methods provide a single-click solution, customizing your Quick Access Toolbar with the ‘Save As’ command gets you pretty close, as it requires just one click to access the save dialog box, where you can then navigate to your desktop.
Is there a way to auto-save my Excel files to the desktop?

+
Excel does not support auto-saving to a specific location like the desktop by default. However, you could explore third-party tools or scripts that automate saving processes.
Why doesn’t Excel allow me to save directly to the desktop when I click ‘Save’?

+
Excel defaults to the last directory you saved in, which might not be your desktop. You need to use the ‘Save As’ function or keyboard shortcuts to specify the desktop as the save location.


