How to Easily Rename Sheets in Excel 2013

Excel 2013 remains a powerhouse for data manipulation, offering a plethora of features that cater to both beginners and seasoned professionals. Among these features, the ability to rename sheets is seemingly simple but vital for organization. This comprehensive guide will explore various methods for renaming sheets in Excel 2013, ensuring you can maintain a well-organized workbook with ease.
Methods to Rename Sheets in Excel 2013

Here are several straightforward methods to rename sheets in your Excel 2013 workbook:
1. Double-click Method

- Locate the sheet tab at the bottom of your Excel window.
- Double-click the tab you want to rename. This action makes the text editable.
- Enter your new sheet name, ensuring it does not exceed 31 characters, and avoid special characters or reserved names like “History” or “Print_Area.”
- Press Enter or click anywhere outside the tab to finalize the name change.
📝 Note: This method is quick and intuitive, perfect for on-the-spot renaming, but be mindful of accidental clicks which might edit names inadvertently.
2. Right-Click Method

- Right-click on the sheet tab you wish to rename.
- From the context menu, select “Rename.”
- The tab name will become editable; type in your new name.
- Press Enter or click away to save the changes.
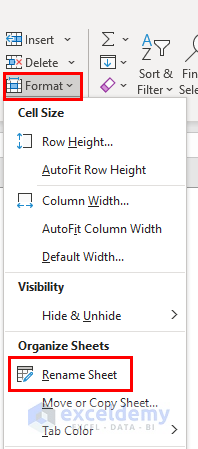
3. Excel Ribbon

- Navigate to the Home tab on the Ribbon.
- Select the sheet you wish to rename by clicking its tab.
- In the Cells group, click on “Format.”
- Under “Organize Sheets,” choose “Rename Sheet.”
- Type the new name and press Enter.
Each of these methods has its benefits:
- The Double-click method is the fastest for quick edits.
- The Right-click method provides additional options like moving or copying sheets.
- Using the Ribbon can be helpful if you're already working with sheet properties.
4. VBA for Bulk Renaming

If you have several sheets to rename, VBA can be your ally:
Sub RenameSheets()
    Dim ws As Worksheet
    Dim i As Integer
    i = 1

    For Each ws In ThisWorkbook.Worksheets
        ws.Name = "Sheet" & i
        i = i + 1
    Next ws
End Sub
To use this:
- Open the Visual Basic Editor (Alt + F11).
- Insert a new module (Insert > Module).
- Paste the above code into the module.
- Run the macro by pressing F5 or selecting "Run Sub/UserForm" from the menu.
🛠️ Note: Macros can automate repetitive tasks but remember to enable macros in Excel's settings for this to work.
Why is Renaming Sheets Important?

Renaming sheets in Excel 2013 offers numerous benefits:
- Organization: Clear, descriptive names make it easier to navigate large workbooks.
- Readability: Names that describe the sheet's content enhance data understanding.
- Collaboration: When sharing workbooks, well-named sheets help others quickly identify relevant data.
- Data Integrity: Preventing accidental overwriting or deletion by ensuring each sheet has a unique, identifiable name.
In conclusion, renaming sheets in Excel 2013 is a fundamental skill for effective workbook management. Whether you're renaming a single sheet or batch renaming several, Excel 2013 provides multiple avenues to do so efficiently. These methods, from simple double-clicking to advanced VBA scripting, offer flexibility and cater to different needs, helping to keep your work organized and professional.
Can I use special characters when renaming sheets?

+
Avoid using special characters like \ / : * ? “ < > | or square brackets [ ]. Excel might allow some, but they can cause issues or be interpreted differently by other software or users.
What’s the limit for the sheet name’s length in Excel?

+
Excel 2013 allows sheet names up to 31 characters long. Keep names concise yet descriptive to maintain clarity.
Can I rename multiple sheets simultaneously?

+
Not natively in Excel 2013. However, you can use VBA scripting to automate the renaming process for multiple sheets, as shown in the guide above.


