Effortlessly Remove Duplicates Across Excel Sheets

Managing Excel spreadsheets can be a daunting task, particularly when working with large datasets across multiple sheets. One common issue users often face is duplicate entries. Identifying and removing these duplicates is essential to maintain data integrity and efficiency. This blog post will guide you through the process of effortlessly removing duplicates across Excel sheets, covering various methods, from manual to automated approaches, to suit different needs and proficiency levels.
Why Removing Duplicates is Important

Before diving into the methods, let's understand why it's crucial to remove duplicates:
- Data Accuracy: Duplicate entries can lead to skewed data analysis, resulting in inaccurate reports or decision-making.
- Data Size Management: Removing duplicates reduces the size of your workbook, making it more manageable and improving performance.
- Data Organization: Cleaner datasets are easier to navigate, analyze, and update.

Manual Methods to Identify and Remove Duplicates

Sometimes, manual inspection is all you need, especially if dealing with smaller datasets or specific cases:
- Using Filters: Filter your data by unique values to highlight potential duplicates visually.
- Conditional Formatting: Highlight duplicate values with specific colors to easily spot them.
⚠️ Note: Manual methods are time-consuming and less effective for large datasets, but they're ideal for small, focused tasks.
Using Excel's Built-in Tools

Excel offers built-in tools that make removing duplicates straightforward:
1. Remove Duplicates Feature

This is one of the most intuitive features for removing duplicates:
- Select the range of cells where you want to remove duplicates.
- Go to the Data tab, click on Remove Duplicates.
- Choose the columns to check for duplicates or let Excel decide based on selected cells.
- Click OK. Excel will remove duplicates, and you'll see a summary of removed entries.
2. Advanced Filter

The Advanced Filter allows for more complex operations:
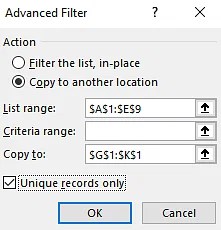
- Select your range, go to Data > Advanced.
- Choose 'Copy to another location' and tick 'Unique records only'.
- Specify the location to copy unique records to, then click OK.
3. Using Excel Formulas

If you need a dynamic solution:
- Use formulas like
=COUNTIF(range, cell) > 1to flag duplicates. - Conditional formatting or helper columns can help visualize duplicates.

Using Power Query for Duplicates Removal

Power Query is a powerful tool for data transformation in Excel:
- Select your data range, go to Data > Get Data > From Table/Range.
- In Power Query Editor, click on Home, then Remove Rows > Remove Duplicates.
- Configure the operation and click Close & Load to apply changes back to Excel.
Macros and VBA

For those comfortable with coding, VBA can automate this process:
Sub RemoveDuplicates()
    Dim ws As Worksheet
    For Each ws In Worksheets
        ws.Range("A1:B" & ws.Cells(ws.Rows.Count, "A").End(xlUp).Row).RemoveDuplicates Columns:=Array(1, 2), Header:=xlYes
    Next ws
End Sub
🧠 Note: This script removes duplicates from columns A and B across all worksheets in the workbook.
When to Use Each Method

Choosing the right method depends on your dataset size, complexity, and frequency of duplicate removal:
- Small Datasets: Manual methods or simple filters.
- Large or Frequent Operations: Use Power Query or VBA for automation.
Common Pitfalls and Tips

Here are some tips to avoid common issues:
- Case Sensitivity: By default, Excel's remove duplicates function is not case-sensitive. Use VBA or conditional formatting if case matters.
- Maintaining Data Integrity: Always make a backup before removing duplicates. Also, consider the impact of removal on related data or formulas.
To sum up, whether you’re dealing with small, occasional clean-ups or large-scale data management tasks, Excel offers versatile tools to effortlessly remove duplicates. From manual checks to automated solutions like Power Query and VBA, you can choose the approach that best fits your data analysis needs. The choice between methods hinges on dataset size, complexity, and your level of comfort with Excel’s features or coding. By understanding these techniques, you not only streamline your data processing but also enhance the accuracy and efficiency of your work, ensuring your spreadsheets remain organized and reliable.
Can I remove duplicates from multiple columns at once?

+
Yes, Excel’s Remove Duplicates feature allows you to select multiple columns. When you do, Excel will remove rows where the combination of the selected columns contains duplicate entries.
How can I ensure that case sensitivity is maintained when removing duplicates?

+
Unfortunately, Excel’s built-in functions aren’t case-sensitive when removing duplicates. However, you can use conditional formatting or VBA to address this:
- Conditional Formatting: Highlight duplicates regardless of case then manually review or use macros.
- VBA: Write a script that considers case when checking for duplicates.
What if I need to keep track of how many duplicates I’ve removed?

+
Excel’s Remove Duplicates feature provides a count of removed duplicates. For more detailed tracking:
- Before/After Counts: Count the number of entries before and after removal.
- Log Duplicates: Use helper columns or VBA to log duplicates in another worksheet.


