5 Quick Ways to Remove Blank Rows in Excel

Dealing with datasets often comes with the challenge of cleaning up unnecessary blank rows that disrupt data analysis and visualization in Microsoft Excel. Blank rows not only clutter your spreadsheets but can also interfere with sorting, filtering, and other data operations. Here are five quick and effective methods to remove those pesky empty rows and streamline your work:
Method 1: Use Find & Select Feature

Excel’s “Find & Select” feature can help identify blank rows quickly:
- Select the range of cells or press Ctrl + A to select the entire worksheet.
- Go to the Home tab, in the Editing group, click Find & Select, and then choose Go To Special….
- In the dialog box, select Blanks, and click OK.
- Right-click one of the selected cells and choose Delete, then select Entire row.
Method 2: Employ Filter Functionality

This method filters out blank rows:
- Select your data range or the entire sheet with Ctrl + A.
- From the Data tab, select Filter.
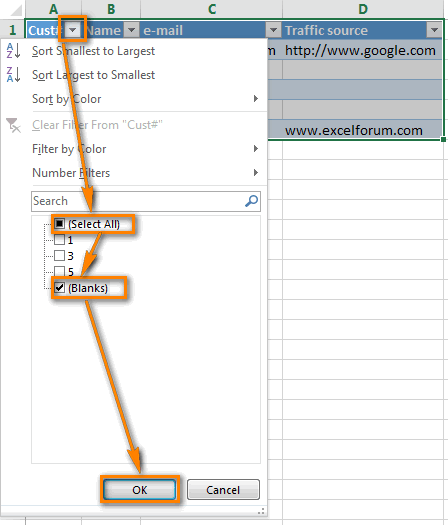
- Click the arrow in the column header of any column, select Filter, then check Blanks.
- Right-click on any row header of the filtered blank rows, and choose Delete Row.
Method 3: Use Excel Formulas

If you are familiar with Excel formulas, here’s how you can remove blank rows:
- Add a column next to your data (let’s say column A).
- In cell A2, enter this formula:
=IF(COUNTA(B2:Z2)=0,ROW(),NA()). - Copy this formula down to the end of your data.
- Select the entire new column A, then press Ctrl + G, click Special…, and select Errors.
- Right-click on the selected cells, choose Delete, and then Entire row.
Method 4: VBA Macro

For repeated tasks, consider using a VBA macro:
- Press Alt + F11 to open the VBA editor.
- Insert a new module (Insert > Module) and paste in the following code:
Sub RemoveBlankRows() Dim ws As Worksheet Set ws = ActiveSheet On Error Resume Next With ws .Rows(“1:1”).Select .Cells.SpecialCells(xlCellTypeBlanks).EntireRow.Delete End With End Sub - Run the macro by pressing F5 or assigning a button.
Method 5: Advanced Filter

Using Advanced Filter can also efficiently remove blank rows:
- Go to Data > Advanced.
- Choose your data range and a criteria range (optional).
- Click Copy to another location, select an output range, and under Unique records only, ensure the box is checked.
- Excel will copy only non-blank rows to the new location.
⚠️ Note: Always ensure you have a backup of your data before performing operations that delete rows or cells to prevent data loss.
By implementing one of these methods, you can clean up your Excel spreadsheets, making them more manageable and easier to analyze. Each technique has its advantages, from the simplicity of the Find & Select feature to the automation capabilities of VBA macros. Choosing the right method will depend on the size of your dataset, your comfort with Excel, and the frequency of this task in your workflow. Keep in mind that with large datasets, methods like VBA macros or advanced filtering might perform better to save time and ensure accuracy.
Can I use these methods to remove blank columns as well?

+
Yes, you can adapt most of these methods to remove blank columns. For example, when using the “Find & Select” feature, choose “Columns” instead of “Entire row” to delete blank columns.
Is there a way to recover deleted rows if I’ve accidentally removed them?

+
Excel doesn’t have an “undo” for row deletion if you’ve closed and reopened the workbook. However, if you still have the same session open, you can use Ctrl + Z to undo actions or check Excel’s version history if available.
Will these methods remove hidden blank rows?

+
Yes, most of these methods will delete hidden blank rows as well. However, be cautious when working with filtered or hidden data, as unintended deletions might occur.


