How to Securely Lock Your Excel Sheets Easily

Excel spreadsheets are powerful tools widely used in businesses, finance, personal budgeting, and various other fields for organizing, analyzing, and storing data. However, protecting the integrity and confidentiality of the information contained within these spreadsheets is crucial, especially when they're shared among team members or circulated beyond your immediate work environment. This guide will walk you through several methods to securely lock your Excel sheets, ensuring your sensitive data remains protected.
Why You Need to Secure Your Excel Sheets

Before diving into the "how," it's worth considering the "why" of securing Excel sheets:
- Data Protection: Prevent unauthorized access to financial, personal, or proprietary information.
- Accuracy: Lock cells to ensure data integrity by preventing accidental changes or deletions.
- Compliance: Many industries require secure handling of sensitive data to comply with legal and regulatory standards.
- Collaboration: Allow for collaborative work while controlling who can edit what parts of the spreadsheet.
Understanding Excel's Security Features

Excel offers various levels of security to lock different parts of a spreadsheet:
- Workbook Protection: Protects the entire workbook from structural changes.
- Worksheet Protection: Locks individual sheets to prevent editing or formatting of cells.
- Cell Locking: Allows you to protect specific cells or ranges within a sheet.
- Password Protection: Encrypts the file or specific worksheets with a password to restrict access.
Step-by-Step Guide to Locking Your Excel Sheets

1. Protecting the Entire Workbook

Here’s how to lock the structure of your workbook:
- Go to File > Info and click on “Protect Workbook.”
- Choose “Protect Structure and Windows.”
- Set a password if desired. Note: Without a password, users can still open the workbook but not make structural changes.
- Click “OK” to apply the protection.
2. Protecting Individual Worksheets

To lock specific sheets within your workbook:
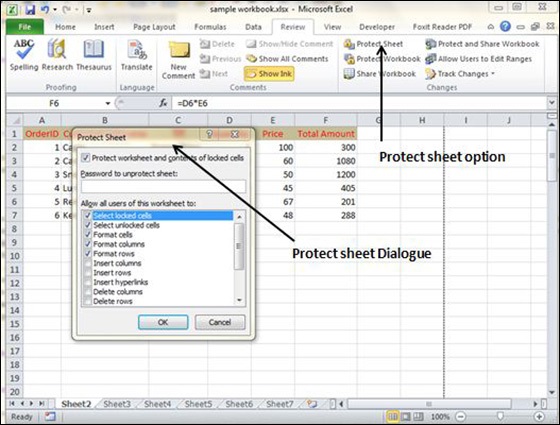
- Right-click on the worksheet tab you want to protect and choose “Protect Sheet.”
- In the dialog box:
- Check the actions you want to allow or disallow.
- Set a password for added security.
- Click “OK.”
🔐 Note: Remember to uncheck “Select locked cells” if you want users to interact with the locked cells in any way.
3. Cell Locking and Range Protection

If you only need to protect specific cells or ranges:
- Select the cells you want to protect. Note that by default, all cells are locked when you protect a sheet, but this doesn’t mean they are secure until you explicitly apply protection.
- Right-click and go to “Format Cells” or press Ctrl + 1, then navigate to the “Protection” tab.
- Uncheck “Locked” for cells you want users to be able to edit.
- After setting the cell properties, protect the sheet as described in step 2.
📝 Note: Cell locking is only effective after the sheet is protected.
4. Advanced Security: Encrypting Your Workbook

For maximum security, encrypt your entire workbook:
- Go to File > Info > Protect Workbook > Encrypt with Password.
- Enter your desired password.
- Confirm the password and save the workbook.
🔑 Note: Encryption will require the password each time the workbook is opened. Lose the password, and you lose access to your data!
5. Handling Permissions

Excel Online (365) users can also manage permissions:
- Use the “File > Share” feature to set different permissions for different users, controlling whether they can view, edit, or comment.
In this modern era, where data breaches are common, securing your Excel spreadsheets is more than a recommendation; it’s a necessity. Excel provides robust tools for locking your sheets, allowing you to manage who can see or modify your data effectively. By following the steps outlined in this guide, you can maintain the confidentiality and integrity of your spreadsheets, ensuring that they serve their intended purpose without risking exposure or tampering.
What is the difference between workbook and worksheet protection?

+
Workbook protection prevents structural changes to the workbook, like adding, deleting, or renaming sheets. Worksheet protection, on the other hand, locks editing capabilities within a specific sheet, allowing users to view but not modify the data.
Can I lock cells without password protection?

+
Yes, you can lock cells without using a password. However, this won’t stop someone from unprotecting the sheet or overriding the settings if they know how. Password protection adds an extra layer of security.
How do I share an encrypted Excel file?

+
Encrypting an Excel file means you must share the password separately from the file itself. Use secure communication channels to transmit the password, like encrypted email or secure messaging apps.


