5 Ways to Safeguard Your Excel Cells

Microsoft Excel is an indispensable tool in various sectors for data management, financial analysis, inventory tracking, and a multitude of other uses. One crucial aspect of using Excel effectively is safeguarding your cells. Ensuring that your data is protected against accidental or unauthorized changes can save hours of rework and prevent data integrity issues. In this comprehensive guide, we'll explore five ways to safeguard your Excel cells effectively.
1. Using Cell Locking


The most straightforward method to protect cells in Excel is by locking them. Here’s how you can do it:
- Select the cells you wish to lock.
- Right-click, choose “Format Cells,” and go to the “Protection” tab.
- Ensure “Locked” is checked.
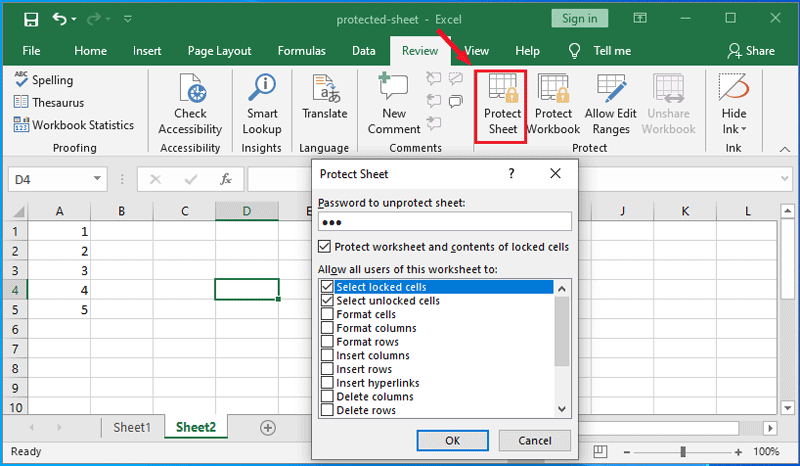
- Protect the sheet by going to “Review” > “Protect Sheet.” Here you can also set a password.
🔒 Note: By default, all cells in Excel are locked, but this only takes effect after sheet protection.
2. Hiding Formulas


Hiding formulas can prevent users from viewing or editing them:
- Select the cell with the formula.
- Go to “Format Cells,” select the “Protection” tab, and check “Hidden.”
- Protect the sheet as described above.
🔍 Note: Hidden formulas will show as ##### when the cell is selected in a protected sheet.
3. Data Validation


Data validation allows you to control what data users can enter into a cell:
- Select the cell(s) where validation is needed.
- Go to “Data” > “Data Validation.”
- Set criteria like List, Date, Number, etc., to limit input options.
📝 Note: This method doesn’t lock cells but ensures data integrity by restricting input values.
4. Password Protecting the Workbook


Protecting the entire workbook provides an additional layer of security:
- Go to “File” > “Info” > “Protect Workbook.”
- Choose an option like “Encrypt with Password.”
This approach ensures that only authorized individuals can access or modify the workbook content.
🔐 Note: Password protection can be bypassed with special software, so it’s not foolproof.
5. Using VBA for Enhanced Security


Visual Basic for Applications (VBA) provides advanced protection:
- Open the VBA editor with “Alt + F11.”
- Create a new module and use VBA to set cell protection, hide formulas, or restrict user access.
- Save and run your VBA script.
| Method | Description | Security Level |
|---|---|---|
| Cell Locking | Basic protection against accidental changes | Medium |
| Hiding Formulas | Protects proprietary or complex formulas | Medium |
| Data Validation | Restricts input to prevent incorrect data entry | Low |
| Workbook Password | Overall protection for the entire file | High |
| VBA Protection | Advanced, customizable protection | Highest |

Understanding and utilizing these protection methods in Excel can significantly enhance the security and integrity of your spreadsheets. Each method offers different levels of security, catering to different needs and scenarios. When implemented correctly, these techniques ensure that your data remains safe from both accidental and unauthorized modifications, which is critical for maintaining data accuracy and confidentiality.
What is the purpose of locking cells in Excel?

+
Locking cells in Excel prevents users from modifying them once the sheet is protected. This is useful for ensuring that formulas or critical data points remain unchanged.
Can data validation be bypassed by Excel users?

+
Data validation can be bypassed if users have sufficient permissions to edit the sheet or workbook without restrictions. However, protecting the sheet can prevent this.
Is there a way to recover a lost workbook password?

+
Excel does not provide native tools for password recovery. Special software might be able to help, but there are no guarantees of success without the original password.


