Print Excel Sheets Centered on Page Easily

When dealing with the intricacies of spreadsheet management in Microsoft Excel, the presentation of your data plays a crucial role. One aspect often overlooked is the printing setup. Ensuring your Excel sheets are printed centered on the page not only enhances readability but also gives your document a professional touch. Here's how you can achieve this effortlessly:
Understanding Page Setup

Before diving into the centering process, familiarize yourself with Excel’s Page Setup options. These settings govern how your worksheet appears when printed. Here’s what you need to know:
- Margins: Define the amount of white space around the edges of your printed page.
- Orientation: Choose between portrait (vertical) or landscape (horizontal) for your printout.
- Scaling: Adjusts the printout size to fit within page margins or reduces/enlarges the printout.
- Print Area: Specifies which range of cells to print.
Adjusting the Page Layout for Centering

To center your worksheet on the printed page, follow these steps:
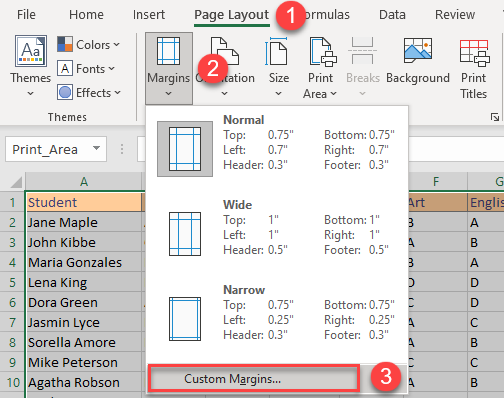
- Open Page Layout: Click on the “Page Layout” tab from the Ribbon at the top of Excel.
- Margins Setup:
- Click on the “Margins” dropdown in the “Page Setup” group.
- Select “Custom Margins” at the bottom.
- In the Page Setup dialog box, check the “Center on page” options for both horizontally and vertically.
- Print Preview: Use Excel’s Print Preview feature to ensure the document appears centered.
⚙️ Note: If your Excel has custom margins already set, selecting 'Custom Margins' will load these settings for your review and adjustment.
Using Excel’s Print Titles Feature

Suppose you have headers or labels in your sheet that you want to be replicated on every printed page. Here’s how to use Print Titles:
- Open Page Layout: Click on the “Page Layout” tab again.
- Print Titles:
- In the “Page Setup” group, click on “Print Titles.”
- In the Page Setup dialog box, go to the “Sheet” tab.
- Under “Print titles,” set the rows or columns you want to repeat at the top or left of each page.
Page Breaks and Fitting on One Page

Sometimes, the challenge is not just centering but also ensuring the data fits on a single page. Here are ways to achieve this:
- Automatic Page Breaks: Excel automatically inserts page breaks based on your print settings, but you can manually adjust them:
- Go to “View” tab, check “Page Break Preview.”
- Drag the blue lines to set custom page breaks.
- Adjust Scaling:
- In the “Page Layout” tab, click on the “Scale to Fit” group.
- Use the “Scale” option to reduce or increase the printout size to fit within page margins.
| Action | Steps |
|---|---|
| Adjust Margins | Page Layout > Margins > Custom Margins |
| Set Print Titles | Page Layout > Print Titles > Sheet Tab |
| Fit on One Page | Page Layout > Scale to Fit > Scale |

💡 Note: Adjusting the Scale to Fit can sometimes reduce readability. Balance scaling with readability when making these changes.
Now that your document is meticulously aligned, the next step is ensuring readability and professionalism in your printouts. The following sections will delve into advanced techniques for controlling the size and appearance of your printed pages, as well as tips on troubleshooting common printing issues in Excel.
Why is my Excel sheet not centered when printed?

+
This can happen if the “Center on page” options are not checked in the Page Setup dialog box. Verify these settings under the Margins tab.
Can I set custom margins in Excel?

+
Absolutely. Navigate to the “Margins” dropdown in the Page Layout tab and select ‘Custom Margins’ to set your preferred margins.
How can I print Excel sheets with headers on every page?

+
Use the “Print Titles” feature to set rows or columns to repeat at the top or left of each printed page.


