Print Entire Excel Sheet on One Page: Simple Tips

If you've ever tried to print an entire Excel sheet only to find that it spills over multiple pages, you're not alone. This can be particularly frustrating when you want a concise document that’s easy to share or present. Fortunately, there are several simple tricks and adjustments you can apply within Microsoft Excel to ensure your worksheet prints out neatly on one page. Whether you're dealing with Excel 2010, 2013, 2016, 2019, or Excel for Office 365, these tips will help you manage your print settings more effectively.
Adjust Page Layout

Before diving into more advanced techniques, consider making some basic adjustments to your Excel sheet’s layout:
- Set Margins: Go to Page Layout > Margins. Select “Narrow” to reduce the default margins or choose “Custom Margins” to set them manually. This can give you more room to print on the page.
- Orientation: Changing your page orientation from portrait to landscape can allow for wider tables and more data per line.
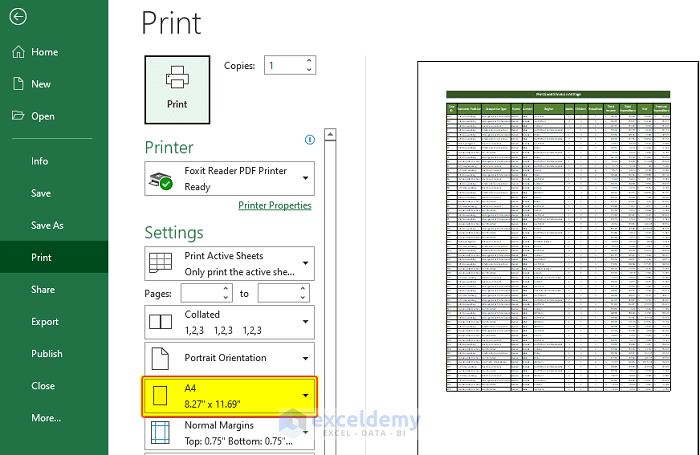
- Page Size: Ensure the paper size in Excel matches the size of paper you’ll use for printing. Go to Page Layout > Size for these settings.
Scale to Fit

The “Scale to Fit” group in the Page Layout tab provides direct control over how your content fits onto a page:
- Width and Height: In Page Layout > Scale to Fit, you can select 1 page wide by 1 page tall. This option ensures that regardless of your data’s actual size, it will be scaled down to fit onto one sheet.
- Adjust Scale: If “1 Page” results in text too small to read, try increasing the scale to a larger percentage or adjust manually until you find an acceptable size.
⚠️ Note: Scaling can affect the readability of your data; ensure text remains clear and legible after scaling.
Reduce Excess Content

Often, there’s unnecessary content that can be removed or adjusted:
- Hide Unneeded Columns/Rows: Right-click on column or row headers, select Hide for any unnecessary data.
- Condense: Use Format Cells to adjust the column width and row height to the minimum needed for readability.
Use Print Preview and Print Area

Before printing:
- Print Preview: Found under File > Print, this function shows you exactly how your data will look on paper. Here you can make last-minute adjustments.
- Set Print Area: To print only a portion of your worksheet, select the cells you want and go to Page Layout > Print Area > Set Print Area.
Optimizing Headers and Footers

Excel allows you to customize headers and footers for your printouts:
- Insert Page Numbering: Add page numbers for documents that span multiple pages.
- Page Names: Include the worksheet name or document title in the header/footer for better document tracking.
- Date and Time: Including a timestamp helps keep track of when the document was last printed.
Advanced Techniques

For more intricate spreadsheets:
- Use Page Breaks: If scaling doesn’t work well, consider inserting manual page breaks to split your data logically across pages. Go to Page Layout > Breaks > Insert Page Break.
- Print Titles: If you need to repeat row or column titles on each page of a multi-page printout, use Page Layout > Print Titles.
After applying these tips, you'll have a much better chance of getting your Excel sheet to print on just one page. Remember, each document might need different settings, so be prepared to experiment. By optimizing your Excel's print settings, you not only save paper but also enhance the clarity and presentation of your work.
What if my data is too large to fit on one page?

+
Consider using print titles, adjusting margins, or splitting your data logically with page breaks. If these don’t work, you might have to condense or restructure your spreadsheet for printing.
How do I ensure that my headers and footers appear on every page?

+
Go to Page Layout > Print Titles. Here, you can set rows or columns to repeat on each page.
Can I change the orientation of just a single page within my Excel workbook?

+
No, page orientation is set at the worksheet level. If you need different orientations within the same document, consider printing specific worksheets separately with different settings.


