3 Easy Tips to Print Oversized Excel Sheets

If you've ever worked with large datasets or complex spreadsheets in Microsoft Excel, you know the challenge of printing oversized Excel sheets can be daunting. Whether it's for a presentation, a report, or to share with colleagues, getting the right fit on paper often involves more than just hitting print. Here are three effective strategies to help you print your oversized Excel sheets with ease and precision:
Adjust Scaling and Margins

The simplest way to manage oversized sheets is by adjusting the scale and margins before you hit print:
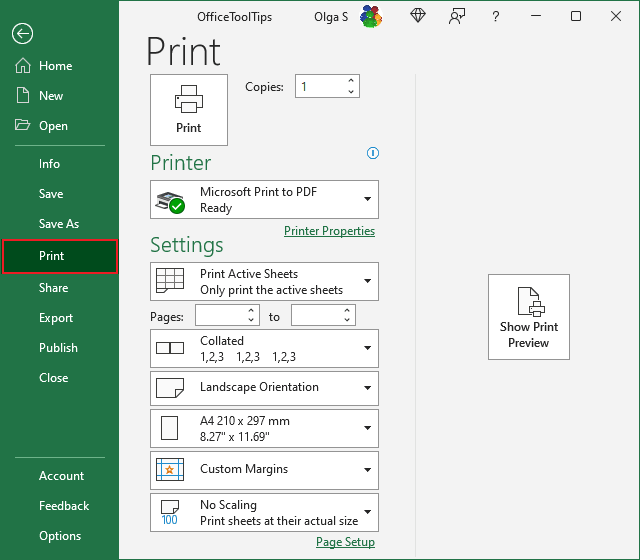
- Select File > Print. The print preview will show you how your sheet will look on paper.
- In the "Print" settings, under "Settings," choose Fit Sheet on One Page. This automatically adjusts the scale to fit all columns and rows on one page.
- To fine-tune further, go to Page Setup:
- Set the orientation to Landscape if it helps fit your data better.
- Adjust the scaling options: you can scale to fit specific number of pages or adjust to a percentage.
- Under the "Margins" tab, narrow the margins as much as possible to increase the printable area.
🚨 Note: Keep in mind that while scaling down can make everything fit, it might render text or numbers too small to read clearly. Always check the preview before printing.
Use Print Areas and Page Breaks

Sometimes, fitting everything onto one page isn’t necessary, and you might prefer to print specific sections. Here’s how you can do that:
- Define Print Area:
- Select the area you want to print.
- Go to Page Layout > Print Area > Set Print Area.
- Insert Page Breaks:
- Select the row or column where you want the break to be.
- Go to Page Layout > Breaks > Insert Page Break.
- Check your print preview to ensure the breaks and print area are set correctly.
Remember, if your data changes, you might need to update your print area or page breaks to match.
Employ Excel’s ‘Print Titles’ Feature

For sheets where you need headers or row labels to repeat on each page, the ‘Print Titles’ feature is your friend:
- Go to Page Layout > Print Titles.
- In the "Page Setup" dialog box, under the Sheet tab, define:
- Rows to repeat at top: Choose which rows (usually column headers) you want to appear on each page.
- Columns to repeat at left: If your data spans multiple pages horizontally, select columns here.
- Click OK to apply the settings.
This feature ensures that as pages print, important identifiers remain visible, keeping your data understandable even when spread over multiple pages.
In conclusion, printing oversized Excel sheets doesn't have to be a headache. By understanding how to scale your document, utilize print areas and page breaks, and make use of print titles, you can significantly enhance the readability and presentation of your printed spreadsheets. These tips not only save you time but also ensure that your data looks organized and professional. Remember, a little preparation before printing can make a big difference in how your data is perceived and understood by your audience.
Can I print Excel sheets larger than A4 size?

+
Yes, Excel allows you to print to larger paper sizes if your printer supports them. Check your printer settings for available paper sizes and select the appropriate one before printing.
How do I know if scaling will affect my data?

+
Always use the print preview feature in Excel. It shows you how the scaled-down sheet will appear, helping you determine if the text or numbers will be legible enough for your purposes.
What if my printer doesn’t support multiple pages?

+
If your printer only supports single-page printing, consider exporting your Excel sheet to PDF and then using print options that might allow you to print across multiple pages or tile the printout to fit.


