Print Full Excel Page on One Sheet Easily

Printing a full Excel sheet on a single page is a common task for many users, often necessitated by the need to present data concisely or for documentation purposes. Microsoft Excel, while powerful in its data manipulation capabilities, can sometimes present challenges when it comes to page layout and printing. This guide will help you master the art of fitting your entire Excel worksheet onto a single printed page efficiently.
Why Fit an Excel Sheet to One Page?

Before we dive into the how-to, let's understand why you might want to do this:
- Presentation Purposes: Reports, presentations, and dashboards often require a full overview of the data to be on one page.
- Documentation: For record-keeping, having everything on one page makes it easier to reference and file.
- Readability: Overcoming the issue of content spillover to multiple pages can be vital for data integrity.
Step-by-Step Guide to Fit Excel Sheet on One Page

1. Using Scale to Fit

The simplest way to fit content to one page is by adjusting the scale:
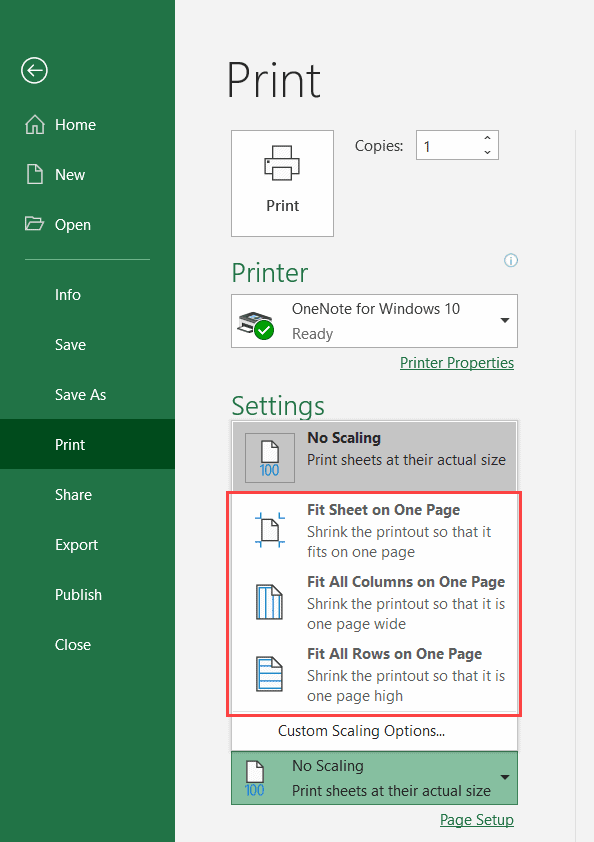
- Click on the ‘File’ tab and then select ‘Print.’
- In the ‘Settings’ section, select ‘Page Setup’ from the drop-down menu next to ‘No Scaling’.
- In the ‘Page Setup’ dialog, go to the ‘Page’ tab.
- Select ‘Fit to’ under the ‘Scaling’ section. Here, you can specify the number of pages wide and tall you want the data to fit within.
- Set the values to 1 page wide by 1 page tall.
- Click ‘OK’ to apply.
⚠️ Note: This method will automatically shrink or expand your print content to fit the selected page dimensions.
2. Manual Scaling

For more control over how content fits:
- Go to ‘File’ > ‘Print.’
- Under ‘Settings,’ choose ‘No Scaling’ or ‘Custom Scaling Options.’
- Adjust the ‘Scale’ percentage manually. A lower percentage reduces the content size to fit, while a higher one enlarges it.
- Preview to see if everything fits on one page.
3. Margins and Orientation

Adjusting margins and page orientation can help:
- Change Page Orientation: Switch to ‘Landscape’ in ‘Page Setup’ for wider spreadsheets.
- Adjust Margins: Reduce margins to increase printable area; access this through ‘Page Layout’ > ‘Margins’ or in the ‘Page Setup’ dialog.
4. Print Area

If not all data is relevant:
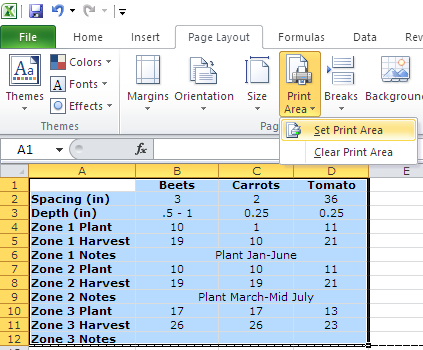
- Select the data you want to print.
- Navigate to ‘Page Layout’ > ‘Print Area’ > ‘Set Print Area’ to define what content to print.
This reduces the amount of data on your printout, making it easier to fit within one page.
5. Using Table Format

Using tables in Excel can organize and potentially shrink data:
- Select the data range and go to ‘Insert’ > ‘Table.’
- Check the box to include headers and adjust styling if needed.
6. Print Preview and Adjust

The ‘Print Preview’ is invaluable:
- Use the preview to gauge how your data will appear.
- Adjust ‘Scale to Fit’, ‘Orientation’, and ‘Print Area’ until content fits perfectly.
In your journey to fit an Excel sheet onto one printed page, consider the following:
📝 Note: Each spreadsheet is unique, and what works for one might not work for another. Always use 'Print Preview' to check your results before printing.
The process of fitting an Excel sheet onto one page involves a blend of manual adjustments, scaling, and smart use of Excel's features. Whether it's for a presentation, documentation, or just ease of reference, this guide provides you with the tools to make your data fit neatly on a single page. Remember to experiment with different settings and always preview your printout to ensure the best results. Embrace the techniques shared here, and let your Excel sheets shine in their single-page glory!
Can I print only a specific part of my Excel sheet on one page?

+
Yes, you can use the ‘Print Area’ feature to select and print only a portion of your sheet. Go to ‘Page Layout’ > ‘Print Area’ > ‘Set Print Area’ to define your selection, then adjust scaling and orientation to fit it within one page.
How can I ensure my Excel sheet prints in high quality?

+
To maintain quality, use ‘Scale to Fit’ or ‘Manual Scaling’ to reduce the size without losing detail. Also, ensure your printer settings are optimized for high-quality output.
What if I need to print in color or grayscale?

+
You can change the print color settings in the ‘Page Setup’ dialog. Navigate to ‘File’ > ‘Print’ > ‘Page Setup’ > ‘Sheet’ tab, and select either ‘Color’, ‘Grayscale’, or ‘Black and White’.


