5 Easy Steps to Create an Attendance Sheet in Excel

Introduction to Creating an Attendance Sheet
An attendance sheet is a crucial document in many work environments, educational institutions, and training sessions, serving as a record of who was present or absent at a given time. Microsoft Excel, with its robust grid and formula capabilities, offers a practical solution for designing a detailed and easy-to-use attendance tracker. Let’s delve into the steps for creating an attendance sheet in Excel.
Step 1: Set Up the Excel Sheet

Begin by opening Excel and creating a new workbook. Here are the initial setup steps:
- Give your sheet a title like “Monthly Attendance Sheet.”
- Adjust column widths for clarity. Date columns should be narrow while name columns might require more width for readability.
Formatting Basics

When setting up the layout:
- Merge and center the title across several columns to make it stand out.
- Use bold and increase font size for the title.
- Apply a fill color to the header row for differentiation.
Step 2: Input Names and Dates

After setting up the layout:
- In the first column, list the names or employee IDs.
- In the second row, list the dates from the first day to the last day of the month or session.
To create a continuous series of dates:
- Enter the first date in the second row, under the title.
- Click on the cell next to it, then go to the Home tab, find Fill under Editing, and choose Series.
- Select Date and specify the unit as Day or Weekday depending on your needs. Set the step value accordingly.
Step 3: Marking Attendance

Now that you have the structure, you can start marking attendance:
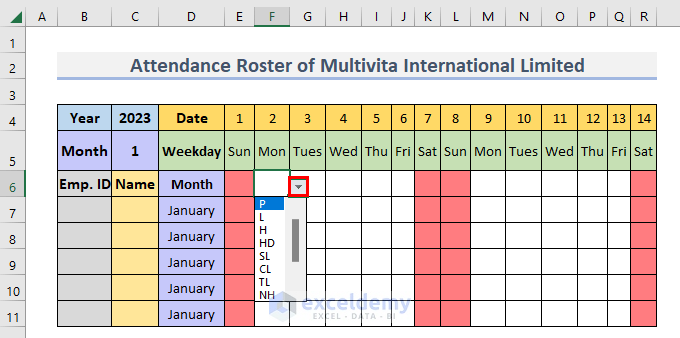
- Choose a system for marking attendance like checkboxes, dropdowns, or simple text entries like "P" for Present, "A" for Absent, or "L" for Late.
- To add dropdown options, go to Data Validation in the Data tab:
- Set up a list with options like "P," "A," and "L."
- Apply this validation to all the relevant cells.
Step 4: Calculating Attendance Statistics

Now, calculate totals for attendance:
- Use formulas to count the number of days present, absent, or late:
=COUNTIF(C3:C31, "P")for the number of times someone was Present.=COUNTIF(C3:C31, "A")for Absent.- Sum these values to get totals, for instance, with
=B3+C3+D3for each employee.
Percentage Calculations

Additionally, you can compute attendance percentages:
- Divide the number of days present by the total number of workdays and multiply by 100 to get the percentage.
- Here's how you might do it:
=(COUNTIF(C3:AM3, "P")/COUNTA(C2:AM2))*100
📌 Note: Ensure you have a consistent method of marking attendance for accurate calculations.
Step 5: Formatting and Final Touches

Finally, improve the visual appeal and usability:
- Change text colors or backgrounds to highlight different statuses (e.g., red for absent, green for present).
- Add borders or outlines to cells for a clear division between sections.
- Use conditional formatting to visually highlight attendance patterns or thresholds, like coloring all cells with less than 80% attendance in red.
| Name | 1/1 | 1/2 | 1/3 | P | A | L | % Attended |
|---|---|---|---|---|---|---|---|
| John Doe | P | P | A | 2 | 1 | 0 | 67% |
| Jane Smith | L | P | P | 2 | 0 | 1 | 100% |

By customizing your attendance sheet with Excel's features, you've created a tool that not only tracks attendance but also allows for analysis and easy comprehension of attendance patterns.
In summary, this guide shows you how to create an attendance sheet in Excel by setting up the layout, inputting data, calculating attendance statistics, and making final formatting adjustments. With these steps, you now have a dynamic tool for tracking attendance that is not only functional but also visually engaging for quick insights.
How can I make my attendance sheet more interactive?

+
You can add interactive elements like Data Validation for drop-down menus, Conditional Formatting for visual cues, or use VBA macros for automating tasks like generating reports or summarizing attendance data.
Can I track multiple events or months on the same sheet?

+
Yes, by adding additional columns for different dates or events. You could also use different sheets within the same workbook for different months or events.
What if I need to account for holidays or non-working days?

+
You can manually enter holidays in the attendance sheet or use conditional formatting to visually indicate non-working days. Alternatively, you could exclude these days from your calculation formulas to accurately reflect attendance.


