5 Easy Steps to Import Data from Database to Excel

Importing data from a database to Excel is an essential skill for business analysts, researchers, and anyone dealing with large datasets. While the process might initially seem daunting, understanding the basic steps can make the transition smooth and efficient. In this comprehensive guide, we'll walk through the five easy steps to successfully import data from a database into Microsoft Excel, ensuring you're well-equipped to streamline your data analysis tasks.
Step 1: Identify Your Database

The first step in importing data into Excel is to pinpoint the exact database from which you’ll be extracting information. Databases come in various types:
- Relational Databases (RDBMS): SQL Server, MySQL, Oracle, etc.
- Non-Relational Databases (NoSQL): MongoDB, Cassandra, etc.
- Cloud Databases: Amazon RDS, Google Cloud SQL, etc.
Make sure you have:
- The correct login credentials, including username and password.
- The server’s location or IP address if it’s not local.
- An understanding of the database structure, including which tables or collections you need to export.
Note: If you’re dealing with cloud databases, ensure you have the necessary permissions to access and query the data.
Step 2: Query Your Data

Once you’ve identified your database, the next step is to craft a query that will extract the data you need. This step involves:
- Writing SQL or NoSQL queries to select, filter, and manipulate data.
- Testing the query to ensure it returns the desired dataset.
- Checking for any data integrity issues or unexpected results.
Here’s an example SQL query for a simple extraction:
SELECT * FROM Employees WHERE Salary > 50000;
💡 Note: Always test your queries in a safe environment to avoid impacting the database or exporting unnecessary data.
Step 3: Export Data to a File

After formulating your query, you need to export the results into a file format compatible with Excel, such as CSV, TXT, or JSON. Here’s how:
- Export to CSV: Most databases support direct export to CSV which can be easily opened in Excel.
- Using Database Management Tools: Tools like phpMyAdmin or SQL Server Management Studio offer export options.
- Manual Export: Run the query and manually save the output.
Here’s an example of a table showing different export methods:
| Database Type | Export Methods |
|---|---|
| SQL Server | Export Data Wizard, BCP Utility |
| MySQL | mysqldump, phpMyAdmin Export |
| PostgreSQL | \pg_dump, pgAdmin Export |

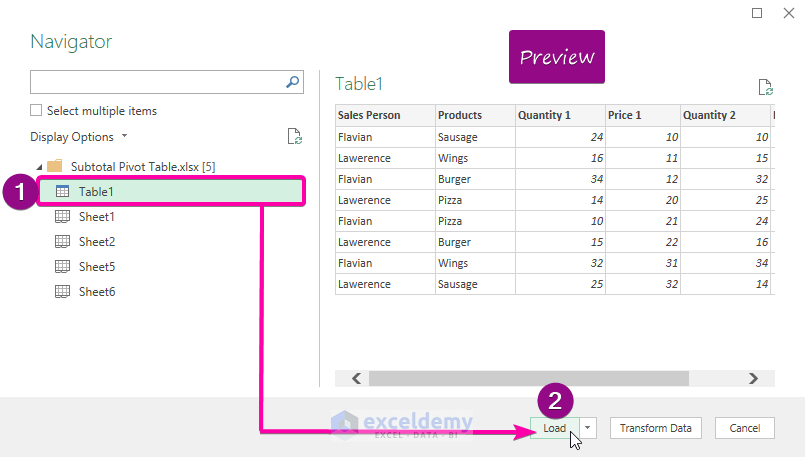
Step 4: Import Data into Excel

With your data exported as a file, you can now import it into Excel:
- Open Excel: Launch Microsoft Excel on your computer.
- Go to "Data" Tab: Click on the "Data" tab on the ribbon.
- Choose "From Text/CSV": If you exported as CSV or TXT. For JSON or other formats, select "Get Data" > "From File."
- Select Your File: Navigate to your exported file and select it.
- Follow Import Wizard: Excel's import wizard will guide you through defining data types, delimiters, etc. Ensure data is correctly formatted during this step.
- Finish Import: Once the import is complete, review the data in Excel for accuracy.
Step 5: Data Validation and Manipulation

After importing the data into Excel, validate and manipulate it to fit your analysis needs:
- Check for Data Integrity: Ensure all data has been imported correctly, no missing or misinterpreted values.
- Data Cleaning: Remove or correct errors, duplicates, or unnecessary columns.
- Data Analysis: Use Excel functions, pivot tables, and charts to analyze and visualize the data.
- Save Your Work: Save the Excel file to preserve your work and data for future use.
Here is a closing thought on the process:
By following these five simple steps, you’ve now successfully imported data from your database into Excel, where it’s ready for further analysis and manipulation. Remember, the key to a smooth import process is understanding your database, crafting the right query, choosing the appropriate export method, and ensuring Excel’s settings align with your data’s needs. While these steps are straightforward, practice will make perfect, and each dataset might require slight adjustments. With these skills in your toolkit, you’ll be better prepared to handle and analyze large datasets, turning raw data into actionable insights.
How do I know if my data has been imported correctly?

+
Check for row and column counts, perform random spot checks on data values, and ensure that data types match your expectations. If possible, export a small subset of data first to verify the import process.
Can I automate this process?

+
Yes, by using scripting languages like Python with libraries like Pandas for Excel manipulation, or using SQL Server Integration Services (SSIS) for automated data extraction, transformation, and loading into Excel.
What should I do if my data contains special characters or formatting?

+
Excel might interpret special characters or formatting in ways that alter the data. Use the import wizard settings to specify delimiters, data types, and formatting to maintain data integrity. If issues persist, consider exporting to a format like JSON or XML which Excel can import more accurately.


