5 Simple Steps for VLOOKUP Between Two Excel Sheets

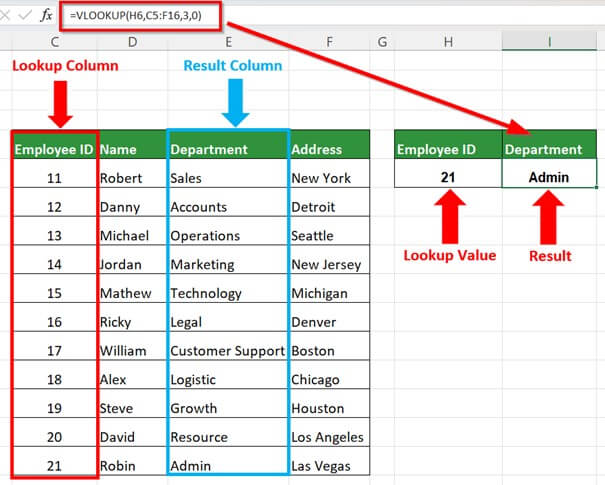
VLOOKUP is one of Excel's most powerful tools for users who need to merge or look up data from two different sheets within the same workbook. It's a lifesaver for data analysts, finance professionals, or anyone dealing with large datasets. This post will guide you through five simple steps to perform a VLOOKUP between two sheets in Excel. We'll explore how to setup, execute, and troubleshoot this common Excel operation, making it easy to manage and analyze your data efficiently.
Understanding VLOOKUP

Before we dive into the steps, let’s understand what VLOOKUP does:
- Search and Retrieve: VLOOKUP searches for a value in the first column of a specified range and returns a value from the same row in another column.
- Two Sheets: You’ll have a source sheet with the data you’re looking up and a destination sheet where you want to display the results.

Step 1: Prepare Your Sheets

Before executing the VLOOKUP, ensure both sheets are properly formatted:
- Check for column headings in both sheets to match data types.
- Ensure the lookup column in the source sheet is sorted if necessary.
Step 2: Write the VLOOKUP Formula

To perform a VLOOKUP:
- Select the cell: In your destination sheet where you want the result to appear.
- Enter the formula:
=VLOOKUP(lookup_value, table_array, col_index_num, [range_lookup]) - Replace the components:
- lookup_value - The value you are looking for in the source sheet.
- table_array - The range in the source sheet containing the data.
- col_index_num - The column number in the source range from which to retrieve the value.
- range_lookup - A TRUE/FALSE value indicating whether you want an exact match (FALSE) or approximate (TRUE).

Step 3: Sheet References

To reference another sheet, use the following syntax:
=VLOOKUP(A2, ‘SourceSheet’!A1:C100, 3, FALSE)🔎 Note: When referencing another sheet, always start with the sheet name followed by an exclamation mark (e.g., ‘SourceSheet’!A1:C100).
Step 4: Drag and Copy

Once your VLOOKUP formula works for one cell, you can:
- Drag the formula down to fill the adjacent cells, or
- Copy and paste it into other cells where you want the same lookup to occur.
Step 5: Troubleshoot and Finalize

If your VLOOKUP isn’t returning the expected results, consider:
- Checking for data type mismatches between sheets.
- Ensuring no extra spaces or formatting issues in the data.
- Verifying that the column index number is correct.
🚨 Note: If your VLOOKUP returns an error like #N/A, double-check the lookup value exists in the source sheet’s lookup column.
Wrapping Up

Mastering VLOOKUP between two sheets can streamline your data management tasks, making it easier to work with large datasets. Remember to organize your sheets, keep your formulas simple, and always double-check your data for accuracy. With these steps, you can confidently use VLOOKUP to enhance your Excel skills and make data manipulation a breeze.
What if VLOOKUP returns #N/A?

+
This error occurs when the lookup value does not exist in the first column of your table array. Ensure the value exists or adjust the formula accordingly.
Can I use VLOOKUP for multiple criteria?

+
VLOOKUP is designed for a single lookup value. For multiple criteria, consider using an array formula or INDEX/MATCH combination.
How can I search for data to the left of the lookup column?

+
VLOOKUP cannot look to the left. Instead, use INDEX and MATCH functions or consider restructuring your data.


