Mastering Excel Validation: Simplify Your Data Checks Now

Mastering data validation in Microsoft Excel can significantly streamline your workflow, reduce errors, and enhance the overall data integrity of your spreadsheets. In this comprehensive guide, we'll delve into how you can set up, customize, and manage data validation rules to ensure your data is always accurate, consistent, and usable.
Why Use Data Validation?

- Prevent Errors: Data validation rules help prevent incorrect data entry, reducing the chances of mistakes.
- Maintain Consistency: Standardize input formats, leading to uniform data entries across your dataset.
- Save Time: By catching errors as they happen, you avoid time-consuming clean-up later.

Setting Up Basic Data Validation

Let's start with the basics of how to set up validation rules:
Step-by-Step Guide:

- Select the cells where you want to apply the validation.
- Go to the Data tab, click on Data Validation.
- In the Settings tab, choose a criteria like Whole Number, Decimal, List, Date, Time, Text Length, or Custom.
- Set the parameters for your criteria (e.g., between 1 and 10 for whole numbers).
- Click OK to save your validation rule.
Customizing Validation with Formulas

For more complex validations, custom formulas can be used. Here's how:
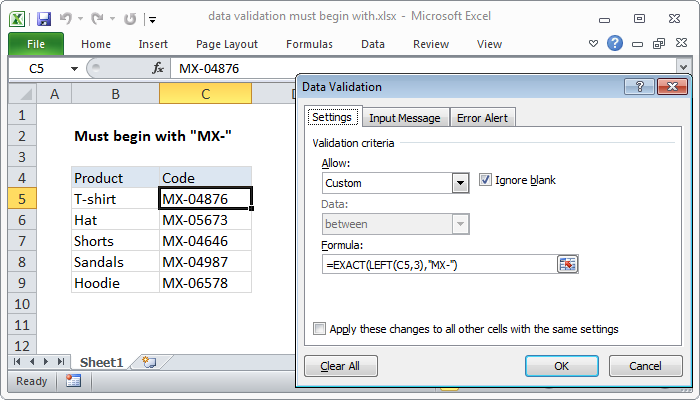
- In the Data Validation window, under Allow, select Custom.
- In the Formula field, enter your custom formula. For example, to ensure a cell is not empty:
=NOT(ISBLANK(A1))
- Click OK to apply the formula.
💡 Note: Custom formulas allow for intricate validation conditions. Use named ranges or Excel functions like AND(), OR(), ISERROR() to make your validations more robust.
Advanced Data Validation Techniques

Creating Dependent Dropdown Lists

To create dropdown lists where the second list depends on the first:
- Setup your main list in one column (e.g., Product Categories).
- In a different range, set up dependent lists for each category.
- Name your dependent lists using a structured naming convention.
- Use the INDIRECT() function in the validation rule to dynamically reference these named ranges.
| Category | Dependent List Name |
|---|---|
| Category A | categoryA_items |
| Category B | categoryB_items |

✅ Note: This setup ensures that selections in the secondary dropdown are valid and relevant, enhancing data accuracy.
Troubleshooting Common Issues

- Circular References: Ensure your formulas don’t create circular dependencies.
- Error Messages: Use the Input Message and Error Alert tabs to guide users.
- Deleting or Moving Data: Always update your named ranges or validation rules when modifying your worksheet structure.
In conclusion, by leveraging data validation, you can maintain high-quality data within your Excel spreadsheets. It simplifies data entry, ensures data integrity, and ultimately saves time in data analysis and reporting. Remember, mastering data validation is not just about setting rules but understanding your data and its flow. With practice, you'll be able to craft precise and efficient validation techniques tailored to your specific needs.
What happens if someone enters data that doesn’t meet the validation criteria?

+
Excel will either display an error message informing the user that the data entered doesn’t match the validation criteria, or it will silently reject the entry, depending on how the error alert is set up.
Can I apply data validation to multiple cells simultaneously?

+
Yes, you can select multiple cells or a range of cells and apply the same data validation rule to all of them at once.
How do I change or remove data validation rules in Excel?

+
To modify or remove a validation rule, select the cells with the rule, go to Data > Data Validation, adjust or clear the settings, and click OK.


