3 Simple Steps to Delete Alternate Rows in Excel

Excel is a powerful tool used by millions for data analysis, project management, and countless other applications. While some tasks like sorting data or summing numbers are straightforward, occasionally, users find themselves needing to perform less common functions, such as deleting alternate rows. This process can be crucial for managing data sets where every other row needs to be removed for clarity or for further analysis. In this guide, we will explore three simple steps to efficiently remove alternate rows from your Excel spreadsheets, enhancing your data management skills.
Step 1: Use Conditional Formatting

Before you dive into deleting, it’s beneficial to visually identify the rows you want to remove. Here’s how you can use Excel’s conditional formatting feature:
- Select the range of cells where you want to apply formatting.
- Go to the ‘Home’ tab, click on ‘Conditional Formatting’, then ‘New Rule’.
- Choose ‘Use a formula to determine which cells to format’.
- Enter the formula:
=MOD(ROW(),2)=0to highlight every even-numbered row. - Choose a fill color that clearly stands out and click ‘OK’.
Now, all even rows will be highlighted, making it easier to decide which rows to delete next.
Step 2: Filter and Delete

With the alternate rows now highlighted, the next step is to filter out these rows for deletion:
- Select your data range.
- Click on the ‘Filter’ icon in the ‘Data’ tab, or use Ctrl + Shift + L as a shortcut.
- Once the filter arrows appear, click the arrow in any column, go to ‘Filter by Color’, and choose the color you used for conditional formatting.
- This will show only the rows that were highlighted.
- Select the visible rows and delete them by right-clicking and selecting ‘Delete Row’ or using Ctrl + -.
- Remember to turn off the filter after deleting the rows by clicking ‘Clear’ in the filter dropdown.
Step 3: Use VBA for Automation

For those comfortable with Excel’s programming capabilities, VBA can automate this process:
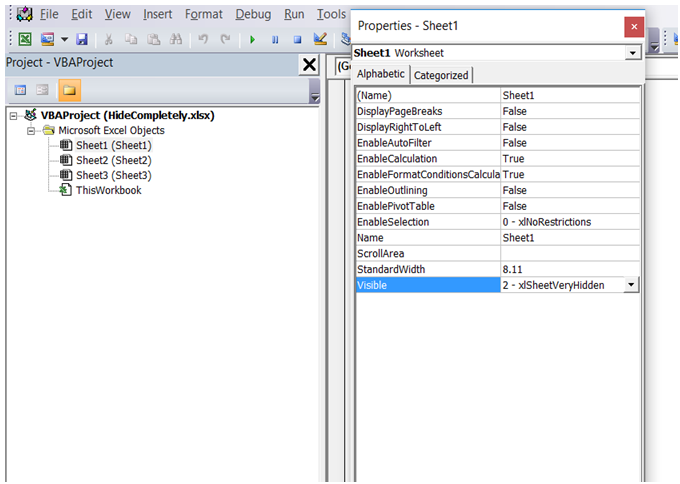
- Open the VBA editor by pressing Alt + F11.
- Insert a new module by selecting your workbook, right-clicking, and choosing ‘Insert’ > ‘Module’.
- Paste the following VBA code into the module:
Sub DeleteAlternateRows() Dim ws As Worksheet Set ws = ActiveSheet Dim lastRow As Long lastRow = ws.Cells(ws.Rows.Count, “A”).End(xlUp).Row Dim i As LongFor i = lastRow To 1 Step -2 ws.Rows(i).Delete Next i
End Sub
- Close the VBA editor.
- Run the macro by going to ‘Developer’ tab, then click ‘Macros’, select ‘DeleteAlternateRows’, and click ‘Run’.
💡 Note: Be cautious with VBA scripts as they can make irreversible changes to your data. Always ensure you have a backup before executing any macros.
By now, you've explored three different methods to delete alternate rows in Excel. Whether you choose manual filtering, VBA automation, or conditional formatting, each method has its unique advantages, allowing you to pick what suits your comfort level and the task at hand. Understanding these techniques can drastically reduce the time you spend on repetitive data cleaning tasks, freeing you up for more strategic analysis. So the next time you're faced with a dataset where every other row needs removal, remember these steps to work smarter, not harder.
Can I undo the VBA script once it’s run?

+
No, VBA scripts typically make immediate and permanent changes. Always backup your data before running scripts.
What if I need to delete every third row instead?

+
Adjust the formula in the VBA script to =MOD(ROW(),3)=0 and change the step in the loop to 3.
Can I save these settings to use later?

+
Yes, save the workbook after adding a macro to reuse the VBA script later. For conditional formatting, you can create and save custom rules in the ‘Manage Rules’ section.


