Copy Excel Formulas to Another Sheet: Master the Move

In the world of spreadsheets, Excel stands as a powerful tool for managing, analyzing, and presenting data. One of the key functionalities that Excel users often need to master is the ability to copy formulas across sheets. Whether you're consolidating financial reports, organizing project timelines, or simply updating a dataset, moving formulas efficiently between sheets can save you hours of repetitive work. This blog post will guide you through various methods to copy Excel formulas, ensuring your data remains consistent and accurate across multiple sheets.
Understanding Excel Formulas

Before diving into the techniques of copying formulas, it’s crucial to understand what they are and how they work. Excel formulas perform calculations using values in cells or ranges, and they can include functions, operators, and references. Here are a few key points:
- Cell References: Formulas can reference other cells or ranges. These references can be relative (adjusts when formula is copied) or absolute (remains unchanged).
- Functions: Excel provides a wide array of built-in functions like SUM, AVERAGE, VLOOKUP, etc.
- Operators: Arithmetic, comparison, and text concatenation operators are used within formulas.
Method 1: Direct Copy-Paste


The most straightforward method to copy a formula is by using the copy and paste function:
- Select the cell containing the formula you want to copy.
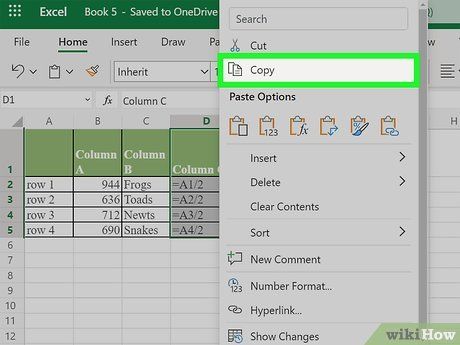
- Press Ctrl + C or right-click and select “Copy.”
- Navigate to the destination cell or range on the new sheet.
- Press Ctrl + V or right-click and choose “Paste Formulas.”
This method works well for small-scale copying but can become cumbersome for large datasets.
🔍 Note: When using Copy-Paste, Excel adjusts relative references automatically, which might not always be desirable.
Method 2: Using Named Ranges

Named ranges simplify formula management across sheets by assigning a name to a cell or range. Here’s how you can leverage them:
- Select the cell or range you want to name.
- Go to the Formulas tab, click on “Define Name,” and provide a unique name.
- Use the named range in your formula. For example, instead of using =A1+A2, you can use =TotalSales.
- Now, when you copy this formula to another sheet, the named range will remain intact, providing consistency.
Method 3: Using Data Consolidation

If you’re dealing with large datasets spread across multiple sheets, Excel’s Data Consolidation tool can be a lifesaver:
- Go to the Data tab and click on “Consolidate.”
- Choose the function you want to use (e.g., SUM, AVERAGE).
- Select the ranges from your sheets. Each range can come from a different sheet.
- Check “Create links to source data” to ensure the consolidation updates as source data changes.
- Excel will create formulas that reference the data from each sheet automatically.
This method is excellent for maintaining dynamic links between sheets, but remember it creates a summary, not an exact replication of formulas.
Method 4: Using External References

When you want to keep your formulas in one place but reference data from another, external references come in handy:
- Click on the cell where you want to insert the formula.
- Start typing the equal sign and navigate to the other sheet by clicking its tab.
- Select the cell or range, and Excel will insert a formula like this: =‘[Workbook]SheetName’!CellReference
- This formula will now reference data from another sheet.
External references are useful for maintaining data integrity when working with multiple sheets or workbooks.
Method 5: Using the Fill Handle

The Fill Handle is an intuitive tool for copying formulas:
- Enter your formula in the first cell of a column or row.
- Drag the Fill Handle (the small square at the bottom right corner of the selected cell) across or down the cells where you want to apply the formula.
- Excel will automatically adjust the formula for relative references.
💡 Note: Ensure that you check the option to “Fill without formatting” if you do not want the formatting copied along with the formula.
Managing Relative vs. Absolute References

Understanding how Excel handles relative and absolute cell references is key when copying formulas:
- Relative References: Adjust when copied, e.g., A1 becomes B1 if moved to the next column.
- Absolute References: Remain constant, e.g., A1 stays the same wherever you copy it.
Using the appropriate type of reference will ensure that your copied formulas yield the correct results in the new context.
Wrapping Up

Copying formulas across sheets in Excel can be done through various methods, each suited to different needs. Whether you choose direct copy-paste, named ranges, data consolidation, external references, or the Fill Handle, understanding how to manage these techniques will significantly enhance your efficiency in data management. Always remember to consider the impact on cell references when moving formulas and ensure data integrity is maintained through proper reference types and dynamic links. By mastering these techniques, you’ll find that working with Excel becomes not just easier, but also more rewarding in terms of productivity and accuracy.
What’s the difference between relative and absolute references in Excel?

+
Relative references change when you copy or move a formula (e.g., A1 becomes A2 if you move it down one cell). Absolute references (A1) do not change, remaining the same wherever you copy or move the formula.
How can I copy a formula to another workbook?

+
You can use external references to link formulas between workbooks. Just navigate to the other workbook when typing the formula, and Excel will automatically create a link to that cell or range.
What should I do if my copied formula references the wrong cells?

+
Check if your references are relative or absolute. If they are relative, Excel might adjust them inappropriately when moved. Use absolute references (A1) if you need fixed references or manually adjust the references after copying.


