5 Ways to Lock Excel Sheet in 2007

Microsoft Excel 2007 provides various ways to protect your spreadsheet from unauthorized changes, ensuring that your data remains secure. Here are five effective methods to lock your Excel sheet, enabling you to maintain the integrity of your work while allowing collaborators to view but not edit critical parts of your document.
1. Password Protection for the Entire Workbook


One of the simplest ways to lock an Excel sheet in Excel 2007 is by setting a password for the entire workbook:
- Click on the “Office Button” in the top-left corner.
- Select “Save As”.
- Choose “Tools” beside the “Save” button.
- Click on “General Options”.
- Enter a password in the “Password to open” field.
- Re-enter the password to confirm, then save the workbook.
🔒 Note: Be careful with password recovery, as Microsoft doesn’t provide a built-in tool to recover passwords if you forget them.
2. Sheet Protection


If you want to protect specific sheets rather than the whole workbook:
- Select the sheet you wish to protect by clicking on its tab.
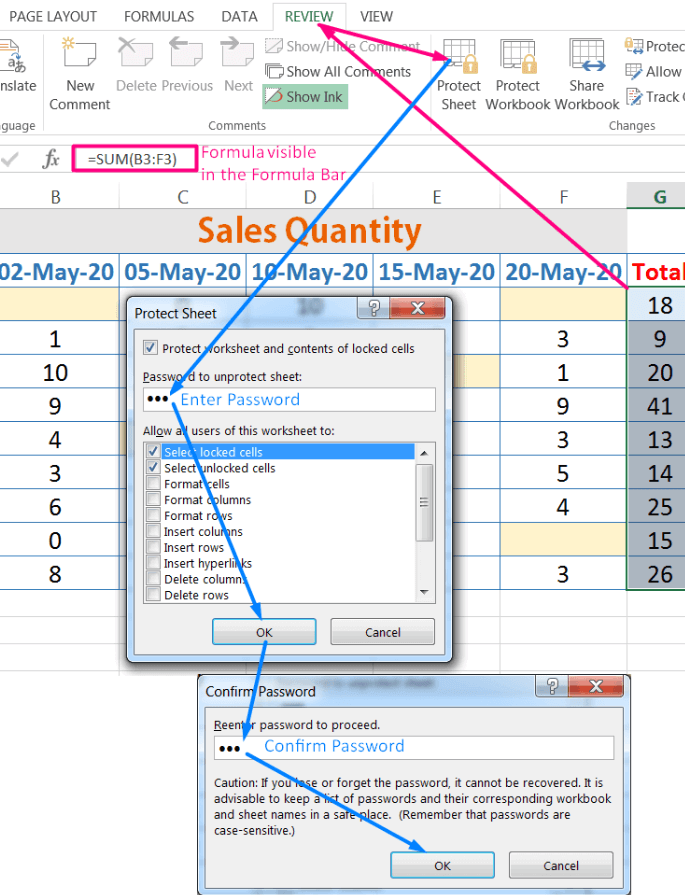
- Go to the “Review” tab on the Ribbon.
- Click on “Protect Sheet”.
- Enter a password (optional) and set the permissions for users, like allowing sorting or filtering.
- Click “OK”.
Users can now view but not modify the protected sheet without the password.
3. Workbook Structure Protection


Protecting the structure of your workbook prevents sheets from being added, deleted, hidden, or unhidden:
- On the “Review” tab, choose “Protect Workbook”.
- In the dialog box, click “Structure”.
- Set a password (optional) to protect the workbook structure.
This method ensures that the overall workbook layout remains intact.
4. Protect Specific Cells


If you need to lock only certain cells in your worksheet:
- Select the cells you want to lock.
- Right-click and choose “Format Cells”.
- Go to the “Protection” tab.
- Check “Locked” (it’s usually enabled by default).
- Protect the sheet as described in the sheet protection method.
Unprotected cells can still be edited, making this method useful for collaborative projects.
5. Use a VBA Macro for Advanced Protection


For more advanced users, you can leverage Visual Basic for Applications (VBA) to create custom protection:
- Press ALT + F11 to open the VBA Editor.
- In the Project Explorer, right-click on “ThisWorkbook” and choose “Insert” - “Module”.
- Paste the VBA code for protection (remember to include any specific sheets or cells).
Here’s a simple example of a VBA macro that locks a specific cell:
Sub LockCell()
    With Worksheets("Sheet1").Range("A1")
        .Locked = True
    End With
    ActiveSheet.Protect
End Sub
This script locks cell A1 on Sheet1 and protects the sheet.
🔧 Note: Custom macros can introduce security risks if not from a trusted source.
In conclusion, securing your Excel spreadsheets is crucial for data protection and maintaining the integrity of your work. By implementing one or more of these protection methods in Excel 2007, you can prevent unauthorized changes, protect sensitive data, and control how collaborators interact with your work. Always consider the balance between security and collaboration, using the right level of protection for your specific needs.
Can I recover a forgotten Excel password?

+
No, Microsoft does not provide a built-in tool for password recovery in Excel. You will need third-party software or services to attempt recovery.
What’s the difference between protecting a sheet and a workbook?

+
Sheet protection locks elements within a single sheet, like cells, while workbook protection safeguards the structure of the workbook itself, like sheet order or hiding.
How can I protect my workbook without using passwords?

+
You can protect parts of your workbook by using permissions settings within sheet protection or by hiding sheets with Read-Only access to discourage changes.
Is it safe to share my Excel macro with others?

+
Sharing macros can be risky as they can execute code. Ensure the macros come from a trusted source or review the code before sharing or using them.