Easily Copy Excel Sheet to Email: Simple Steps

From sending weekly reports to sharing data sets, copying Excel sheets to email is a routine task for many professionals. While this might seem straightforward, there are efficient ways to do it to save time and ensure the information appears exactly as intended in the email. Let's delve into the steps for seamlessly transferring an Excel sheet into an email.
Step 1: Preparing Your Excel Sheet

Before you begin, it’s essential to prepare your Excel sheet:
- Check for Accuracy: Ensure that all formulas, data, and formatting in your Excel sheet are correct and ready to be shared.
- Use Print Area: If you’re sending a specific section, set a print area to avoid sending unnecessary data.
- Clean Up: Remove any excess rows or columns to keep your email light and uncluttered.
Step 2: Copying the Sheet

Here are a couple of methods to copy your Excel sheet:
- Method 1: Direct Copy and Paste
- Highlight the area you want to copy.
- Press Ctrl + C (or Cmd + C for Mac users) to copy.
- Method 2: Paste as Picture
- Select the range you want to copy.
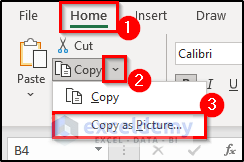
- Go to the ‘Home’ tab, click ‘Copy’, and then select ‘Copy as Picture’ from the dropdown menu.
- Choose ‘As Shown on Screen’ for appearance or ‘Picture of Screen’ for what you see.
- Hit ‘OK’ to proceed.
Step 3: Composing Your Email

Now that you’ve got your data ready, let’s move it into an email:
- Open your email application or webmail platform.
- Create a new email.
- Paste the copied data into the email body:
- If you’re using the direct copy method, click into the email body and press Ctrl + V or Cmd + V.
- If you’ve copied as a picture, right-click in the email body and select ‘Paste’ from the context menu or press Ctrl + V / Cmd + V.
📝 Note: Ensure your Excel sheet fits within the email constraints of your email service to avoid distortion or cut-offs.
Step 4: Formatting and Polishing

Once your data is in the email:
- Adjust the email’s formatting to enhance readability or preserve the Excel formatting:
- Use HTML formatting to adjust font size, style, or alignment if necessary.
- If the data looks distorted or doesn’t display properly, consider these tips:
- Use the ‘Paste as Picture’ option or convert your Excel sheet to PDF before sending.
- Keep the email’s design simple to avoid formatting issues.
📝 Note: When sending as an image, make sure the image resolution is high enough for clarity.
Step 5: Sending and Confirming

The final steps involve sending your email and checking its delivery:
- Add a subject, write any necessary message or explanation, and then send the email.
- Check your sent folder to ensure the email was sent as intended. If possible, ask the recipient to confirm they received it correctly.
That's how you can ensure your Excel sheet makes it into your email without issues, ready for your recipients to view or work with. Following these steps keeps your data intact, formatted, and clear for the reader.
FAQ Section

What if my email provider does not support HTML formatting?

+
Consider sending your Excel data as a PDF or attaching the Excel file directly to avoid formatting issues.
Can I copy multiple sheets from Excel into one email?

+
Yes, you can. Copy each sheet using the steps provided, paste them into a new sheet in Excel, and then copy all at once or as individual images.
How can I preserve Excel formatting when copying to email?

+
To keep Excel formatting, use the ‘Paste as Picture’ method. Alternatively, you could convert your sheet to PDF or send the original file as an attachment.
In summary, transferring an Excel sheet to an email can be done efficiently in just a few steps. Keep your Excel data clean, choose the right method for copying, and adjust your email’s formatting to ensure your information looks as intended. Whether it’s for a business presentation, daily reporting, or sharing data, these techniques will streamline your process and reduce any potential errors or miscommunications.


