Mastering Sheet Duplication in Excel 2013: A Quick Guide

Why Duplicate Sheets in Excel 2013?

Mastering Excel's functionality, particularly for repetitive tasks, can significantly enhance your productivity. Among these, the ability to duplicate sheets in Excel 2013 stands out as a simple yet powerful tool. By duplicating sheets, you can quickly create backups, apply templates, or manage different versions of data within the same workbook without manual re-entry, thus saving time and reducing errors.
Steps to Duplicate Sheets in Excel 2013

Step-by-Step Instructions:

- Select the Sheet: Begin by selecting the sheet you wish to duplicate. Click on the sheet tab at the bottom of your workbook to highlight it.
- Right-Click or Use the Ribbon: You have two methods here:
- Right-click on the selected sheet tab.
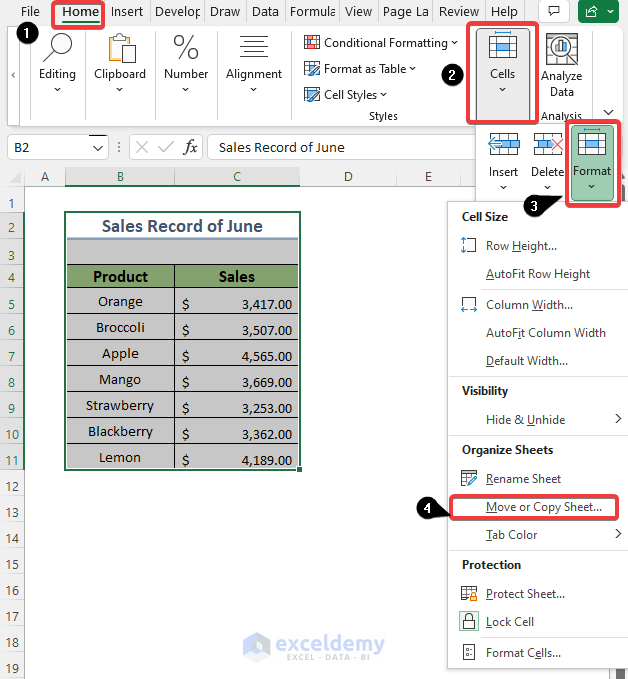
- Alternatively, navigate to the Home tab in the Ribbon, and find the Cells group. Click on “Format” then hover over “Move or Copy Sheet.”
- Choose ‘Move or Copy’: From the context menu (after right-clicking) or the drop-down list, select ‘Move or Copy.’
- Select the Destination:
- In the Move or Copy dialogue box, choose where you want to place the new sheet.
- Select the workbook you want to place the duplicate into from the “To book” dropdown.
- Then, under “Before sheet,” choose where you want the duplicate sheet to appear.
- Create a Duplicate: Ensure the ‘Create a copy’ checkbox is selected at the bottom of the dialogue box. This is vital for creating a duplicate rather than moving the sheet.
- Press OK: Click ‘OK’ to duplicate the sheet. Excel will create an identical copy right next to your original sheet, adding ‘(2)’ to its name.
📝 Note: The new sheet will be positioned according to the options you selected, but remember that its name might need to be manually adjusted if multiple sheets have been duplicated.
Keyboard Shortcuts:

For those who prefer keyboard commands, here’s how to duplicate a sheet quickly:
- Hold down the Ctrl key, then click and drag the sheet tab to the right or left. This will make a duplicate before or after the original sheet, respectively.
Mastering these shortcuts can streamline your workflow, allowing for swift sheet duplication even in the most complex Excel environments.
Managing and Organizing Duplicated Sheets

Renaming:

Excel’s default naming convention for duplicated sheets might not always meet your needs. Here’s how to rename them:
- Double-click the sheet tab at the bottom. This will enable you to type in a new name directly.
- Use the context menu by right-clicking the sheet tab, selecting “Rename,” then typing in the new name.
Color Coding for Easy Identification:

To make your workbook more visually organized:
- Right-click on the sheet tab.
- Select “Tab Color,” then choose a color from the palette. This can help differentiate between sheets at a glance.
Deleting Sheets:

If you need to remove a sheet, be cautious to avoid deleting important data:
- Right-click on the sheet tab.
- Select “Delete.” Be aware that this action cannot be undone unless you use the Undo function immediately after.
| Task | Method | Alternative Method |
|---|---|---|
| Duplicate Sheet | Right-click sheet tab > Move or Copy | Hold Ctrl and drag sheet tab |
| Rename Sheet | Double-click on sheet tab | Right-click > Rename |
| Change Sheet Color | Right-click > Tab Color > Choose Color | None |
| Delete Sheet | Right-click > Delete | Home Tab > Cells Group > Delete |

Advanced Tips for Efficient Excel Sheet Duplication

Knowing how to duplicate sheets is useful, but here are advanced tips to truly harness this feature for greater efficiency:
- Using VBA Macros: Automate repetitive tasks like sheet duplication with VBA macros. This can save you from manually duplicating sheets, especially in a workbook with many sheets or complex data.
- Set Up Template Sheets: Create sheets with predefined formats or formulas. Duplicate these template sheets for each new dataset, ensuring consistency across your workbook.
- Conditional Formatting: Use conditional formatting rules on duplicated sheets to highlight changes or key data, making data analysis easier.
- Protecting Sheets: Protect sheets after duplication to prevent accidental changes, or lock specific cells or formulas you want to keep consistent across versions.
The above techniques will not only streamline your sheet duplication process but also enhance your overall Excel experience.
In summary, duplicating sheets in Excel 2013 is a straightforward yet powerful technique that can save time and reduce errors in repetitive tasks. Whether you’re organizing data, applying templates, or backing up crucial information, mastering this feature will enhance your productivity significantly. Understanding how to duplicate, rename, color-code, and manage sheets efficiently provides you with tools to work smarter, not harder. With these steps, tips, and insights, you’re well-equipped to navigate and utilize Excel 2013’s sheet duplication capabilities for all your spreadsheet needs.
Can I duplicate multiple sheets at once in Excel 2013?

+
Unfortunately, Excel 2013 does not support duplicating multiple sheets simultaneously through the user interface. However, you can use VBA to automate this process.
Will formulas update automatically in duplicated sheets?

+
If your formulas use absolute references ($ signs), they will remain the same. For formulas with relative references, Excel will adjust them based on the new location of the duplicated sheet.
How can I avoid copying chart sheets when duplicating?

+
Chart sheets are created with a different procedure, and thus, they are not duplicated through the standard sheet copy methods. You must manually create or duplicate them if needed.
What happens to data validation rules when duplicating a sheet?

+
Data validation rules will be copied over to the duplicated sheet, maintaining the integrity of your data entry processes.
Can I duplicate sheets between different Excel workbooks?

+
Yes, in the Move or Copy dialog box, you can select a different workbook to place the duplicated sheet into.


