5 Simple Steps to Convert Excel to Google Sheets with Protections

Introduction to Converting Excel to Google Sheets

In an increasingly collaborative world, cloud-based tools like Google Sheets have become vital for sharing and working on spreadsheets in real-time. However, many users are still reliant on Microsoft Excel for their day-to-day data analysis tasks due to its advanced features. This blog post will guide you through the straightforward process of converting an Excel file into a Google Sheets document while maintaining the protections and integrity of your original data.

Step 1: Preparing Your Excel File for Conversion

Before converting your Excel file, consider these preparatory steps:
- Ensure all formulas are updated and functioning correctly.
- Remove any external links or references that may not translate well into Google Sheets.
- Review and adjust any protections or data validation rules.
- Save your Excel workbook in a universally compatible format like .xlsx.
✅ Note: If your Excel file contains VBA macros, be aware that Google Sheets does not support them directly.
Step 2: Uploading to Google Drive

To begin the conversion:
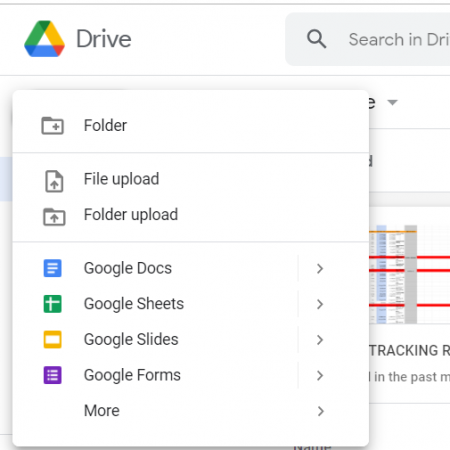
- Open Google Drive in your web browser.
- Click on the “+ New” button on the left side.
- Select “File upload” from the dropdown menu.
- Navigate to your Excel file on your local storage and upload it.
Step 3: Opening with Google Sheets

Once uploaded:
- Locate the uploaded Excel file in Google Drive.
- Right-click on the file and choose “Open with” then select “Google Sheets.”
Google Sheets will now convert the Excel file into its format. This might take a few moments, depending on the file size and complexity.
Step 4: Reviewing and Adjusting Protections

After conversion, ensure your spreadsheet’s integrity by:
- Checking if all data, formulas, and formats have translated correctly.
- Verifying and reapplying any data protections, including cell protections, sheet protections, or hidden formulas.
Type of Protection Excel Google Sheets Cell Locking Right-click cell > “Format Cells” > “Protection” tab > Check “Locked” Select range > Data > “Protected sheets and ranges” > Add a description > Set permissions Sheet Protection Review tab > “Protect Sheet” > Specify what can be changed Data > “Protected sheets and ranges” > “Sheet” tab > Set permissions 
- Re-enter any missing data validation rules.
🔍 Note: Remember that some features like data validation might work differently in Google Sheets compared to Excel.
Step 5: Saving and Sharing Your Google Sheet

With your Google Sheet now secure:
- Save the file in Google Drive with an appropriate name.
- Set sharing permissions for collaborators if needed by clicking the “Share” button at the top-right.
This step concludes the conversion process, giving you a robust, secure Google Sheet ready for collaborative use.
☝️ Note: Always inform users about permissions when sharing your Google Sheet to prevent unintended edits or data access.
By following these five steps, you've successfully converted an Excel file to Google Sheets while maintaining the necessary data protections. This not only ensures data integrity but also facilitates real-time collaboration, which is often not possible with traditional desktop software like Excel.
What if my Excel file has complex formulas that don’t work in Google Sheets?

+
If your Excel file uses formulas that are not supported or behave differently in Google Sheets, you’ll need to manually adjust them. Google Sheets supports most common functions, but some complex array formulas might need reconfiguration.
Can I convert Google Sheets back to Excel if needed?

+
Yes, you can easily convert a Google Sheets document back to an Excel file. Go to File > Download and choose Microsoft Excel (.xlsx).
Are all Excel features available in Google Sheets?

+
No, Google Sheets does not support all Excel features, especially those related to VBA scripting or very advanced Excel functionalities. However, for everyday data management and analysis, Google Sheets provides a robust set of tools.


