Effortlessly Convert Excel to Google Sheets: A Simple Guide

When it comes to managing data, spreadsheets are undoubtedly one of the most utilized tools by businesses, professionals, and students alike. Microsoft Excel has been the traditional go-to for spreadsheets, but with the rise of Google's suite of tools, many are now turning to Google Sheets for its collaborative features, accessibility, and integration with other Google services. Converting your existing Excel files to Google Sheets is not only seamless but also opens up a plethora of new possibilities for data management. Let's delve into how you can effortlessly transition your Excel spreadsheets into Google Sheets.
Why Convert Excel to Google Sheets?

Before we dive into the steps, it’s crucial to understand the benefits:
- Real-time collaboration: Multiple users can edit the same sheet simultaneously.
- Cloud storage: No more worrying about backups; Google Sheets autosaves your work.
- Access anywhere: Work from any device with internet access.
- Integration: Easily connect with other Google services like Docs, Forms, and Drive.
- Version History: Track changes and revert to previous versions with ease.
Converting Excel to Google Sheets

Here are the straightforward steps to convert your Excel file into a Google Sheets document:
Step 1: Prepare Your Excel File

- Open your Excel file and ensure all data is correct.
- Save the file in .xlsx or .xls format if it isn’t already.
Step 2: Upload to Google Drive

- Log into your Google Account and navigate to Google Drive.
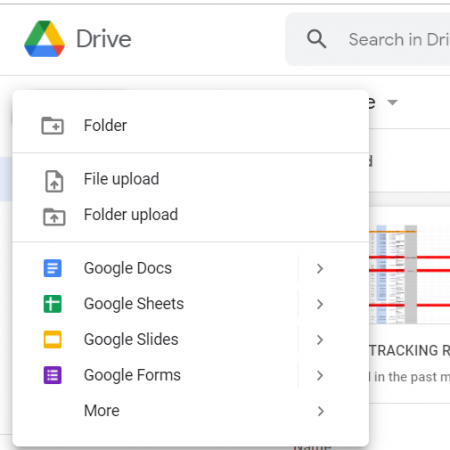
- Click on “New” and then “File upload.”
- Select your Excel file from your device and upload it.
⚠️ Note: Make sure your file size is within Google Drive's upload limit.
Step 3: Convert the File

- Once the upload is complete, right-click on the Excel file in Google Drive.
- Choose “Open with” and then select “Google Sheets.”
Automatic Conversion:
- Google Drive will automatically convert your Excel file into Google Sheets format upon opening.
- The new Google Sheets file will appear in a new tab.
Step 4: Review and Edit

- Review the converted sheet for any formatting issues or data integrity.
- Make necessary edits to ensure the document looks as intended.
Step 5: Save Your Work

- Your converted file is automatically saved in Google Sheets format.
- To rename the sheet, click on the title and type in your preferred name.
Now, let's address some potential considerations when converting:
Potential Conversion Issues

- Formatting: Some Excel-specific formatting might not translate perfectly to Google Sheets.
- Formulas: Certain Excel functions might need tweaking to work in Google Sheets.
- Macros: Google Sheets uses ‘Apps Script’ instead of VBA, meaning macros will not carry over and require rewriting.
In conclusion, converting your Excel spreadsheets to Google Sheets can greatly enhance productivity, particularly when collaboration and cloud-based working are key. The process is simple, straightforward, and offers several benefits over traditional Excel files. Remember to check your converted sheets for any formatting issues or formula discrepancies, and if your spreadsheet includes macros, consider rewriting them for Google Sheets compatibility. With these steps and considerations in mind, you're well on your way to leveraging the full potential of Google Sheets for your data management needs.
Will my formulas work in Google Sheets after conversion?

+
Most formulas will work, but some Excel-specific functions may need slight adjustments to work in Google Sheets. Google Sheets uses a different syntax for some functions.
Can I still use VBA scripts in Google Sheets?

+
No, Google Sheets does not support VBA. Instead, you would use Google Apps Script, which is based on JavaScript.
What happens if I have conditional formatting in my Excel file?

+
Conditional formatting should transfer over during conversion, but it’s wise to check and adjust if necessary to ensure the rules are applied as intended.


