5 Easy Steps to Validate Excel Data

Ensuring the accuracy and integrity of data within Microsoft Excel is critical for efficient data analysis, reporting, and decision-making. Data validation in Excel helps maintain data consistency and prevents input errors, which can have significant consequences in data-centric environments. This guide will walk you through 5 easy steps to validate your Excel data effectively.
Step 1: Define Data Validation Rules

The first step in validating data in Excel is to define what rules your data should follow. These rules could include:
- Data Type - Ensure inputs are of the correct format (text, numbers, dates, etc.)
- Range - Limit entries to a specific range (e.g., 1 to 100)
- List - Restrict input to values from a pre-defined list
- Formula - Use a custom formula to check for complex conditions
To set these rules:
- Select the cells or range where you want to apply data validation.
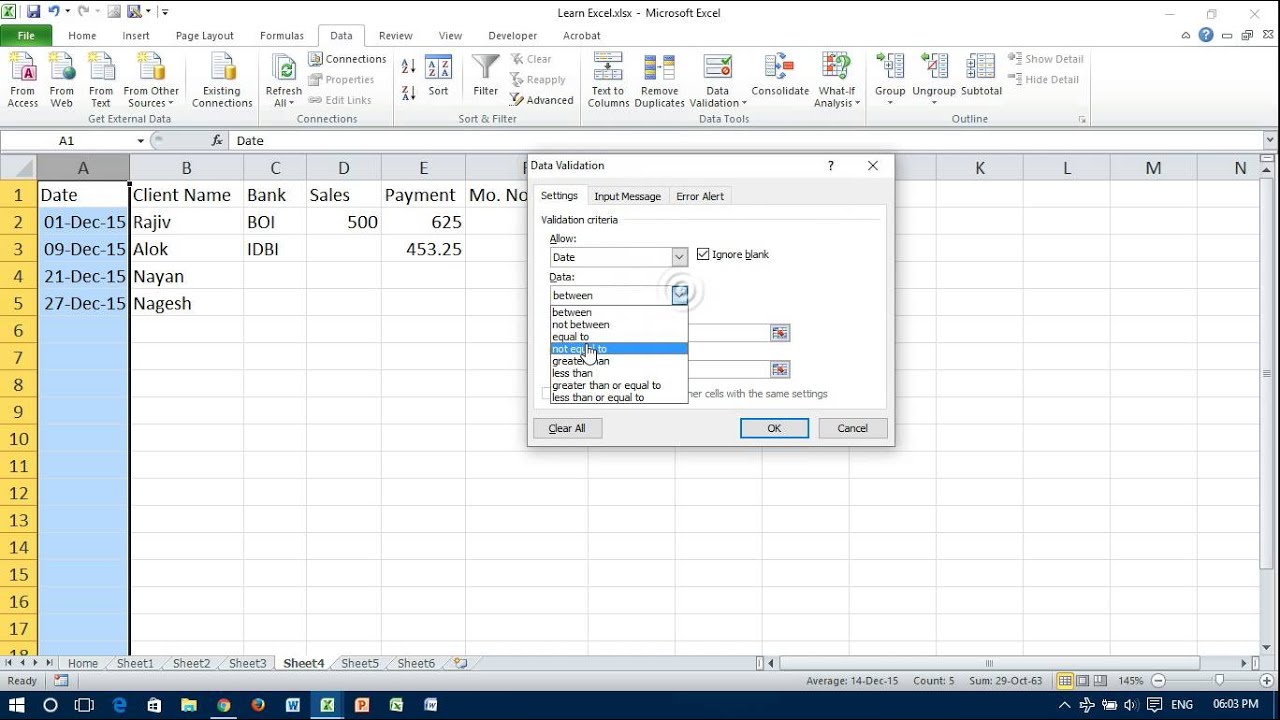
- Go to Data > Data Validation in the Excel ribbon.
- Under the Settings tab, choose the validation criteria from the options provided.
🔔 Note: Ensure you understand the implications of each validation rule to avoid unintended data restrictions.
Step 2: Set Up Custom Error Messages

Custom error messages guide users when they input data incorrectly. To create a helpful error message:
- Follow the same steps as above to access Data Validation settings.
- Select the Error Alert tab.
- Check the Show error alert after invalid data is entered checkbox.
- Choose the Style of the error message (Stop, Warning, or Information).
- Enter a clear Title and Error Message to instruct the user on what went wrong.
🔔 Note: Error messages should be clear and actionable to facilitate user correction.
Step 3: Use Data Validation Formulas

When your validation needs are more complex, you can use Excel formulas:
- Text Validation: Use functions like
LEN,ISNUMBER, orISBLANK. - Date Validation: Utilize functions like
DATEVALUEorWEEKDAY. - Conditional Validation: Employ
AND,OR, andNOTfor compound conditions.
Here is an example of setting up data validation with a formula:
=AND( A1>=TODAY(), A1<=TODAY()+30 )
This ensures the date entered is within the next 30 days from today.
Step 4: Apply Circle Invalid Data

After defining validation rules, you can visually identify any incorrect entries:
- Select the range where data validation is applied.
- Go to Data > Data Validation > Circle Invalid Data.
- Invalid data will be circled, providing a quick visual cue.
Step 5: Review and Adjust Your Validation

Data validation isn’t a set-and-forget activity. Regular review and adjustments are necessary:
- Update Validation Rules: Adjust rules as your data requirements evolve.
- Remove Validation: If validation is no longer required, remove it to avoid confusion.
- Automate Validation: Use VBA for more advanced validation or automation.
To summarize, validating data in Excel through these 5 easy steps provides robust control over data integrity, ensuring your spreadsheets remain accurate and consistent. By setting up clear rules, customizing error messages, using advanced formulas, and regularly reviewing your validation, you can significantly improve the quality of your data analysis work.
What is data validation in Excel?

+
Data validation in Excel is a feature that allows you to control the type of data or the values that users can enter into a cell. It helps in maintaining data consistency, preventing errors, and enhancing data quality.
Can I apply data validation to multiple cells?

+
Yes, you can apply data validation to multiple cells or even entire columns/rows at once. Just select the range before setting up your validation rules.
What are the common types of data validation in Excel?

+
Common types include restricting data to a specific list, numeric ranges, date ranges, length of text, and custom formulas. Each type helps in enforcing different kinds of data accuracy and consistency.


