5 Simple Steps to Add Filters to Your Excel Sheet

Whether you're managing a small business, organizing event data, or handling complex datasets, Microsoft Excel provides numerous features to streamline your data management processes. One of the most useful tools in your Excel toolkit is data filtering. Filters allow you to view and analyze specific data from a large dataset efficiently. Here's how you can add filters to your Excel sheet in five straightforward steps:
Step 1: Open Your Excel Workbook

Begin by opening your Excel workbook where the data is stored. Ensure your data is organized in a table format with headers at the top of each column.
Step 2: Select the Data Range

- Click the top-left cell of your data range.
- Drag to select all the cells containing data, including the headers.
This step ensures that filters will apply only to your dataset, keeping any other content on the sheet untouched.
Step 3: Apply Filters

- In the Home tab, under the Editing group, click on Sort & Filter.
- Select Filter. Alternatively, you can use the shortcut Ctrl + Shift + L.
Once applied, you'll see dropdown arrows in each header column, indicating that filters are now active for sorting or filtering data.
Step 4: Use Filters

Now that your filters are set up:
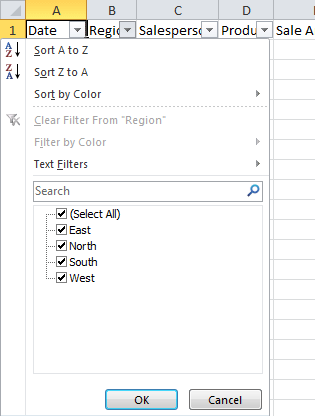
- Click on the dropdown arrow in any column header to access filter options.
- Choose from the following options:
- Text Filters for searching, matching, or excluding specific text.
- Number Filters for numerical operations like greater than, less than, or between.
- Date Filters for time-based filtering.
- Select your filter criteria and click OK.
Step 5: Clear or Manage Filters

To manage or clear your filters:
- To remove a specific filter, click the dropdown arrow in the column and select Clear Filter From [Column Name].
- To remove all filters, go back to Sort & Filter in the Home tab and choose Clear. Alternatively, use Ctrl + Shift + L again.
🎗️ Note: Filtering in Excel will not alter your original dataset. It only displays the filtered results while keeping all data intact.
To wrap up, adding filters to your Excel sheet can significantly enhance your data handling capabilities, enabling you to manage and analyze data with ease. The steps provided make it simple to implement this powerful feature, helping you to focus on what matters most in your datasets. Whether for business analysis, personal finance tracking, or any other purpose, Excel's filtering functions ensure that you can efficiently navigate through your data, drawing insights where it counts.
Can I apply multiple filters on one sheet?

+
Yes, Excel allows you to apply multiple filters simultaneously. You can combine filters from different columns to narrow down your dataset as needed.
Will filtering affect the data I have?

+
No, applying filters in Excel only hides data temporarily. Your original dataset remains unchanged. To remove the filters and see all data again, simply clear the filters.
Is there a shortcut to toggle filters in Excel?

+
Yes, you can toggle filters on and off by pressing Ctrl + Shift + L.
How can I filter dates effectively?

+
When working with dates, use the Date Filters option from the dropdown menu. You can filter by specific dates, date ranges, or by periods like today, this week, last month, etc.
Can I save a filtered view for later use?

+
While Excel doesn’t save filter views directly, you can save the workbook with filters applied. However, for more complex data views, consider using Excel’s Custom Views feature.


