Add Checkbox in Excel 2010: A Simple Guide

In this guide, we delve into the practical use of checkboxes in Microsoft Excel 2010. Checkboxes serve as interactive tools to make your spreadsheets more user-friendly, efficient, and interactive. Whether you're creating a task list, a project management dashboard, or an inventory checklist, knowing how to insert and manage checkboxes can significantly boost your data organization and analysis. Let's explore how to add checkboxes to your Excel sheets, customize them, and use them effectively.
Adding a Checkbox in Excel 2010

Here’s a simple step-by-step guide to inserting a checkbox in Excel:
- Open your Excel workbook.
- Go to the “Developer” tab. If it’s not visible, enable it by going to “File > Options > Customize Ribbon” and check “Developer” under “Main Tabs.”
- In the Developer tab, click on “Insert” and then select “Form Controls”.
- Choose the “Checkbox” option and click and drag to place the checkbox where you want it in your worksheet.
- Right-click on the checkbox to edit the text label next to the box, or to link the checkbox to a cell.
🔗 Note: Linking the checkbox to a cell allows for automation and conditional formatting based on whether the box is checked or not.
Customizing Checkboxes

Once you’ve added checkboxes, you might want to make them stand out or fit into your spreadsheet’s theme:
- Resize: Adjust the size of the checkbox by clicking and dragging the corners.
- Edit Label: Click on the label to type or edit the text associated with the checkbox.
- Color and Design: Right-click on the checkbox, choose “Format Control,” and then adjust properties like color, font, or style.
Using Checkboxes for Data Management

Checkboxes can transform how you manage and interact with data in Excel:
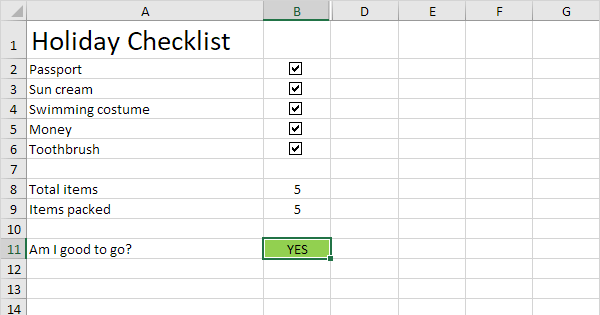
- Task Lists: Use checkboxes to mark tasks as complete. You can set formulas to count the number of completed tasks.
- Data Filtering: Filter data based on whether checkboxes are checked or not, aiding in quick analysis or presentation.
- Interactive Reports: Use checkboxes to toggle between different data views, making your reports dynamic.
| Feature | Usage Example | Benefit |
|---|---|---|
| Conditional Formatting | Change row color based on checkbox state | Visual data management |
| Formula Integration | Count checked boxes for task management | Automated task tracking |
| Data Analysis | Filter data based on checkbox selection | Efficient data handling |

📝 Note: For advanced users, integrating macros with checkboxes can automate complex tasks or create custom form controls.
Common Pitfalls and How to Avoid Them

While checkboxes are user-friendly, here are some common issues:
- Checkbox Placement: Ensure checkboxes do not overlap with cell data or other controls.
- Linked Cells: Always link checkboxes to cells to use their state in formulas; otherwise, their check status is not recorded.
- Protection Mode: When protecting sheets, ensure you allow interaction with checkboxes.
In closing, adding checkboxes to Excel 2010 is a small feature with big potential. From simple to-do lists to complex data analysis tools, checkboxes can enhance the interactivity and functionality of your spreadsheets. By following this guide, you've learned how to insert, customize, and utilize checkboxes effectively, providing you with the tools to create more intuitive and dynamic spreadsheets. Remember, the key to effective data management is not just in collecting information but in organizing it in a way that is easily accessible and understandable.
Can I link multiple checkboxes to the same cell?

+
Yes, you can link multiple checkboxes to a single cell by using formulas like =AND(A1, B1, C1), where each cell corresponds to a checkbox’s linked cell. This will return TRUE only if all linked checkboxes are checked.
How do I delete a checkbox?

+
Simply select the checkbox and press the Delete key on your keyboard. If it’s part of a group or linked to a cell, it might require ungrouping or unlinking first.
Why won’t my checkbox link to a cell?

+
This can happen if the sheet is protected, the checkbox is not selected correctly, or the Developer tab isn’t enabled. Ensure your settings are correct, and the sheet isn’t locked.


