5 Easy Steps to Create a Balance Sheet in Excel 2010

Starting Your Balance Sheet Journey

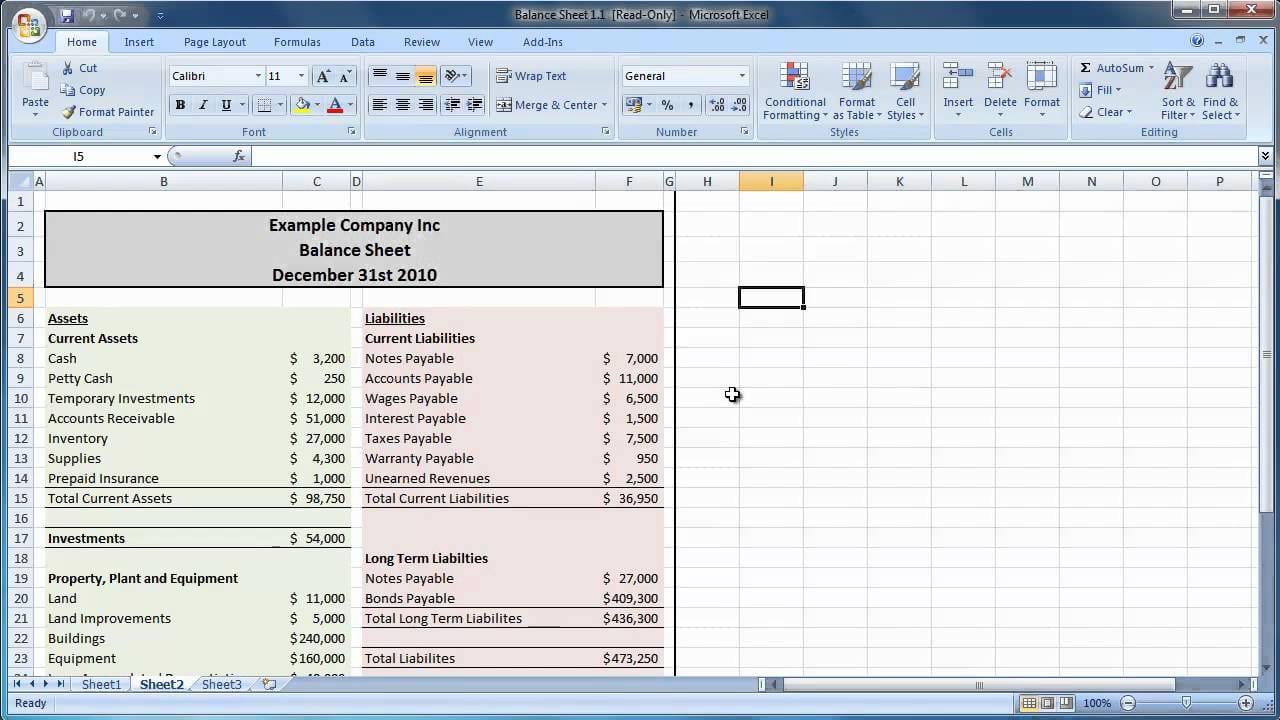
Creating a balance sheet is a vital task for any business owner, accountant, or financial enthusiast looking to understand their company’s financial health at a glance. Using Microsoft Excel 2010, you can easily construct a balance sheet that not only meets professional standards but also simplifies your financial analysis. In this guide, we’ll walk through the process step by step, ensuring you’re equipped with the knowledge to craft an effective and accurate balance sheet.
Step 1: Open Excel and Set Up Your Workbook

To begin, open Microsoft Excel 2010. Create a new blank workbook by pressing Ctrl + N or selecting File > New > Blank Workbook. This is where you’ll compile your balance sheet.
- Save your workbook: Click on the File menu, select Save As, and name your file something relevant like "BalanceSheet_2023". Choose your preferred file format and save location.
- Ensure automatic calculation is enabled: Excel should default to this setting, but you can check it under Formulas > Calculation Options > Automatic. This ensures any changes in your data are instantly updated in your balance sheet.
Step 2: Input Your Data

The balance sheet consists of three main sections: Assets, Liabilities, and Equity. Let’s format these sections in your Excel:
- Assets:
- Current Assets: Cash, Accounts Receivable, Inventory, Prepaid Expenses.
- Fixed Assets: Property, Plant, Equipment, Long-Term Investments.
- Liabilities:
- Current Liabilities: Accounts Payable, Short-term Loans, Accrued Expenses.
- Long-Term Liabilities: Bonds Payable, Long-term Debt, Deferred Tax Liabilities.
- Equity:
- Common Stock, Retained Earnings, Treasury Stock.
Here's how to organize this in Excel:
| Row | Column A | Column B |
|---|---|---|
| 1 | Balance Sheet | |
| 2 | As of [Date] | |
| 3 | Assets | Liabilities and Equity |
| 4 | Current Assets: | Current Liabilities: |

💡 Note: Ensure each category and subcategory aligns vertically in your spreadsheet for easy readability.
Step 3: Add Formulas and Sum Calculations

Now that your data is structured, you’ll need to calculate the totals for each section:
- For each asset category, sum the values under it. If Cash is in A5 and Accounts Receivable is in A6, use =SUM(A5:A6) in A7.
- Do the same for Liabilities and Equity.
Total Assets: After all assets are totaled, sum these totals. If they're from A5 to A10, use =SUM(A5:A10) in A11.
Total Liabilities and Equity: Combine the totals of your liabilities and equity sections to get this number, usually placed in the same row as Total Assets for direct comparison.
Step 4: Format Your Balance Sheet

Excel allows you to make your balance sheet visually appealing and easy to navigate:
- Change cell colors: Highlight the heading row (e.g., “Assets”, “Liabilities and Equity”) and use Home > Fill Color to give them a background color. Use lighter shades for readability.
- Adjust fonts: Bold headers, italicize subcategories, and ensure all text is legible. You can choose a font under Home > Font.
- Align text: Left-align headers, right-align numerical data. Use Home > Alignment options to adjust.
Step 5: Review, Print, and Share Your Balance Sheet

Before sharing your balance sheet:
- Review: Double-check all calculations for accuracy. Ensure your totals match, i.e., Total Assets should equal Total Liabilities and Equity.
- Print Preview: Under File > Print, you can see how your balance sheet will look on paper, adjusting the layout if necessary.
- Save: Once you’re satisfied, save your workbook. Consider saving a read-only copy for archival purposes.
- Share: Excel files can be shared via email or cloud services. For presentations, consider converting to PDF for stability in viewing.
Creating a balance sheet in Excel 2010 is straightforward, but it demands attention to detail and accuracy. The steps outlined here guide you from setting up your workbook to sharing your completed balance sheet with stakeholders or for personal analysis. With Excel’s powerful tools for calculations and formatting, you can produce a document that not only meets financial reporting standards but also allows for dynamic updates and what-if scenarios.
By organizing your data logically, using formulas for calculations, and formatting your sheet for maximum readability, you’ve equipped yourself with a tool that can adapt to changes in your financial landscape. This ensures your balance sheet remains a current and useful instrument for financial decision-making.
What’s the difference between assets and liabilities?

+
Assets are resources with economic value owned by the business, like cash, inventory, or property. Liabilities are obligations or debts the company owes to others, such as loans, accounts payable, or accrued expenses.
Why should I use Excel for a balance sheet?

+
Excel provides dynamic tools for calculations, sorting, filtering, and formatting that make it an ideal platform for creating and managing financial documents like a balance sheet. Its ability to update automatically as data changes also makes it efficient for regular financial reporting.
How do I ensure my balance sheet balances?

+
Ensure your balance sheet balances by making sure that the total assets on the left side equal the total liabilities and equity on the right side. Any discrepancy would indicate an error in data entry or calculation.
Can I use Excel 2010 for other financial statements?

+
Yes, Excel 2010 can be used for creating other financial statements like income statements, cash flow statements, or even complex financial models, using similar principles for organizing and analyzing data.


