5 Quick Tips to Set Print Settings for All Excel Sheets

Mastering the art of printing spreadsheets in Microsoft Excel is a skill every professional should have, especially if your work involves extensive data handling. Whether it's a financial report or a project timeline, you might find yourself needing to adjust settings for a large number of sheets. Today, I'll walk you through 5 quick tips to set print settings for all Excel sheets uniformly, enhancing your productivity and ensuring consistency across your work.
1. Use the Page Layout View

When dealing with multiple sheets, using Page Layout View is invaluable. This view allows you to preview how your sheets will look when printed.
- To access Page Layout View, click on the ‘View’ tab, then select ‘Page Layout’ from the Workbook Views group.
- This will give you an on-screen preview where you can adjust margins, page orientation, scaling, and headers/footers before printing.
📝 Note: Remember to apply settings changes to individual sheets before replicating them for all sheets. This can be done by right-clicking the sheet tabs and selecting ‘Select All Sheets’.
2. Group Sheets for Uniform Settings

One of the most time-saving techniques for setting print settings across multiple Excel sheets is grouping them.
- To group sheets, hold down the Ctrl key and click on each sheet tab you want to include.
- Once grouped, any changes made in one sheet will reflect in all the grouped sheets.
- This technique is particularly useful for setting print areas, headers, and footers that need to be consistent across all your sheets.
After setting your preferences in the first sheet, you can then extend them to all sheets by:
- Right-clicking a grouped sheet tab, choosing ‘Select All Sheets’, and then making your adjustments.
3. Set Print Areas

Not all data on your Excel sheets might need printing, especially when dealing with complex workbooks. Here’s how to set print areas:
- Select the range you want to print, go to the ‘Page Layout’ tab, and click on ‘Print Area’ > ‘Set Print Area’.
- If you’ve already grouped sheets, this action will apply to all selected sheets at once.
4. Define Headers and Footers

Headers and footers can greatly enhance your printed reports by providing context or additional information.
- Go to the ‘Insert’ tab or the ‘Page Layout’ tab, depending on your Excel version, to set up headers and footers.
- Here, you can add page numbers, dates, file names, or custom text that will appear at the top or bottom of each printed page.
When using grouped sheets, remember that:
- Settings for headers and footers will apply uniformly across all selected sheets.
5. Page Breaks and Scaling

The final step in ensuring your printed sheets are presented exactly how you intend is managing page breaks and scaling:
- In Page Layout View, you can manually adjust page breaks by dragging the breaks to include or exclude certain cells.
- Use the ‘Print Titles’ feature to repeat row or column titles on each page.
- Adjust scaling by going to ‘Page Layout’ > ‘Scale to Fit’, where you can fit your printout to a single page width or height.
📝 Note: When you adjust scaling, ensure that readability is not compromised. Experiment with different scaling options to find the best balance between page number and clarity.
These five tips form a solid foundation for anyone looking to set print settings for all Excel sheets efficiently. By utilizing the Page Layout View, grouping sheets, setting print areas, defining headers and footers, and managing page breaks and scaling, you'll not only save time but also ensure that your printed documents are professional and consistent.
Remember, mastering Excel settings is all about knowing the tools at your disposal. As you work through these tips, continue exploring Excel's vast array of features to further streamline your spreadsheet management. Each new trick you learn can turn complex tasks into simple, routine procedures, enhancing your workflow and productivity.
How do I adjust the print area for a single sheet?

+
Select the cells you want to print, go to the ‘Page Layout’ tab, click on ‘Print Area’ in the ‘Page Setup’ group, and then select ‘Set Print Area’.
Can I save these print settings for future use?

+
Yes, you can save print settings by saving the Excel workbook as a template (.xltx). This will preserve your settings for future use.
What if I only want to print specific sheets from a workbook?

+
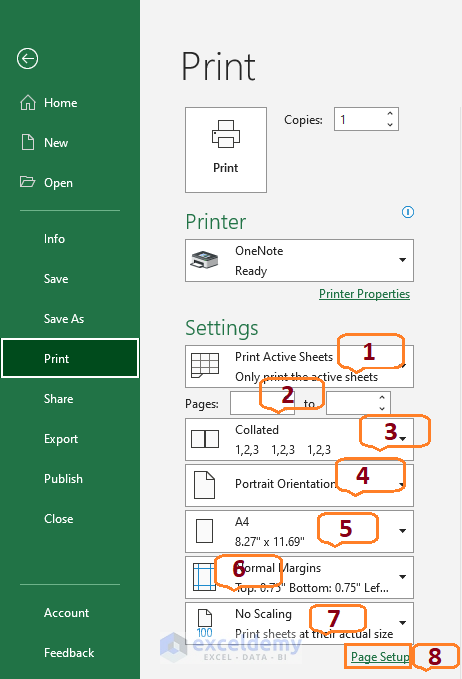
To print specific sheets, hold the Ctrl key while clicking on the tabs of the sheets you want to print. Then go to the ‘File’ > ‘Print’ menu, and under ‘Settings’, select ‘Print Active Sheets’.
How can I print my Excel sheets in color?

+
Ensure your printer supports color printing. In Excel, go to ‘File’ > ‘Print’, and under ‘Printer Properties’, check the color print option. Remember to have appropriate color settings in your print setup for color output.
What if my print settings are not applying to all grouped sheets?

+
Ensure all sheets are selected before making changes. Right-click a tab, select ‘Select All Sheets’, and make your adjustments. Any change made should then apply to all grouped sheets.


