Master the Art of Printing Excel Sheets on One Page

Printing Excel sheets can be a daunting task, especially when you want everything to fit neatly on a single page without losing readability. Whether you're preparing a report for a meeting, organizing data for analysis, or just aiming for a cleaner, more professional output, understanding how to master the art of printing Excel sheets on one page is crucial. Here's a step-by-step guide to help you achieve this:
Adjusting Page Layout

Start by accessing the Page Layout tab in Excel, which is pivotal for setting up how your sheet will appear when printed:
- Orientation: Change from Portrait to Landscape if necessary. Landscape often accommodates wider data.
- Margins: Tighten margins to fit more content. Go to Page Setup > Margins or click ‘Custom Margins’ for exact control.
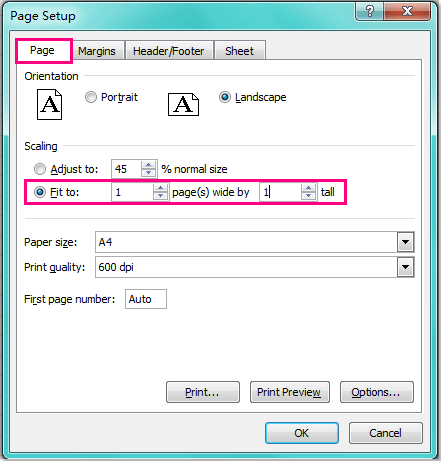
- Scaling: Adjust the ‘Scale’ to shrink or expand your data to fit. This option is under ‘Page Setup’ > ‘Fit to’. However, be cautious as extreme scaling might make text unreadable.

Data Organization and Formatting

Effective formatting can significantly influence how data is displayed and printed:
- Remove Unnecessary Columns and Rows: Hide or delete any rows/columns that are not crucial for your printout.
- Reduce Font Size: Lower the font size just enough to fit the data onto one page without making it too small to read.
- Adjust Column Widths and Row Heights: Manual adjustments can help fit the content better. Use ‘Format Cells’ for precision.
🚫 Note: Reducing font size too much can affect readability. Aim for a balance between content fit and legibility.
Scaling and Printing Options

Excel offers tools to scale and print your document effectively:
- Use ‘Fit to’: In the ‘Page Setup’ dialog, ‘Fit to’ allows you to scale the worksheet to fit on a specific number of pages.
- Print Preview: Before finalizing, check the print preview. Adjust scaling if necessary for better readability.
| Setting | Action |
|---|---|
| Fit to | Manually set the number of pages for both width and height. E.g., 1x1 for a single page |
| Print Area | Select and set the print area to focus only on the relevant data |

Header and Footer Management

Headers and footers might seem minor, but they can push content out of the printable area:
- Keep headers and footers concise to avoid taking up valuable space.
- Utilize the ‘Header/Footer’ options to add necessary info or identifiers for your document.
Final Preparation

Before you print, ensure all elements are in place:
- Check Sheet Size: If possible, reduce the data range by removing or hiding excess.
- Ensure Even Alignment: Align your data to fit evenly across the page.
- Print Preview: Double-check the print preview to ensure all content fits and is legible.
By following these steps, you'll be able to print your Excel sheets neatly on one page, enhancing the presentation and readability of your data. Remember, the goal is not just to make everything fit but to do so in a way that retains the integrity and clarity of your information.
Why won’t my Excel sheet fit on one page?

+
Your Excel sheet might not fit due to excessive data, wide columns, or too many rows. Scaling, reducing font size, or adjusting margins can help fit the content onto one page.
Can I print only selected areas of my Excel sheet?

+
Yes, you can set a print area to only print the selected cells by selecting your range, going to ‘Page Layout’ > ‘Print Area’ > ‘Set Print Area’.
How do I ensure headers and footers don’t interfere with page fitting?

+
Keep headers and footers short and utilize the ‘Header/Footer’ options for essential information. Ensure they are not consuming too much of the printable area.


