5 Easy Steps to Print Numbers on Excel Sheets

Printing numbers on Excel sheets is a common task for many individuals who use spreadsheets for data management, financial tracking, or analysis. Whether you're a novice Excel user or someone familiar with its basic functions, this guide will walk you through five easy steps to efficiently print numbers and ensure they are formatted for optimal readability and presentation. Let's dive into how you can make your data stand out when printed.
Step 1: Data Preparation and Organization

Before you even think about printing, ensuring your data is well-organized is crucial:
- Consolidate Your Data: Keep all relevant numbers within one worksheet to make it easier to print. If your data spans multiple sheets, consider consolidating it into one.
- Ensure Uniformity: Use consistent formatting for your numbers. Decide on decimal places, use of commas, and whether negative numbers should be highlighted in red or enclosed in parentheses.
Here's an example of a basic spreadsheet format:
| Product ID | Price | Quantity Sold |
|---|---|---|
| 1 | 10.00 | 15 |
| 2 | 12.50 | 8 |
| 3 | 20.99 | 5 |

📝 Note: The above table is simplified for illustration; your actual data might be more complex or detailed.
Step 2: Adjusting Your Page Layout

Excel provides tools to help you set up your page for printing:
- Page Layout Settings: Navigate to the Page Layout tab in Excel. Here, you can choose your margins, orientation (portrait or landscape), and page size.
- Print Area: Define the print area if you don't want to print the entire worksheet. This can save ink and paper by only printing necessary data.
- Scaling: Use 'Fit Sheet on One Page' if you want to ensure all your data fits on one page, although this might reduce readability.
Step 3: Formatting Numbers

Excel's formatting options allow you to present your data in various ways:
- Custom Formats: Right-click on your cells, select 'Format Cells', and choose from number formats like Currency, Percentage, or Scientific Notation.
- Conditional Formatting: Use this feature to highlight specific cells, such as negative numbers, or to show trends with data bars or color scales.
Here is a quick guide on setting up a custom number format:
- Select the cells you want to format.
- Right-click and select 'Format Cells'.
- In the 'Number' tab, choose 'Custom'.
- Enter your desired format (e.g., "0.00" for two decimal places).
- Click 'OK' to apply the format.
📝 Note: Excel's custom formatting allows for a lot of flexibility, but remember that it does not change the actual value, just how it's displayed.
Step 4: Printing Preview and Adjustments

To ensure your print job turns out as expected:
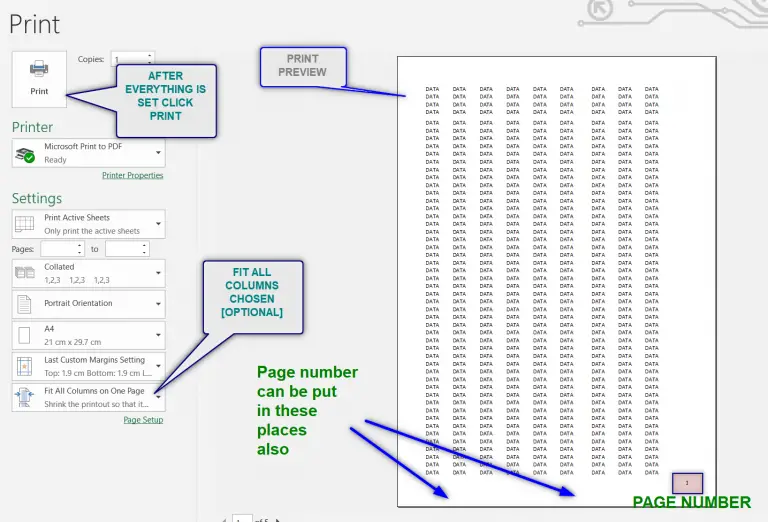
- Print Preview: Always use the 'Print Preview' feature to see how your data will look on paper. You can adjust margins, scaling, and print orientation here.
- Headers and Footers: Add headers and footers for additional information like the date, page numbers, or company logo. This is done from the Page Layout tab.
- Final Touches: Review your settings to make sure your numbers are aligned correctly, and cell borders or gridlines are visible if needed.
Step 5: Print Your Document

With all settings adjusted, it's time to print:
- Print Settings: Go to 'File' > 'Print' to review your settings one last time. Check the printer properties for paper type and quality.
- Print: Hit 'Print' when ready. If possible, consider printing a test page first to ensure the output meets your expectations.
📝 Note: Modern printers might have additional settings or options; ensure you know your printer's capabilities to get the best quality printout.
By following these steps, you'll have masterfully printed your Excel sheet, ensuring your numbers are clear, organized, and presentable. Understanding how to manipulate Excel for print purposes can save time, reduce mistakes, and present your data in a way that is easy to read and analyze. Remember that these steps are your roadmap to achieving professional-looking Excel prints that communicate your data effectively.
Can I print part of my Excel sheet?

+
Yes, you can define a print area in Excel to print only the selected cells or range.
What if my numbers don’t fit on one page?

+
Use Excel’s scaling options to fit the sheet on one page or adjust your page layout settings to allow for automatic pagination.
How can I make my printed numbers stand out?

+
Use conditional formatting to highlight numbers, adjust number formatting for readability, and ensure proper contrast with the background.
Is there a way to print in color?

+
If your printer supports color printing, Excel will print colors as they appear on-screen. Ensure your printer settings allow for color output.


