5 Ways to Print Excel Sheets with Titles on Each Page

Printing Excel sheets is a common task for anyone who deals with data, financials, or project management. However, ensuring that headers or titles appear on each page when your spreadsheet spans multiple pages can sometimes be tricky. Here are five effective methods to make sure your Excel sheets print with titles on every page, ensuring clarity and professional presentation.
1. Page Setup Layout Options

One of the simplest and most direct ways to print headers on each page in Excel involves adjusting settings under Page Layout.
- Navigate to Page Layout tab.
- Choose Print Titles from the Page Setup group.
- In the dialogue box, go to the Sheet tab.
- Under Rows to repeat at top, enter the row numbers containing your title or header.
📝 Note: The Rows to repeat at top will apply to all printed pages of the current sheet only.
2. Freezing Panes

Although typically used for on-screen viewing, freezing panes can also help when printing.
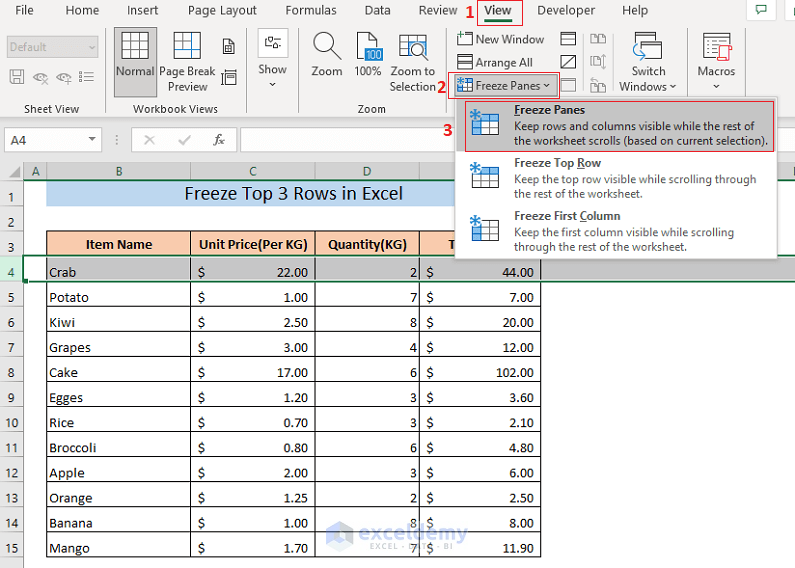
- Select the row below your title.
- Go to View > Freeze Panes > Freeze Top Row or Freeze Panes if you need to freeze multiple rows.
- When printing, ensure that Print Titles are set to repeat the frozen rows.
3. Using Page Break Preview

Page Break Preview helps you visualize how your data will spread across printed pages, allowing you to manage titles manually.
- Switch to Page Break Preview under the View tab.
- Adjust page breaks to ensure that your titles appear at the top of each printed page.
- Be cautious with this method as it requires manual intervention, which might not be ideal for large datasets.
4. VBA Macro for Automatic Printing

By using a VBA Macro, you can automate the process of printing sheets with headers.
- Press Alt + F11 to open the Visual Basic Editor.
- Insert a new module and paste in the following code:
Sub PrintWithHeaders()
    With ActiveSheet.PageSetup
        .PrintTitleRows = "$1:$2" ' Change this range as necessary
    End With
    ActiveWindow.SelectedSheets.PrintOut
End Sub
- Save the module, exit, and run the macro by pressing Alt + F8, selecting PrintWithHeaders, and clicking Run.
📝 Note: Ensure macros are enabled in Excel for this method to work.
5. Print Headers Using Page Layouts for Each Sheet

If you're working with multiple sheets, setting print titles for each individual sheet can be time-consuming.
- Navigate to each sheet individually.
- Set up the headers as described in method 1.
- Use Go To Special under the Find & Select menu to quickly navigate between sheets.
Overall, these methods help in presenting your data in a way that maintains readability and organization. Whether you choose manual settings, VBA automation, or default Excel features, you're equipped to print your Excel sheets with headers intact.
Can I set different headers for different sheets in the same workbook?

+
Yes, you can set unique headers for each sheet by manually adjusting print titles for each one. Alternatively, VBA can automate this process for all sheets in a workbook.
How do I know if my headers are set correctly?

+
Switch to Page Layout View or Page Break Preview to see where headers appear on each printed page. Ensure that the Print Titles settings are correct.
What if my headers exceed one line?

+
If your headers span multiple lines, adjust the row height and column width to ensure all text fits, or consider merging cells to accommodate headers better.


