Print Excel Sheet on One Page with Lines

Printing an Excel sheet on one page with lines can seem like a daunting task, especially if you’re dealing with large datasets. However, with a few tweaks and some strategic planning, it's not only possible but can also be quite straightforward. Whether you're preparing a report for a meeting, compiling data for analysis, or sharing information with colleagues, printing your Excel data efficiently can save time and resources.
Understanding Page Setup Options

Before diving into the specific steps to print your Excel sheet on one page, it’s crucial to understand the page setup options in Excel:
- Margins: Define how much white space there is on all four sides of your printed page.
- Orientation: Choose between portrait or landscape to fit more data.
- Scaling: This option allows you to adjust the size of your data to fit on one page.
- Fit to: Instead of scaling, you can fit your sheet to a specific number of pages.
- Print Area: Select the specific range of cells to print.
- Gridlines: Option to print gridlines or not.
Steps to Print Your Excel Sheet on One Page

Step 1: Adjust Page Layout

First, navigate to the Page Layout tab on the ribbon.
- Click on Page Setup to open the dialogue box.
- In the Page tab:
- Select Orientation: Choose either Portrait or Landscape. Landscape often fits more data per page.
- Set Scaling: Choose Fit to one page wide by one page tall, or adjust the scaling percentage manually to shrink the data.
- In the Sheet tab:
- Check the box for Print Gridlines if you want to show lines.
👉 Note: The Fit to option may distort the data if the ratio between width and height is significantly different from the page dimensions.
Step 2: Modify Data for Optimal Fit

If the scaling or fit to one page options still leave your data overflowing:
- Adjust Column Widths: Click and drag to reduce column widths or use AutoFit.
- Modify Row Heights: Make rows taller or shorter where necessary.
- Reorganize Data: Consider combining or removing unnecessary columns/rows or using data validation to limit cell content.
Step 3: Set Print Area

Define the print area if you don’t want to print the entire workbook:
- Select the range of cells you want to print.
- Go to Page Layout > Print Area > Set Print Area.
Step 4: Preview and Adjust

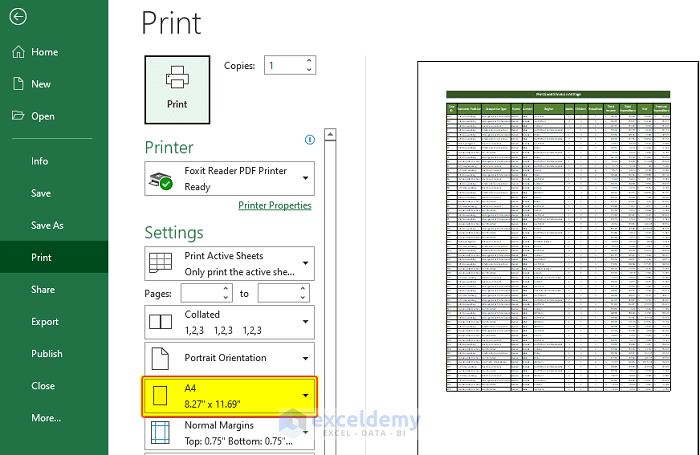
Before printing, use the Print Preview feature:
- Go to File > Print or click on the Print Preview button on the ribbon.
- Check how your data looks, and if necessary, return to Page Layout to make further adjustments.
Step 5: Finalize and Print

Once you're satisfied with the layout in the Print Preview:
- Hit the Print button to start printing your Excel sheet on one page with lines.
Additional Considerations

Using Excel Tables

If your data is in an Excel table:
- Excel will automatically extend gridlines to all data within the table.
- Adjusting row heights and column widths will be easier as they auto-fit when you enter data.
Using Print Titles

If your dataset spans multiple pages vertically:
- In the Page Setup dialogue, under the Sheet tab, you can set rows or columns to repeat at the top or left side of each page, ensuring headers are always visible.
📌 Note: If your data includes headers or titles, setting them to repeat at the top of each page might be beneficial for readability.
In conclusion, ensuring your Excel sheet prints on one page with lines involves several steps that blend technical adjustments with smart data management. Remember to use Page Layout settings to optimize scaling, fit to one page, and set print areas. Adjust your data format for better fit, utilize print preview to fine-tune your layout, and consider Excel's additional features like tables and print titles for enhanced readability. This process not only saves paper but also ensures that your reports are concise and visually appealing, enhancing communication effectiveness.
How can I ensure that my Excel sheet prints on one page without distorting my data?

+
To minimize distortion, ensure that the ratio between the width and height of your data fits well within the page dimensions. Use the ‘Fit to’ scaling option with a bit of manual adjustment to the columns and rows, or strategically manage your data by removing unnecessary columns or using data validation to limit cell content.
What if my data still doesn’t fit after scaling and adjusting the layout?

+
Consider summarizing data, using pivot tables to condense information, or exploring multiple sheets if printing on one page isn’t absolutely necessary. Sometimes, presenting data across multiple pages can offer better readability.
Can I print lines on an Excel sheet without gridlines?

+
Yes, you can manually add borders to cells by selecting the desired range and choosing a border style from the Home tab. This gives you more control over which lines are printed.


